
Internal Repair Job Cards (IR JC) are the equivalent of a Repair Order to an external vendor or a repair within your own Company. Closing an Internal Repair Job Card is the equivalent of receiving a Repair Order line item.
Serialized Parts (Non-Consumable)
When Serialized Parts are removed from an aircraft for repair, they are placed in Return to Inventory. In this case, an IR JC would then put the Serialized Part back into Inventory once it is closed.
Consumables
When a Consumable is issued, the trace quantity is expended, which means it is reduced by the quantity that is issued. In this case, an IR JC would add a quantity to a Trace or create a new Trace.
To locate an existing Internal Repair Job Card
Navigation
-
Click on Planning and Production or Stores and select Job Card Listing.
-
Select the Company and Job Card Group.
-
Click Generate.
-
If the job card is not in the listing, click the Filter button to adjust the filter settings and click Save. Click the Generate button.
Find a Job Card
-
Follow steps 1 and 2 of the Navigation instructions.
-
Click the Find button.
-
Enter the search criteria, select the appropriate fields and statuses to be searched, and click Find.
-
Select the check box for the desired Job Card and click View. Close the Job Card Find window once you have the desired Job Card.
Creating an Internal Repair Job Card
The most important part of the IR JC is the Affected Part. An IR JC cannot be processed when the Affected Part is not a PN that exists in RAAS or is in a location that cannot be moved back to Inventory.
NOTE: Internal Repair Job Cards can only be created against the Company, not against an Aircraft or All Line Maintenance.
Serialized Parts (Non-Consumable)
-
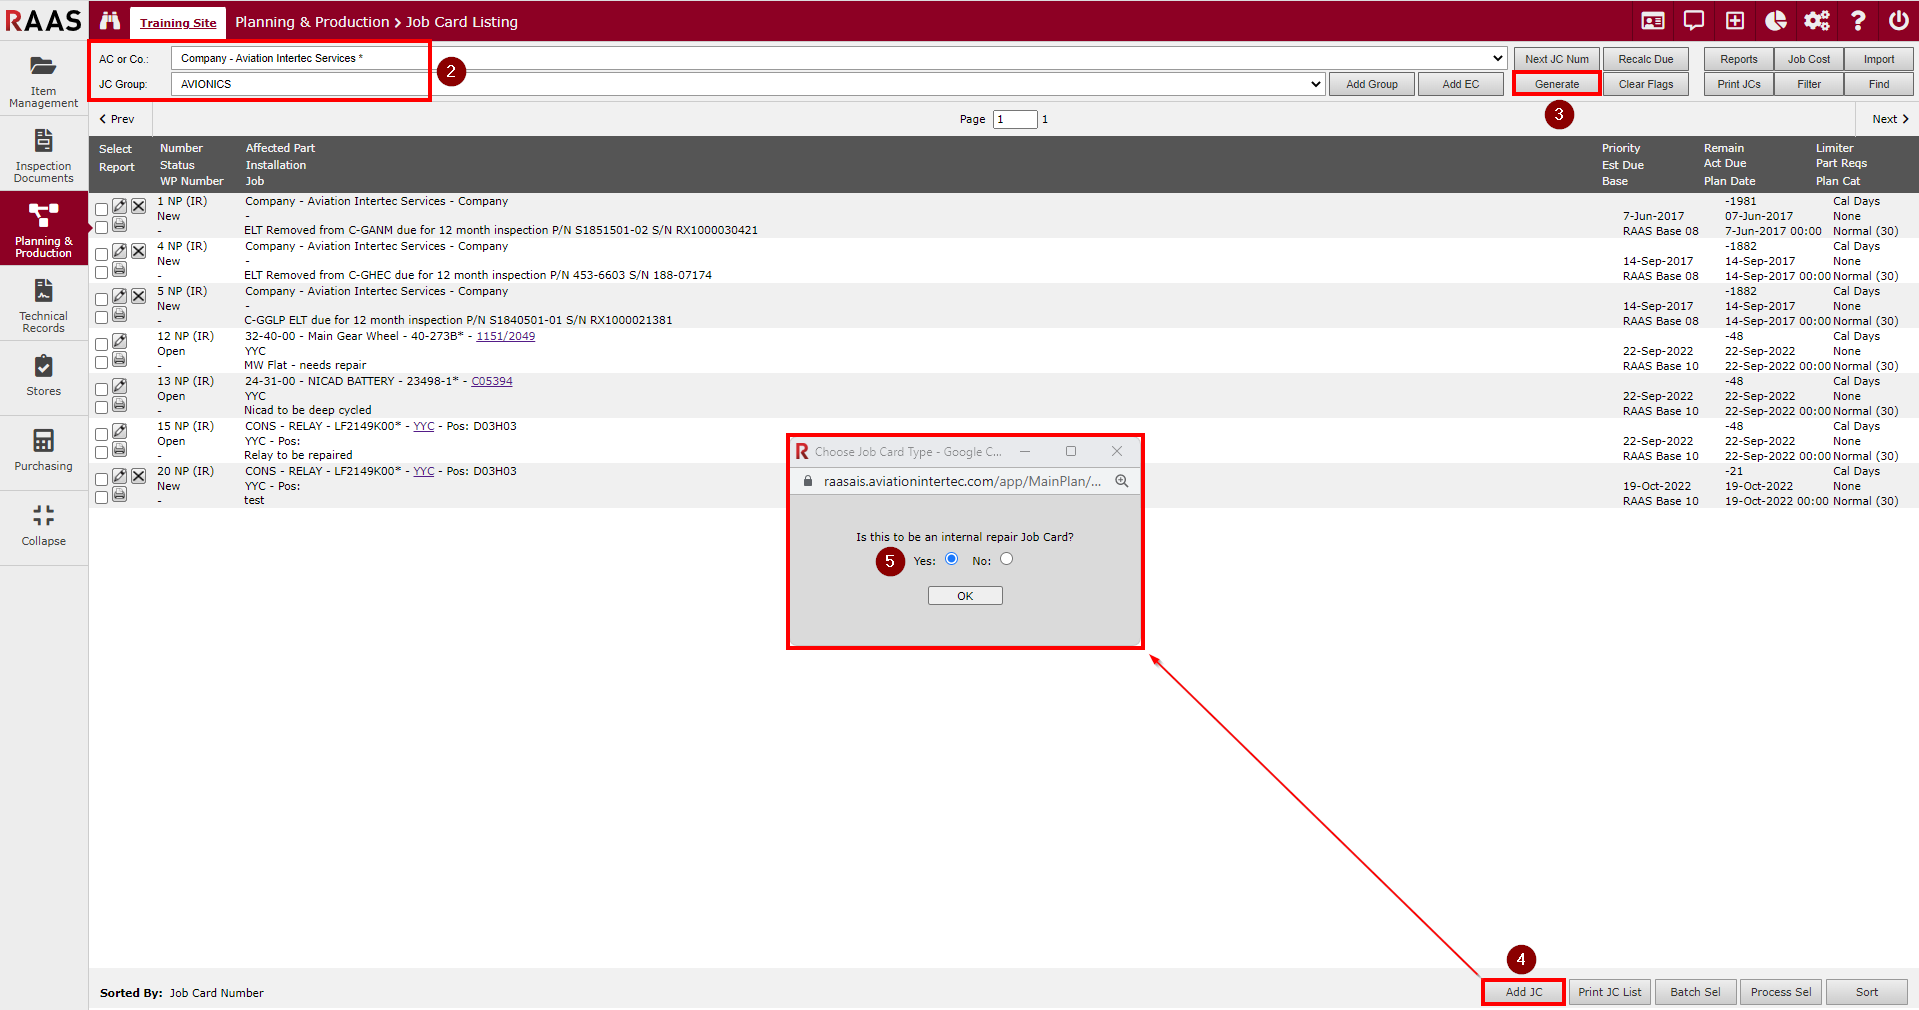
Click on Planning and Production or Stores and select Job Card Listing.
-
Select the Company and Job Card Group.
-
Click the Generate button.
-
Click Add JC button, located at the bottom of the generated Job Card Listing window.
-
Select Yes for an Internal Repair Job Card. Click OK to continue.
-
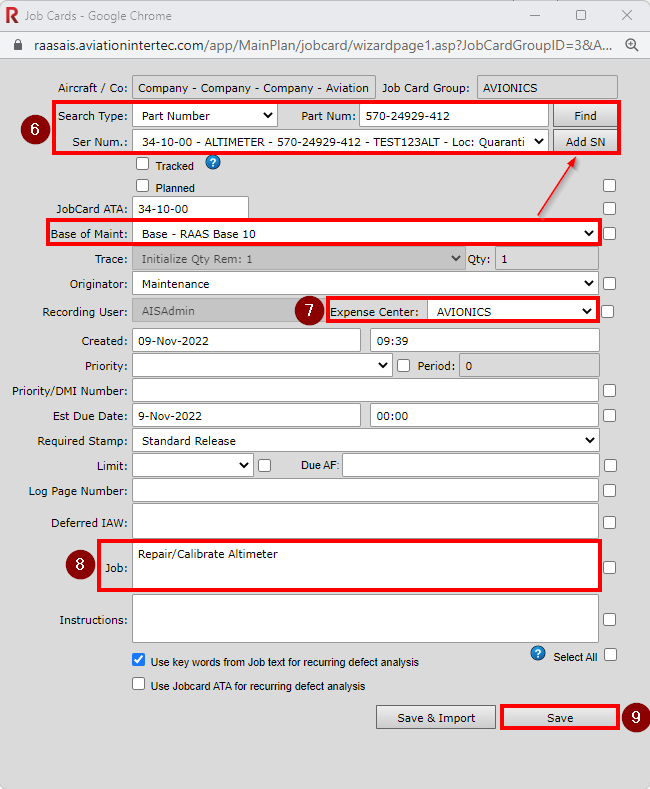
Select Search Type: Enter the PN, PD or SN of the affected Part. If the SN does not exist, you can click Add SN once a Base of Maint has been selected. (This option may be affected by User Roles)
NOTE: A specific part (the JC “Affected Part”) must be selected for an IR JC. DO NOT issue the affected part to the JC. Only parts used in the repair of the affected part get issued to the JC.
-
Select an Expense Center (if applicable).
NOTE: An IR JC can be raised without selecting an Expense Center, but Expense Center Transactions will not be written for parts or labour applied.
-
Enter Job details.
-
Click Save.
Consumables
-
Click on Planning and Production or Stores and select Job Card Listing.
-
Select Company and Job Card Group.
-
Click the Generate button.
-
Click the Add JC button, located at the bottom of the generated Job Card Listing window.
-
Select Yes for an Internal Repair job card. Click OK to continue.
-
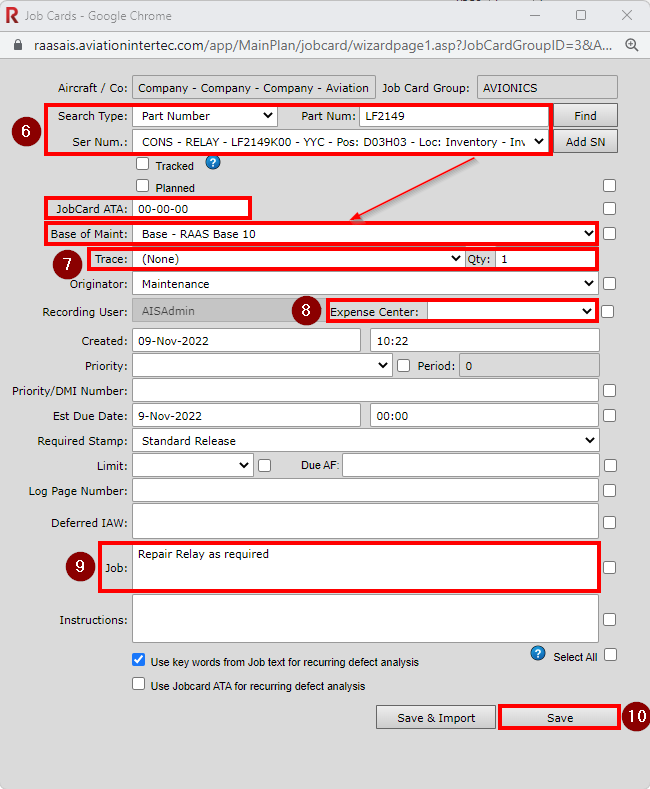
Select Search Type: Enter the PN or PD of the Affected Part. Consumable SNs should be the same as the Base of Inventory, and the Loc: must be Inventory. Verify Base of Maint.
-
Trace: (None) - will create a new Trace with the quantity selected once Closed. If you select an existing Trace, the IR JC will add the quantity to that Trace once Closed.
NOTE 1: The Job Card ATA may default to CONS in RAAS, but it may need to be changed to 00-00-00 on the IR JC for processing purposes; this will not change the ATA of the PN in RAAS.
NOTE 2: A specific part (the JC “Affected Part”) must be selected for an IR JC. DO NOT issue the affected part to the JC. Only parts used in the repair of the affected part get issued to the JC.
-
Select an Expense Center (if applicable).
NOTE: An IR JC can be raised without selecting an Expense Center, but Expense Center Transactions will not be written for parts or labour applied.
-
Enter Job details.
10. Click Save.
Generic Job Card Templates can be set up for recurring Internal Repair jobs. Save & Import can be used to import the details from the JCT without having to enter the information manually.
NOTES: The Job field text CANNOT exceed 1200 characters. The Deferred IAW field CANNOT exceed 500 characters.
Opening an Internal Repair Job Card
Opening an Internal Repair Job Card is equivalent to sending an item on an Order.
Serialized Parts (Non-Consumable)
To open the IR JC the Serialized Affected Part must be in a location from which the part can be moved to Internal Repair (Return to Inventory, Inventory, Awaiting Repair, Dead).
-
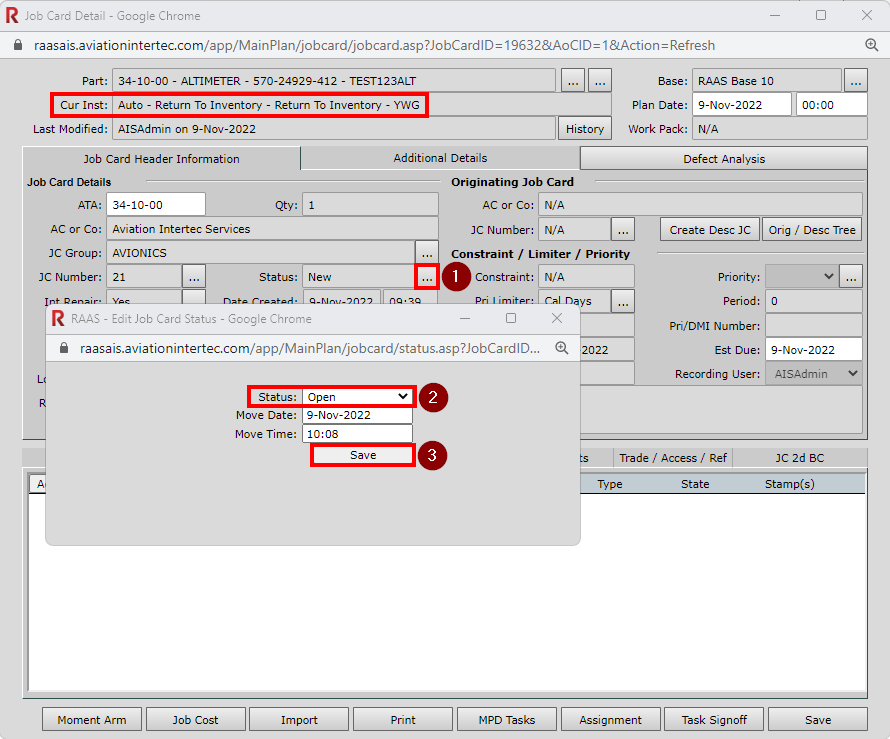
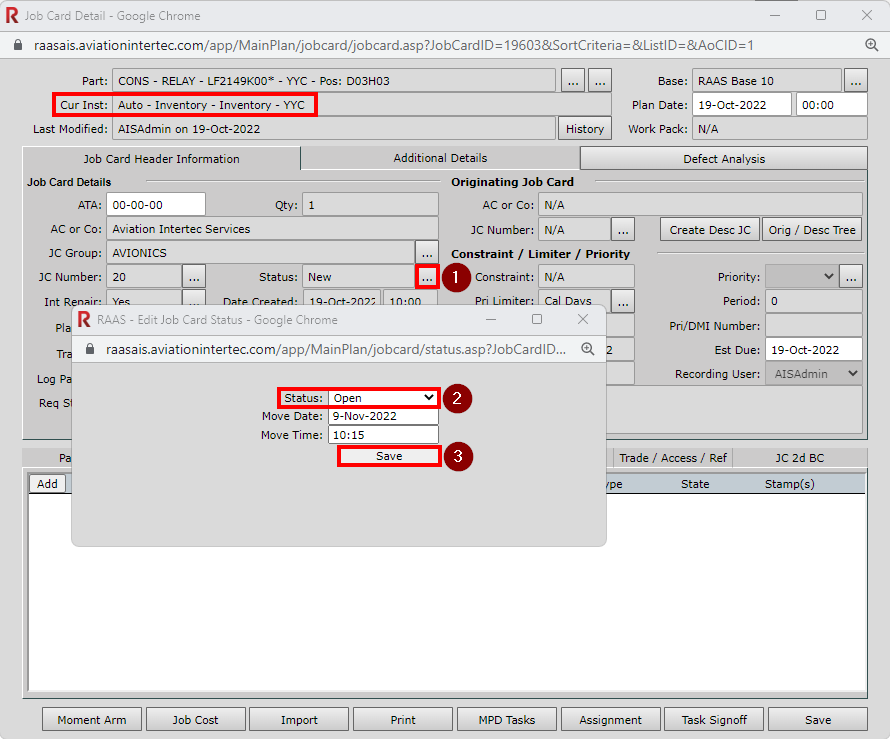
Click on the ellipse (...) button next to the Status field.
-
Change the Status from New to Open.
-
Click Save.
When a Serialized IR JC status is changed from New to Open, the part will be moved to Internal Repair.
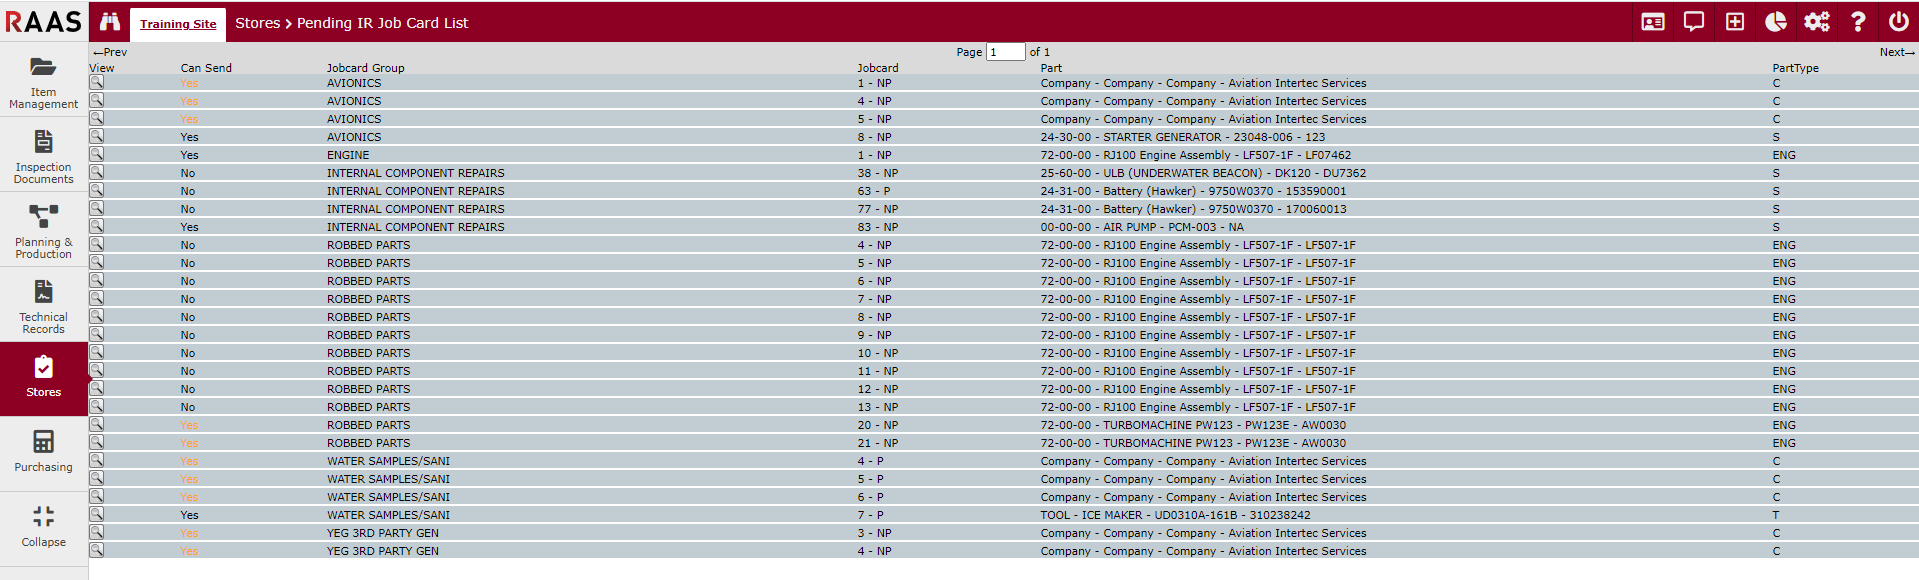
The most common scenario preventing the user from opening an IR JC is the Affected Part is still being on wing in RAAS – Tech Records has not yet posted the removal. Depending on how current Tech Records is, this could cause a delay. In the Stores module, there is a “Pending IR Job Card List” that can be used to keep on top of pending closures/receipts. See Figure 6.
When Open, required Parts can be issued in the Issued Parts tab and Labour/Trade Hrs can be added in the Trade / Access / Ref tab.
Once the IR JC has been Opened, it cannot be changed back to New.
Consumables
In order to open the IR JC the Consumable affected PN/SN must be in Inventory location.
-
Click on the ellipse (...) button next to the Status field.
-
Change the Status from New to Open
-
Save.
When a Consumable IR JC status is changed from New to Open the new Trace qty is not yet created.
When Open, required Parts can be issued in the Issued Parts tab and Labour/Trade Hrs can be added in the Trade / Access / Ref tab.
When the IR JC is Open it cannot be put back to New. If the IR JC is no longer required change the status to Recalled. Recalling an IR JC will not reverse any Parts Issued or Labour applied, these will have to be done manually.
Recalling an Internal Repair Job Card
If an IR JC is no longer required, it should be Recalled. If the Affected Part is Non-Consumable, Recalling the IR JC will move the Affected Part back to its previous location, but will not reverse any Parts Issued or Labour applied. Any parts issued to an IR JC should be reversed before it is recalled, or else they will need to be moved manually.
To Recall the IR JC:
-
Click on the ellipse (...) button next to the Status field.
-
Change the Status from Open to Recalled.
Note: The IR JC must be in Open status to be Recalled. -
Click Save.
Rectification
IR JCs cannot be closed through Line Level/Manual Rectification, but a rectification entry can still be added from the Rectification tab.
IR JC Rectification can also be made via TMI Entry, but is not required (see 6.c. below).
Closing an Internal Repair Job Card
Closing an IR JC is equivalent to receiving an item on a Repair Order. Before closing an IR JC users must confirm that all parts have been issued/reversed as necessary, and all labour has been correctly applied. Once closed, an IR JC cannot be reopened, and if corrections are required to the affected part’s value, it will need to be adjusted manually.
Serialized Parts (Non-Consumable)
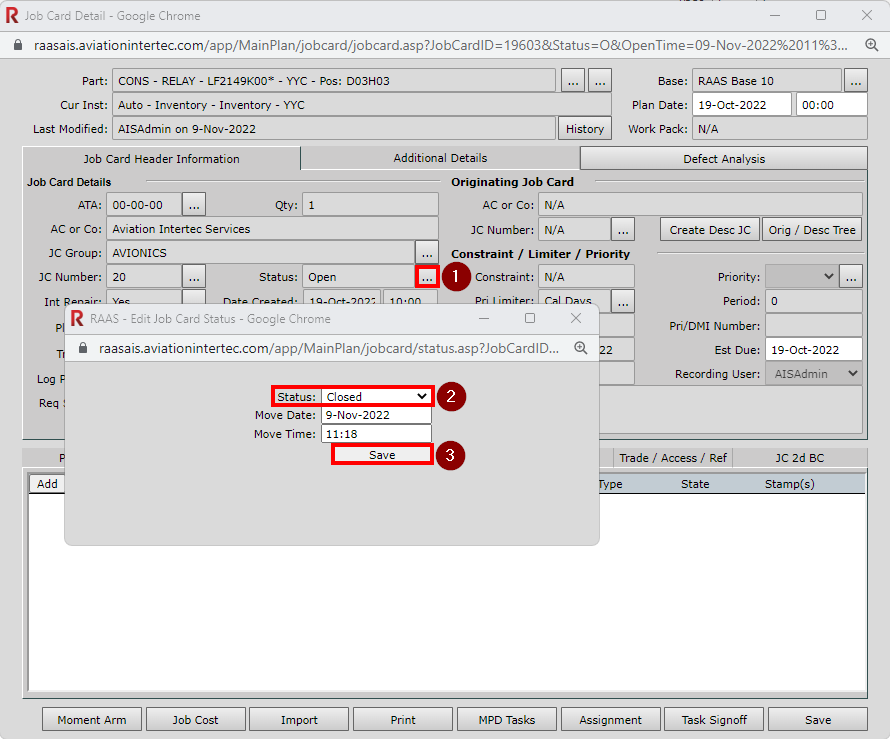
-
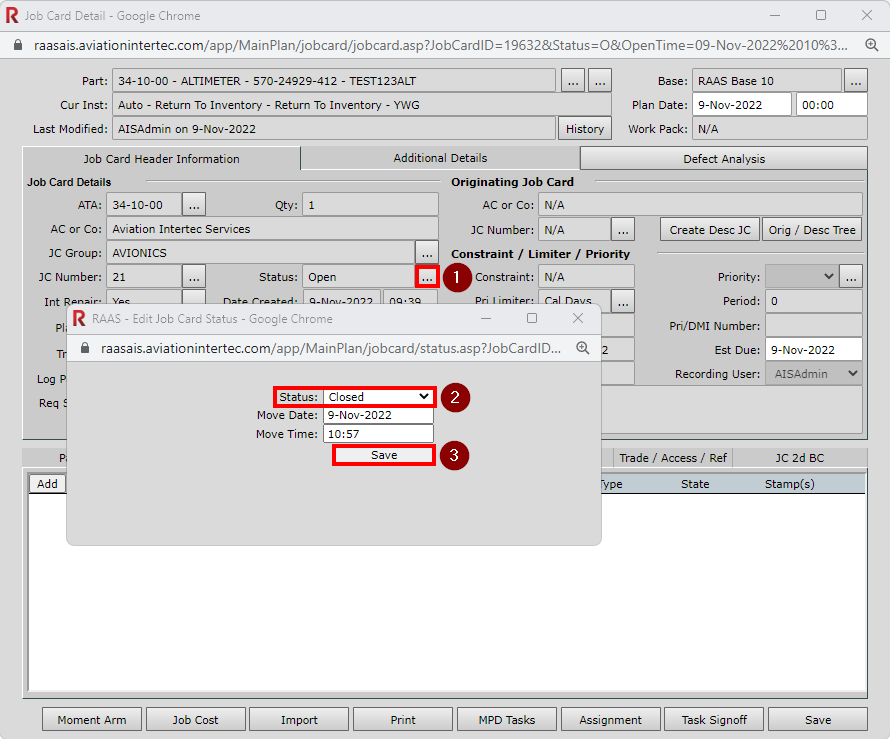
Click on the ellipse (...) button next to the Status field.
-
Change the Status from Open to Closed.
-
Save.
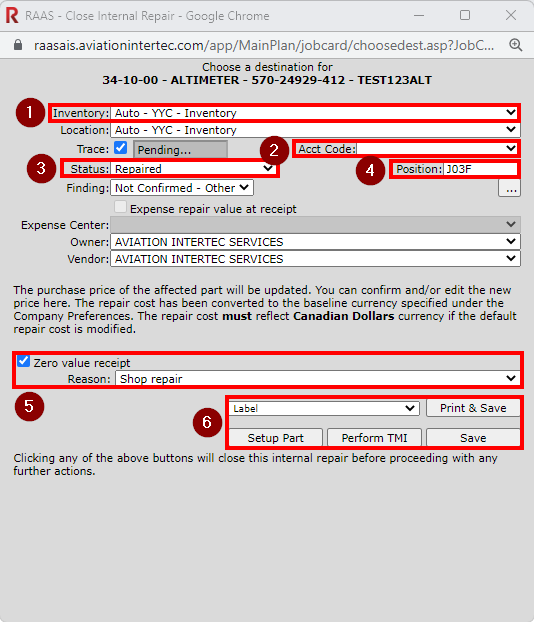
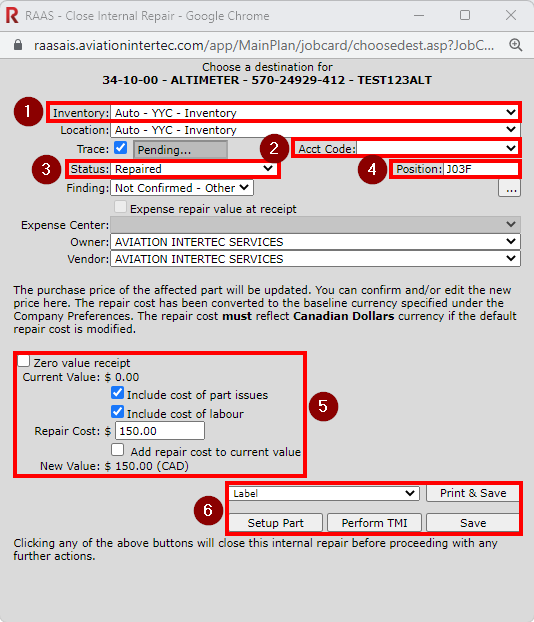
Closing Internal Repair Job Card Pop-Up Window
-
Choose the Inventory in which to receive the Affected Part.
-
Select an Acct Code (if required).
-
Select the correct Status for the Affected Part.
-
Enter Inventory Position if required.
NOTE: Expense repair value at receipt can be defaulted on or off in Company Settings - Accounting Preferences. -
Valuation:
-
If the Item is a Company Internal Repair and no cost needs to be applied, then Zero value receipt can be selected. You must select a Reason in the drop-down menu. (Figure 9)
-
RAAS adds the total of parts issued and labour applied to the IR JC and by default makes that total the Repair Cost. This will be the Affected Part’s new Inventory and Issue value. The Repair Cost can be overwritten as necessary. If the Affected Part has a residual/non-expensed value, the “Add repair cost to current value” option can be used. (Figure 6.2)
-
-
Saving.
-
Print & Save - allows the user to print a Company Label or Release Certificate if required, and Close the IR JC.
-
Setup Part - opens the SN Detail Screen and allows the user to add/edit any details required (ie. shelf life, next due) and Close the IR JC.
-
Perform TMI - opens the TMI screen and allows the user to make a TMI entry against the Affected Part and Close the IR JC.
-
Save - Saves the existing data and Close the IR JC.
-
The Serialized Part will be moved to the Base - Inventory that was selected, with any new Inventory Values if applicable.
Consumables
-
Click on the ellipse (...) button next to the Status field.
-
Change the Status from Open to Closed.
-
Save.
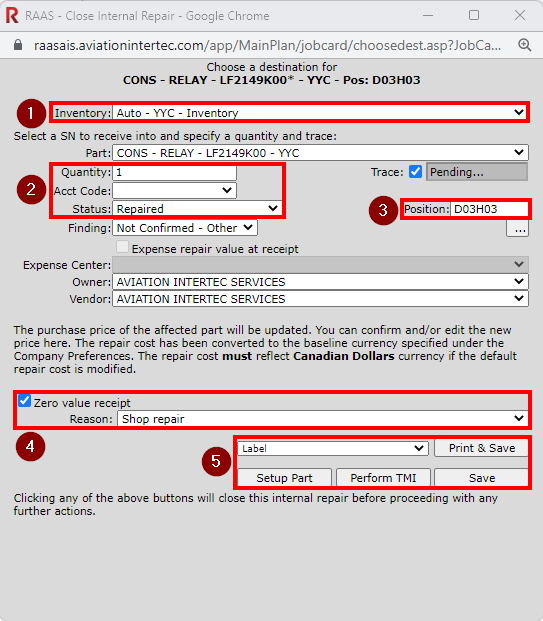
Closing Internal Repair Job Card Pop-Up Window
-
Choose the correct Inventory in which to receive the Affected Part.
-
Enter the Quantity to be added to Inventory, select an Acct Code (if required), and select a Status.
-
Enter Inventory Position if required.
NOTE: Expense repair value at receipt can be defaulted on or off in Company Settings - Accounting Preferences -
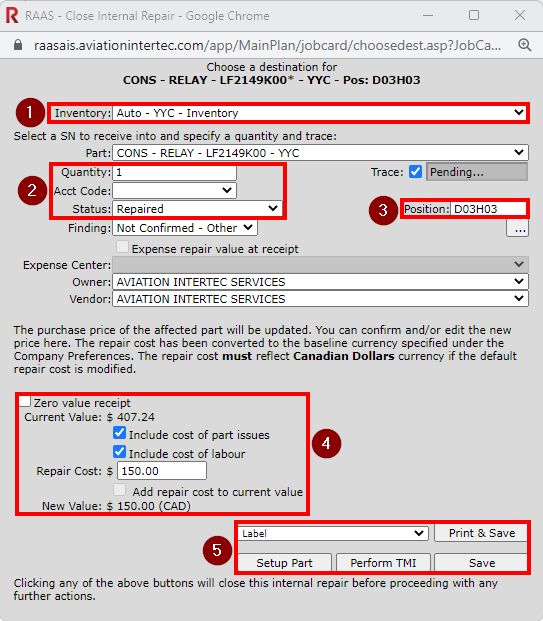
Valuation:
-
If the Item is a Company Internal Repair and no cost needs to be applied, then Zero value receipt can be selected. You must select a Reason in the drop-down menu. (Figure 12)
-
RAAS adds the total of parts issued and labour applied to the IR JC and by default makes that total the Repair Cost. This will be the Affected Part’s new Inventory and Issue value. The Repair Cost can be overwritten as necessary. If the Affected Part has a residual/non-expensed value, the “Add repair cost to current value” option can be used. (Figure 13)
-
-
Saving.
-
Print & Save - allows the user to print Company Label or Release Certificate if required and Close the IR JC
-
Setup Part - opens the SN Detail Screen and allows the user to add/edit any details required (ie. shelf life) and Close the IR JC
-
Perform TMI - opens the TMI screen and allows the user to make a TMI entry against the Affected Part and Close the IR JC. (Usually only used for Serialized parts)
-
Save - will Save the existing data and Close the IR JC
-
The Consumable Part Number will now have a new Trace Number with the Qty created, or the new Qty added to an existing Trace, including any new Inventory Values if applicable.
Multi-Step Repairs
Multi-step repairs may be required if a Part is discovered to require an External Repair before completing the Internal Repair (ie. a tire needs repair, but requires NDT testing prior to repair).
In this scenario, the Affected Part would be selected for the IR JC, but the IR JC would be left with a New status until the external repair (Repair Order) is fully processed.
At that time, the IR JC would be opened and closed, and the external repair cost would be added to the Trace as a “Carry Forward”.
-
If the part is a company part, print the label and physically put the part into inventory. If the part is not a company part, a Release Cert can be printed.
Creating Kits
Kits can be built using Internal Repair Job Cards (IR JC). For example, consider a PT6 300-hour Inspection Kit:
-
Set up the header part as a serialized item and assign it as the Affected Part on the IR JC.
-
Issue all individual parts that make up the kit to the same IR JC. (Serialized parts issued to the kit will be moved to Issued for Maintenance and may require manual movement to Dead.)
-
Once the kit is assembled, you only need to issue the main part number (PN) when the kit is used.
-
Each item will still be received individually, but after the kit is “built” on the IR JC, you manage it as a single unit.
-
The Trace will be linked to the IR JC number and will show all parts issued to the kit, making it easy to review the kit’s contents.
Company Settings affecting Closing IR JCs
-
Accounting Preferences - Force expense of rotable and asset repair costs at the point of receipt by default
-
If selected, the user must select an Expense Center upon Closing the IR JC.
-
-
Job Card Information - Set Internal Repair Job Cards Trace default to (None)
-
If selected, the Trace defaults to (None) when creating a Consumable IR JC to avoid selecting an existing Trace in error.
-
Expense Center Transaction Notes:
-
Upon opening an IR JC, a credit transaction is written in the Inventory EC, and a debit transaction is written to the EC selected on the IR JC.
-
Upon closing an IR JC, a credit transaction is written to the EC selected on the IR JC, and a debit transaction is written to the inventory EC.
-
Pricing will be carried forward after closure.