
Exchange Orders are used when parts are being exchanged with a third party. An Inbound Exchange Order is used when a part is being received or borrowed from a vendor, and an equivalent part is sent back in return, either after the part is received from the vendor or in advance.
When receiving orders, your company is considered to be the owner. For loans/borrows this is not always the case. When using an Inbound Exchange Order to borrow a part, the vendor would be the owner. The Inventory Value Report filtered for all locations can be used to produce a parts listing by sorted by owner.
Creating an Exchange Order (Inbound)
Note: If the vendor requires an advanced core return, start by creating a Shipping Bill to send the part to the vendor. If the core return will be sent after the part is received by the vendor, start by creating the Exchange Order (Inbound).
-
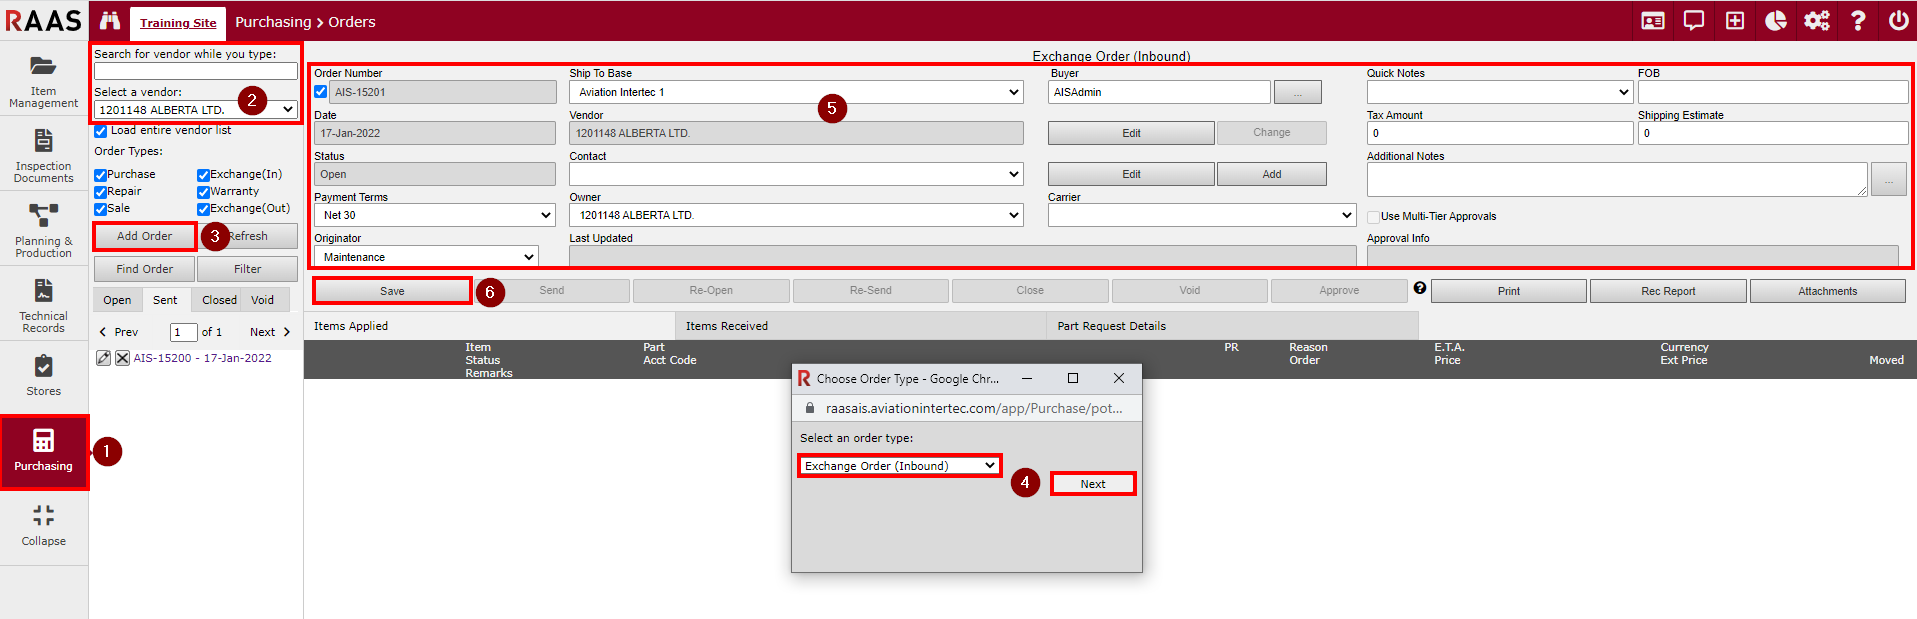
Click on Purchasing and select Orders.
-
Select the Vendor from which the item(s) will be received and click Refresh.
-
Click the Add Order button.
-
Select Exchange Order (Inbound) from the Order Type pull-down and click Next.
-
Enter the shipping and vendor information, such as Ship To Base, Buyer, Vendor Contact, Payment Terms, Carrier, and Owner. An important selection is the Owner as for Inbound Exchange Orders the vendor would be the owner.
Note: RAAS will automatically assign an Order Number, but you can deselect the checkbox beside the Order Number to manually assign a number. -
Click Save.
Adding Items to an Exchange Order (Inbound)
-
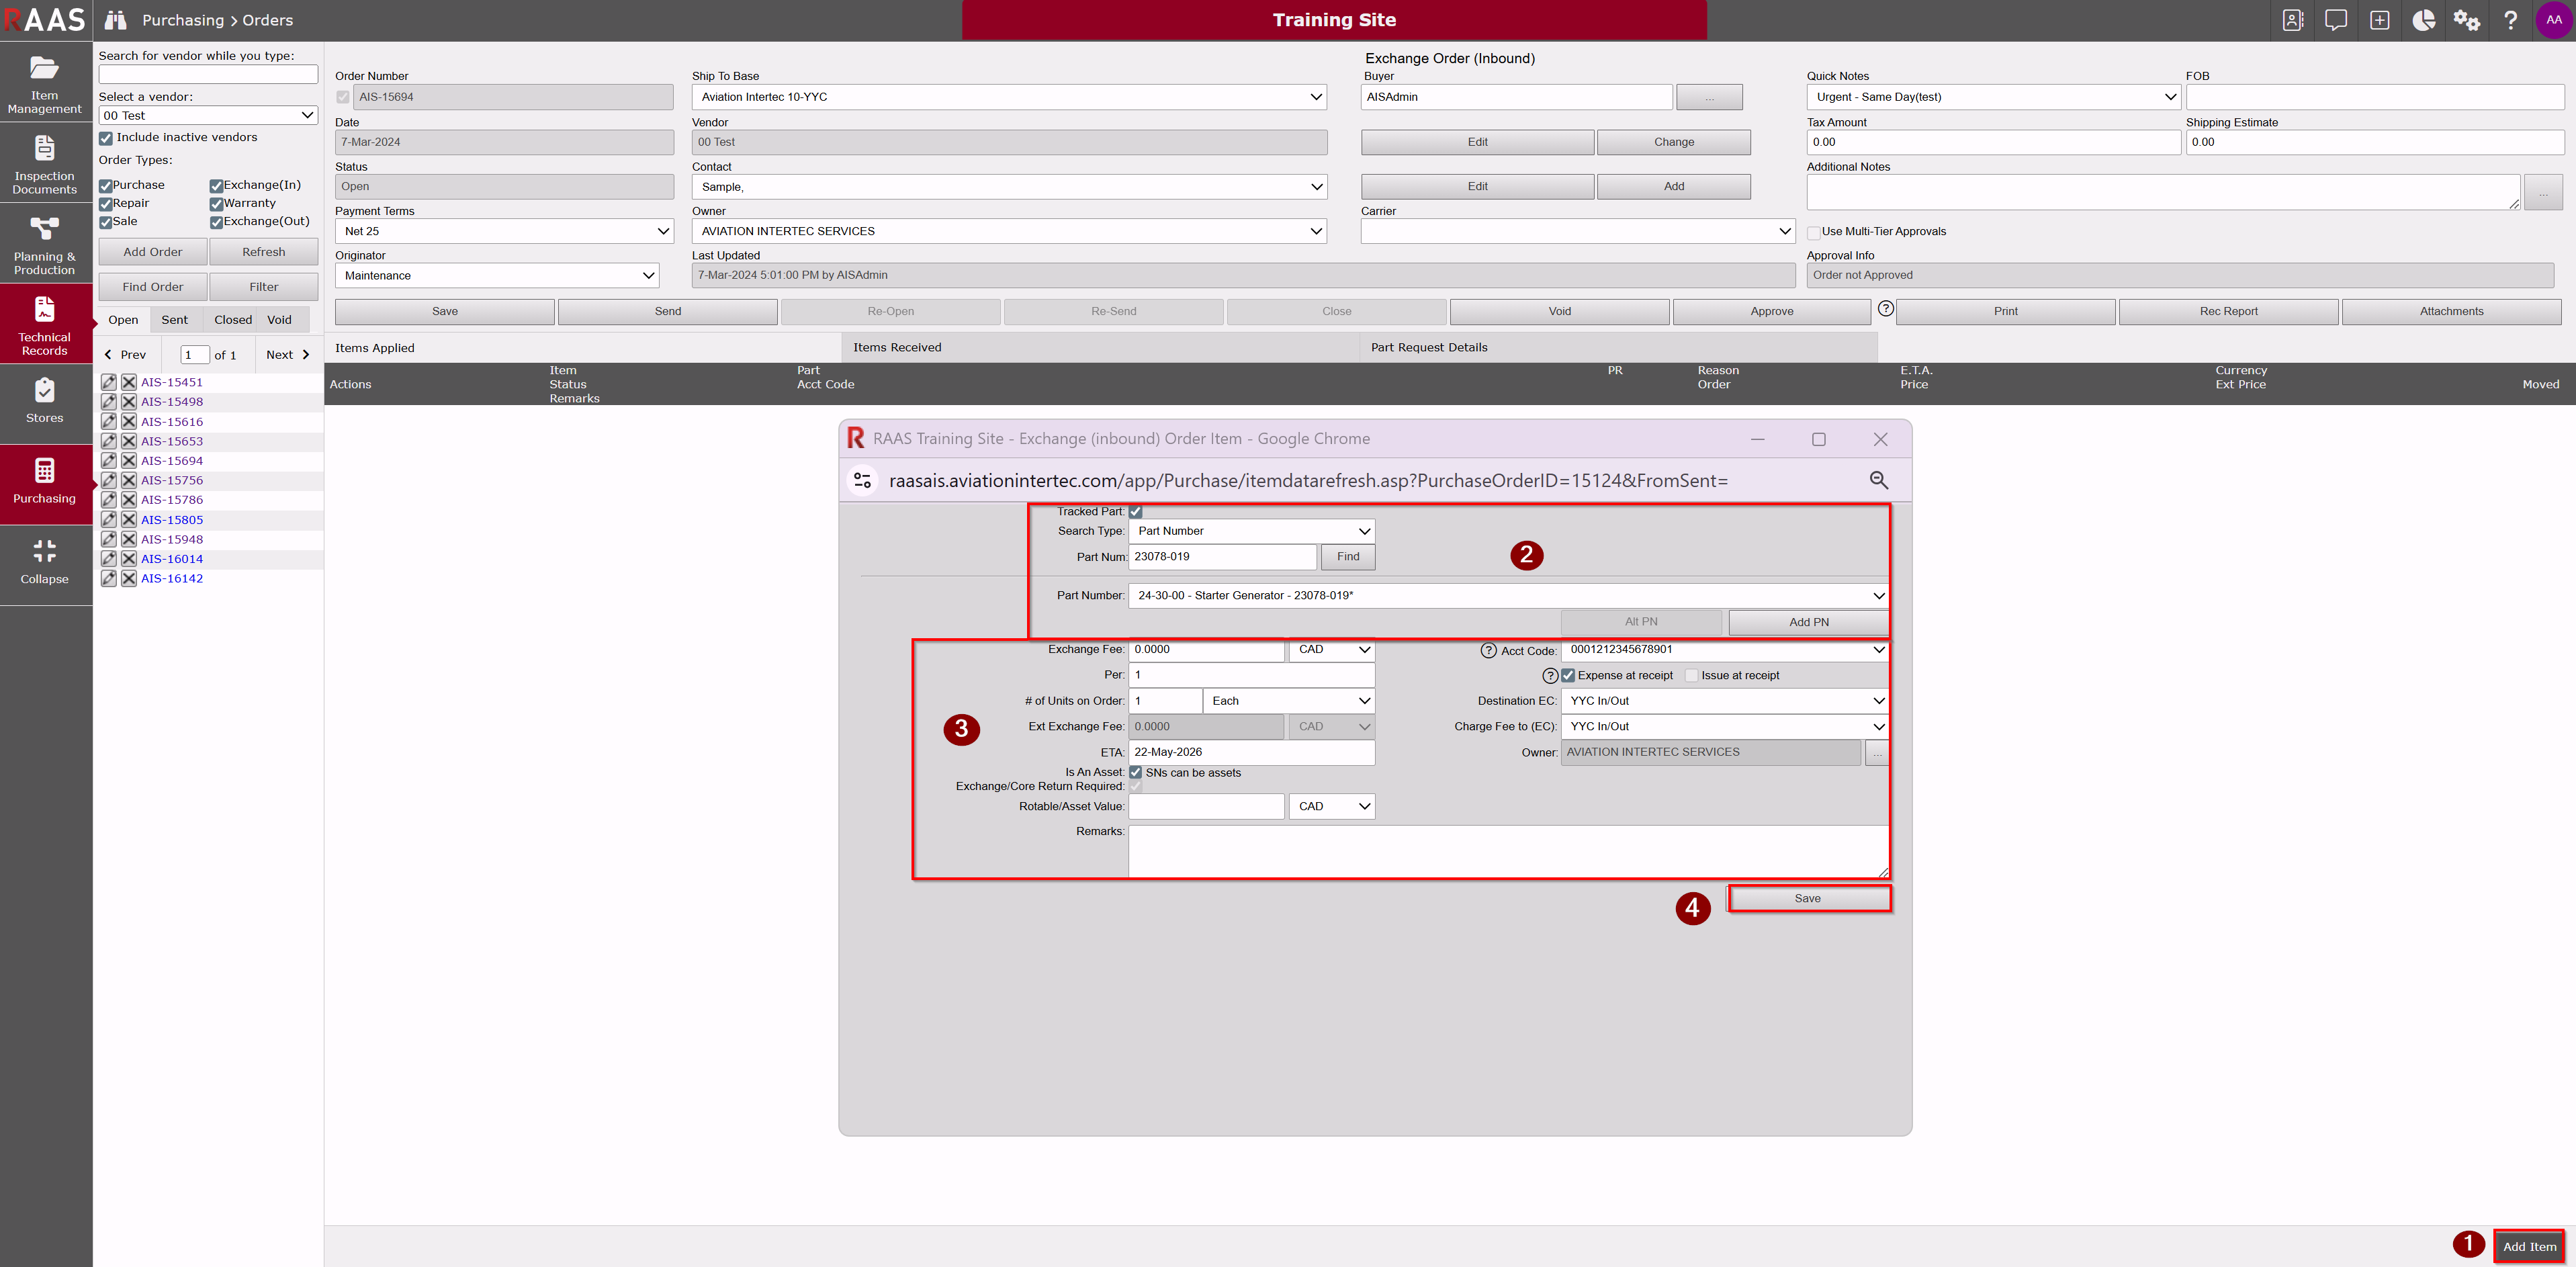
On the Items Applied tab, click the Add Item button to open the Exchange (Inbound) Order Item screen.
-
Search for the Part Number of the item to be added and ensure the correct part is selected from the pull-down menu. If the Part Number does not already exist in RAAS, it can be added from this screen using the Add PN button.
-
If known, enter the Exchange Fee and the remaining details of the order. (See Notes.)
-
Click the Save button.
Notes:
-
An Account Code will be required if the “Account code required at item receipt” option is selected in the Purchasing / Shipping / Receiving Information section on the Company Settings page in Options.
-
The Part Movement EC is the Expense Center of the inventory in which the part will be received.
-
The Charge Fee to (EC) is the Expense Center to which the Exchange Fee should be attributed, and the selection of a Charge Fee to (EC) is only available when the part is being expensed at receipt. When a part is not being expensed at receipt, the Charge Fee to (EC) will default to the same selection as the Destination EC. Under most circumstances, it is not recommended to expense tracked items at receipt, as they will be expensed when they are issued.
-
The Is An Asset flag will be automatically selected if the Part Description is flagged as “Is Rotable And/Or Asset”. If the Is An Asset flag is selected, a Rotable/Asset Value must be entered.
-
The Exchange/Core Return Required flag will be selected for Exchange Orders and cannot be turned off.
Sending an Exchange Order (Inbound)
Once all required items have been added to the Exchange Order (Inbound), take a moment to verify that the order details are correct for all items.
-
Click the Send button.
-
Click OK to continue.
-
Enter a Send Date or click the checkbox to enter the current date, and click Next.
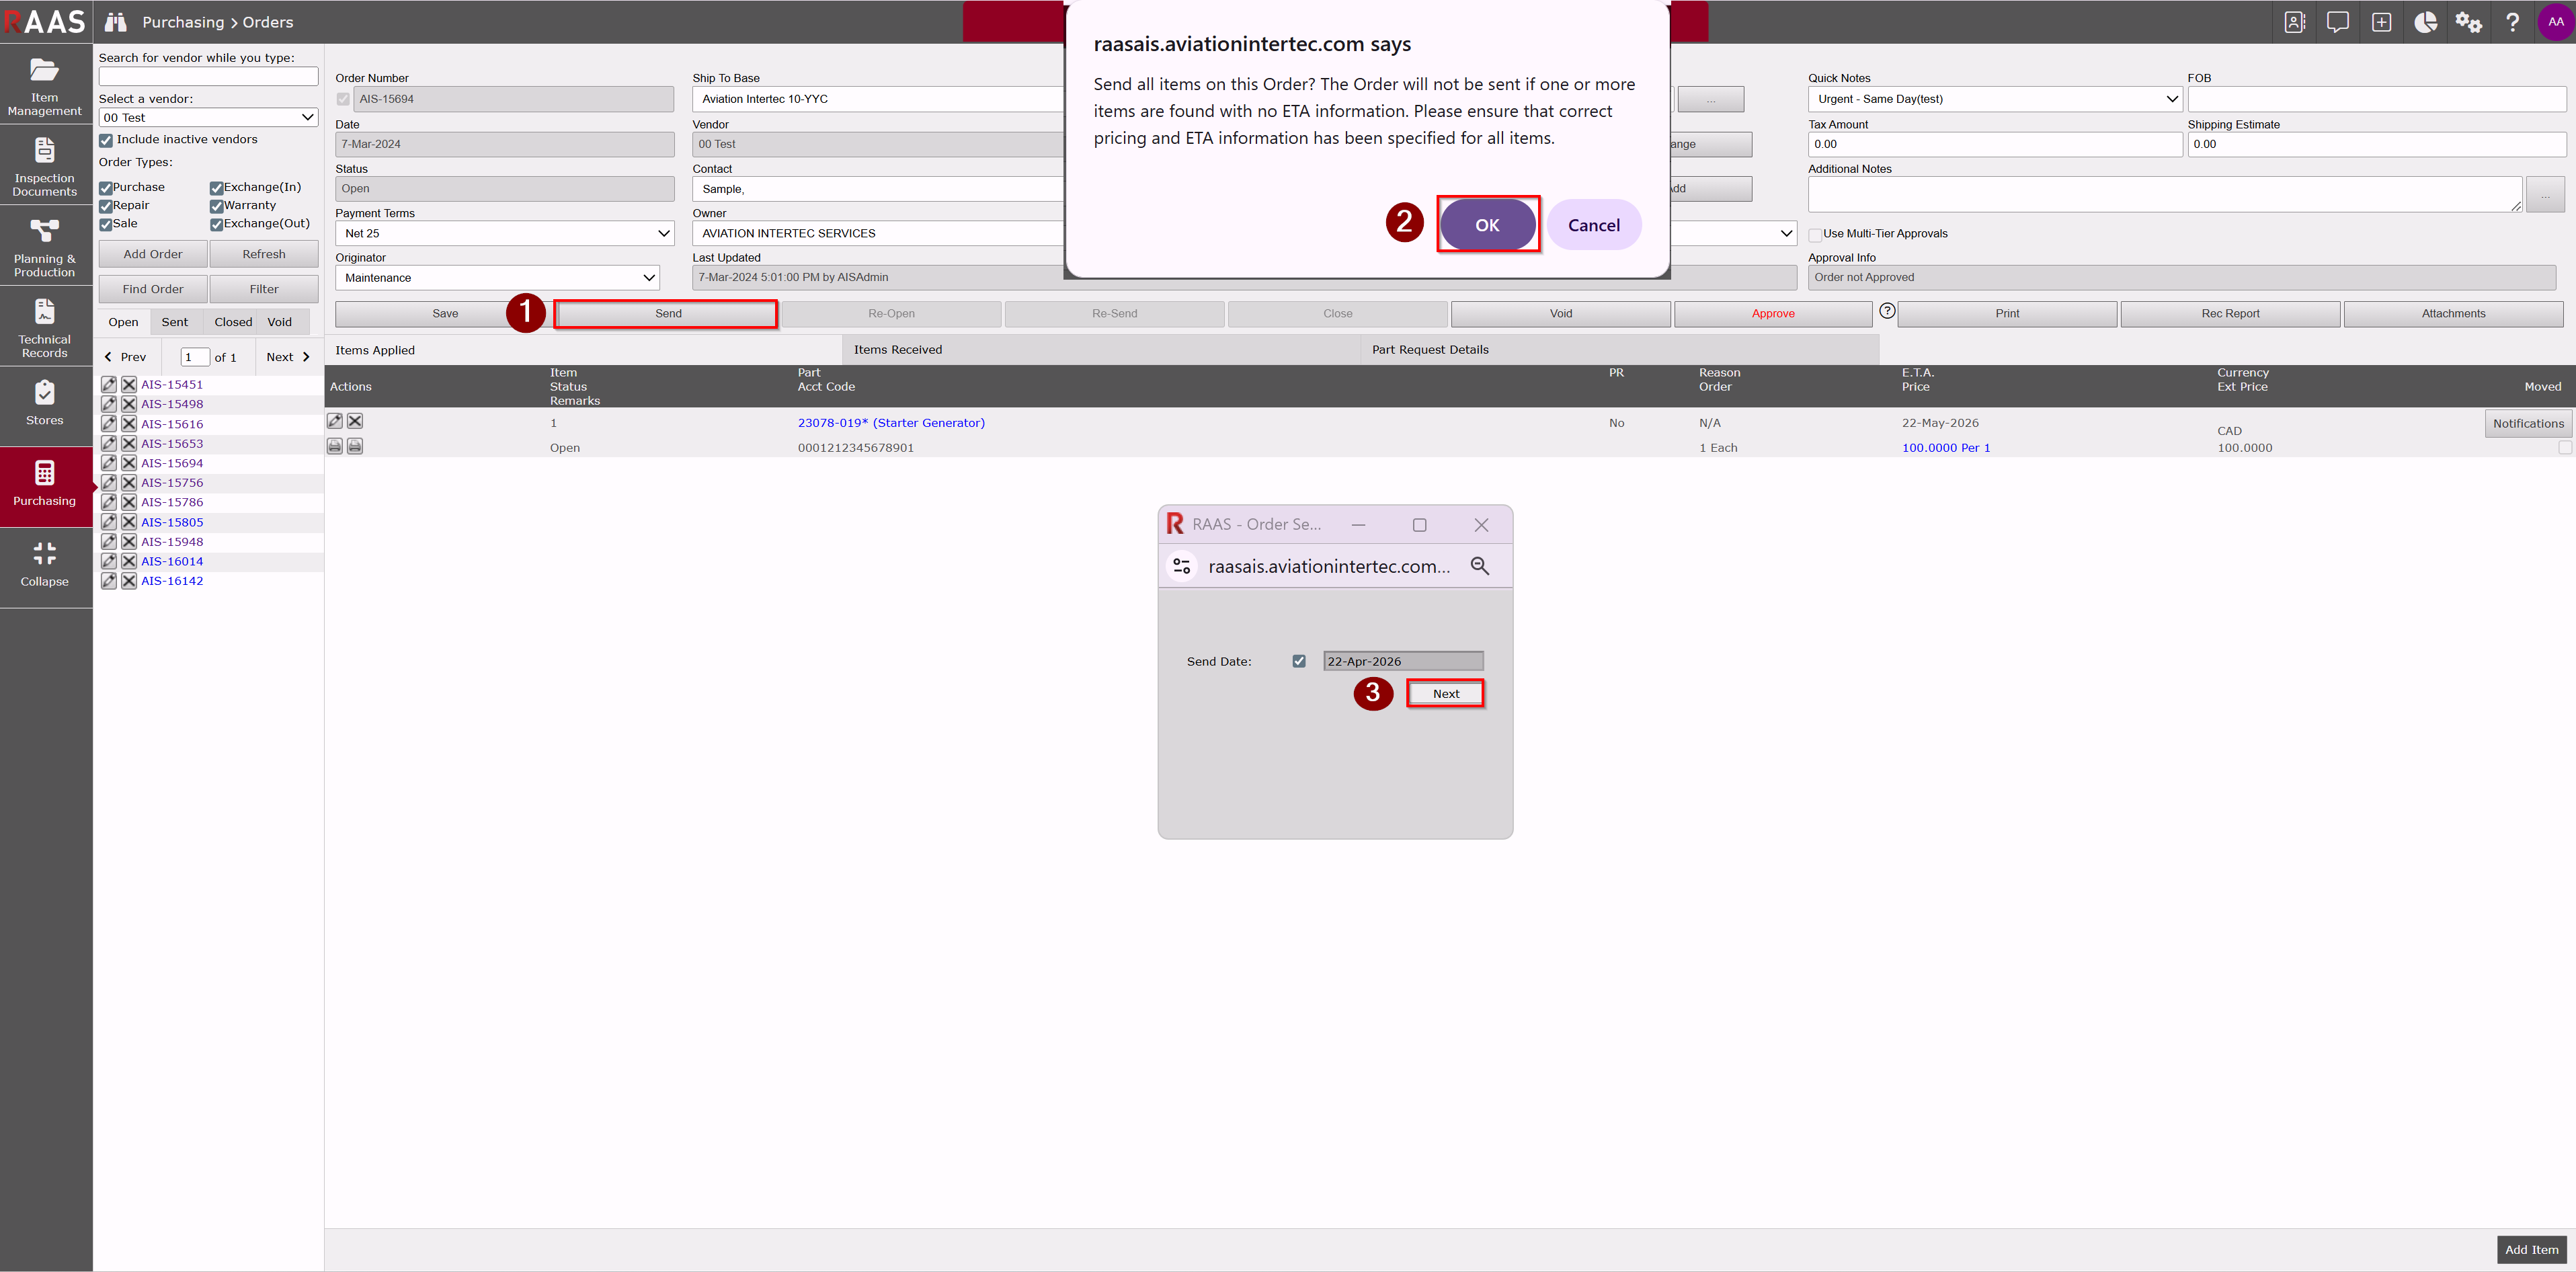
When the Exchange Order (Inbound) is sent, the screen refreshes and the Order Status is changed from Open to Sent. The Order Number Listing will also be refreshed, and the Exchange Order number will appear under the Sent tab.
Receiving Items on an Exchange Order (Inbound) - Wizard Page 1 - Items
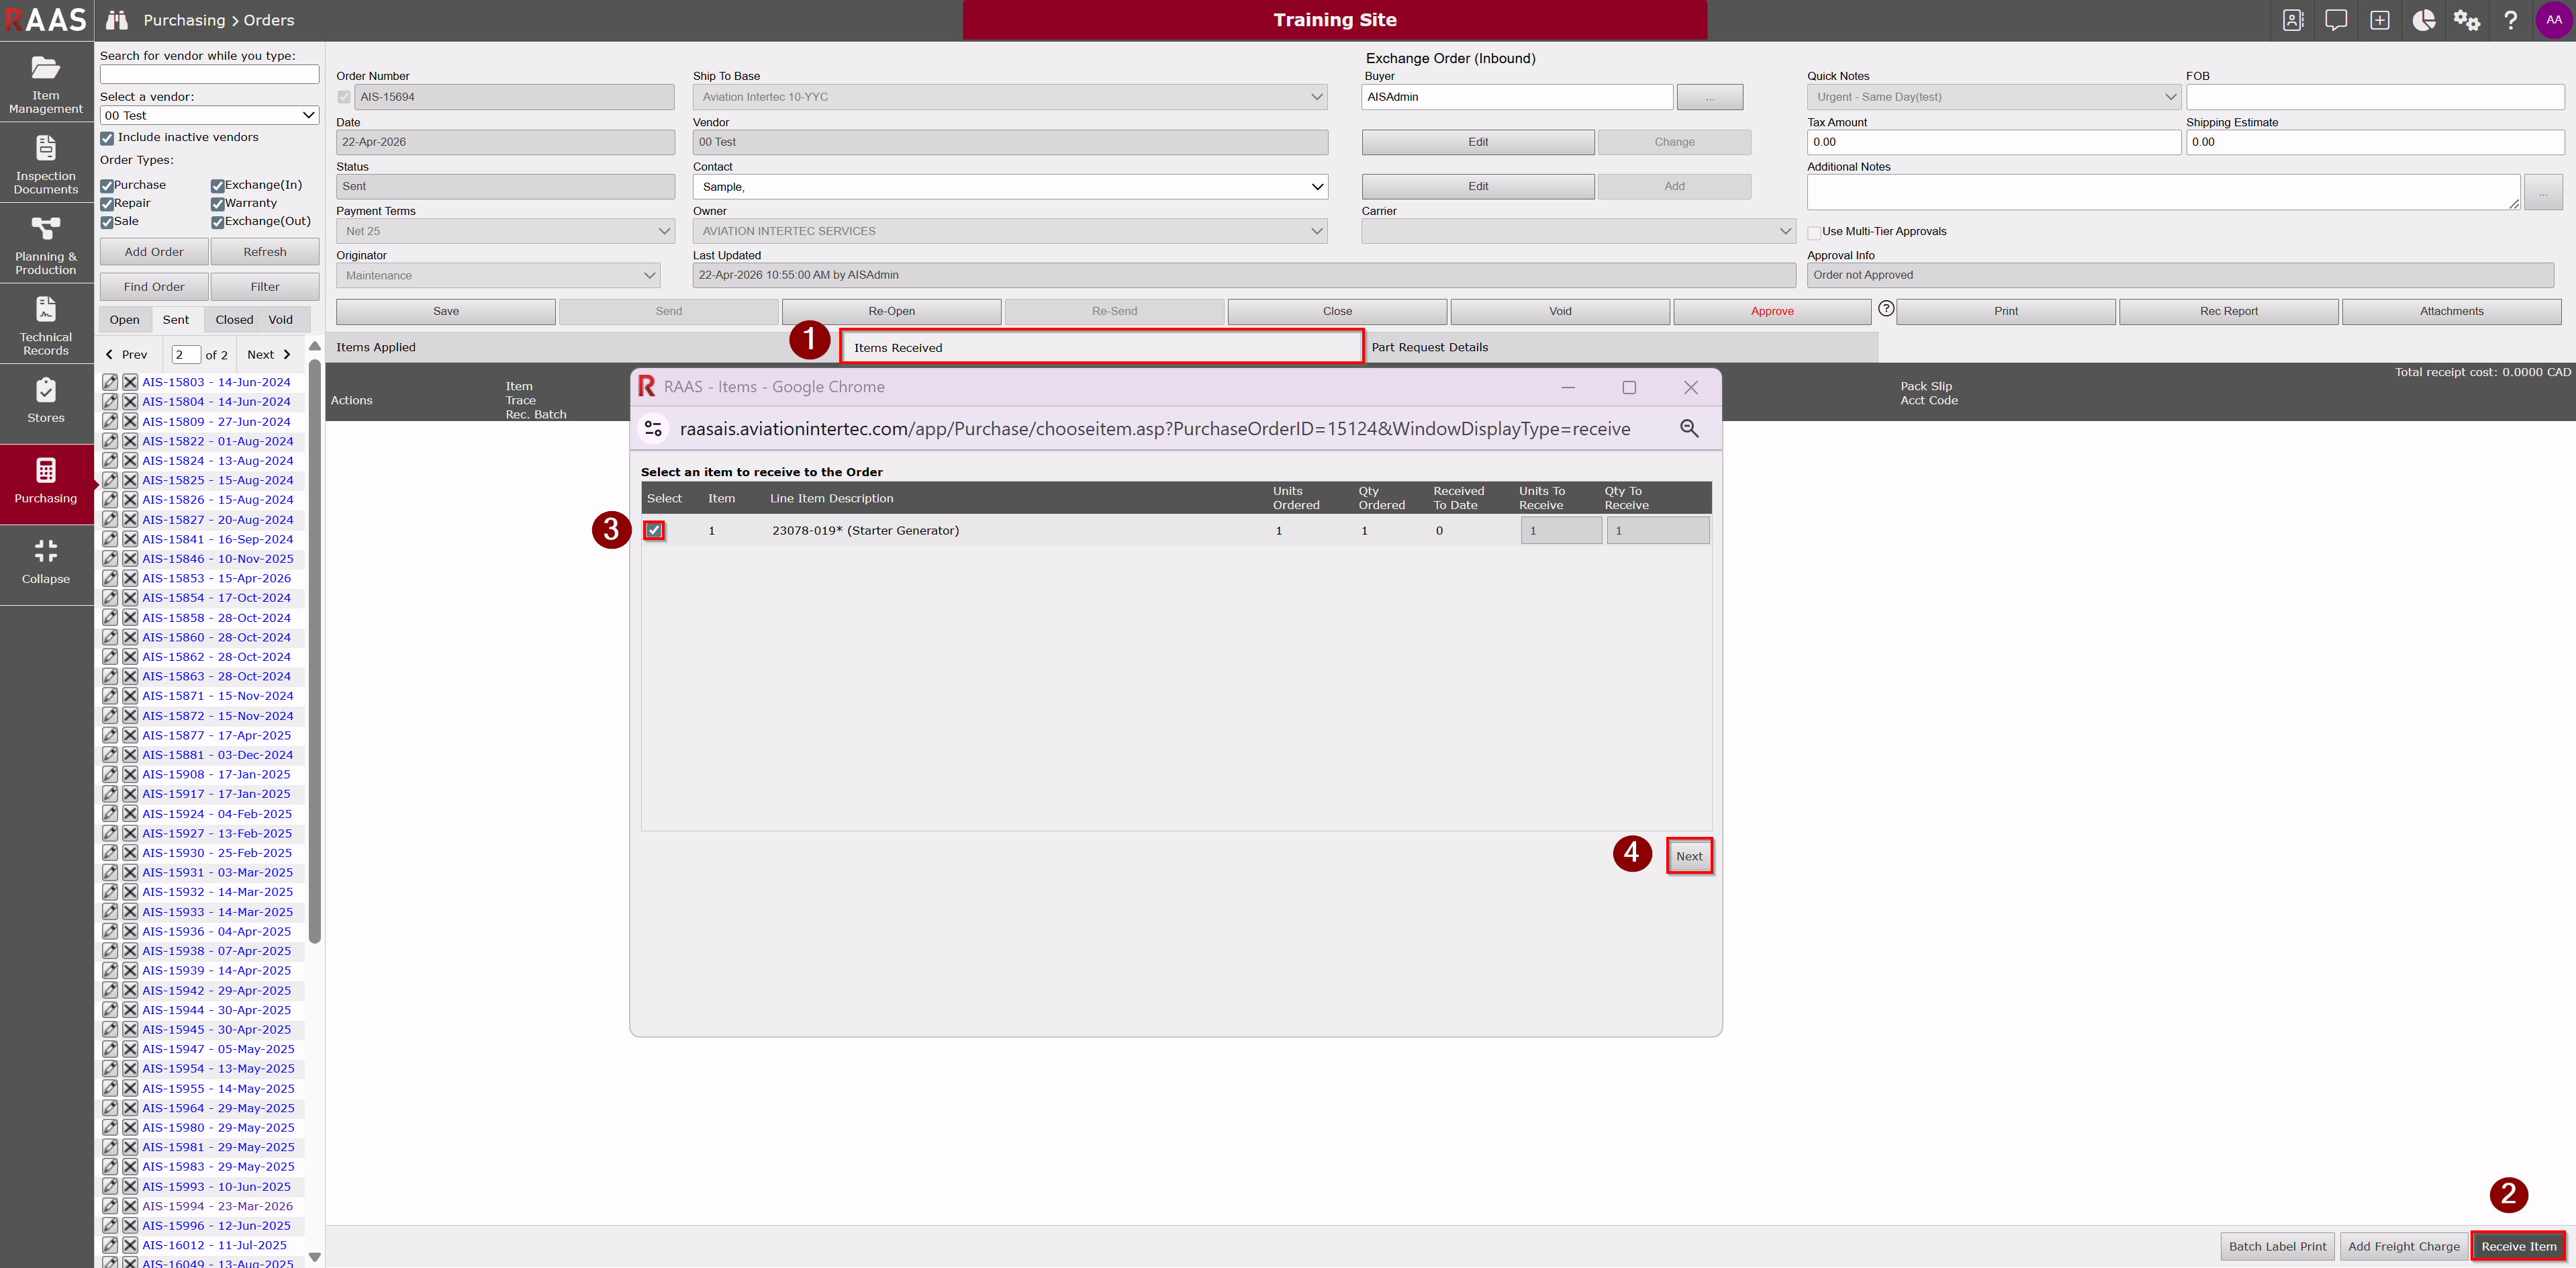
Once an item on an Exchange Order (Inbound) has been received from a vendor, the transaction must be recorded in RAAS. The Items Received tab, within the Orders sub-module, allows the receiver to track the receipt of items.
To receive an item on an order, the order must have been sent and the status of the item you are receiving must not be cancelled or closed on the Items Applied tab of the order.
-
Locate the Exchange Order (Inbound) on which the item to be received was entered and click on the Items Received tab.
-
Click the Receive button to begin receiving the items listed on the order.
-
Select the item being received.
-
Click Next.
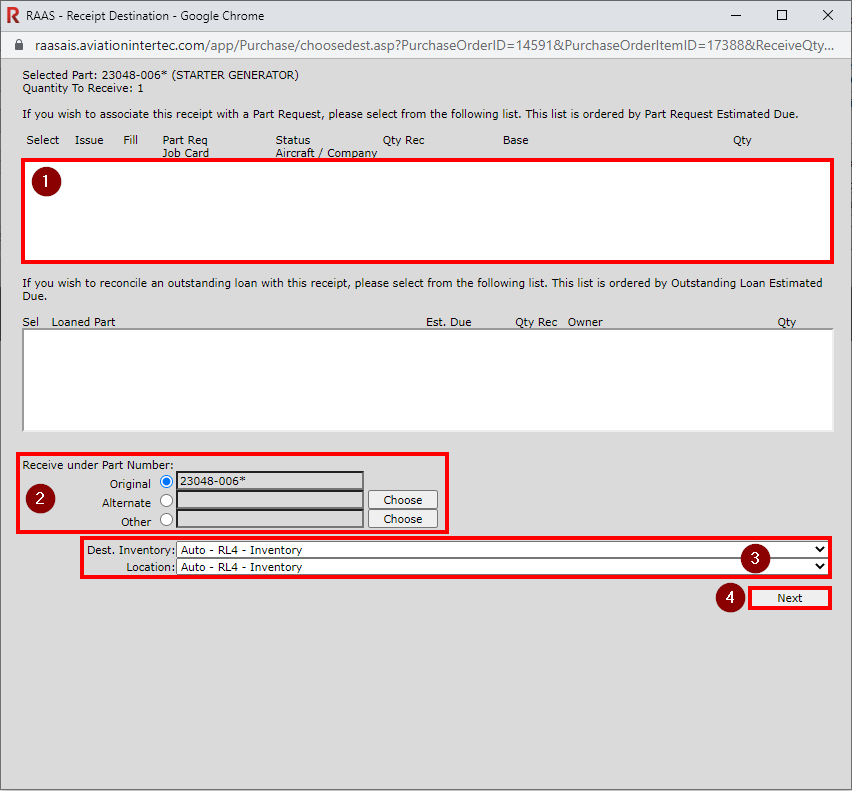
Receiving Items on an Exchange Order (Inbound) - Wizard Page 2 - Receipt Destination
If the item being received was ordered in response to a part request, the receipt can be associated with the part request from this wizard.
-
Select the Part Request from the listing and enter a quantity. The receiver may be required to Issue or Fill the part request. (In this example there was no associated part request.)
-
Select the applicable Receive under Part Number option. If selecting Alternate or Other, click the Choose button beside the selection to choose a different part number.
• Alternate - choose an alternate part number located under the same part description.
• Other - choose a part number under a different part description.
Note: If the Part Number does not exist in RAAS yet, you must add it first and then come back to receive the part.
-
Verify that the item is being received to the correct Position and/or Location and Destination Inventory. In most cases, the receiver can use the default settings. All five Inventory sub-locations appear in the Location drop-down, however, only the Awaiting Repair and Quarantine locations would be selected based on the status of the part being received. Tool Crib would be the default if the item being received is of Item Type Tool.
-
Click Next.
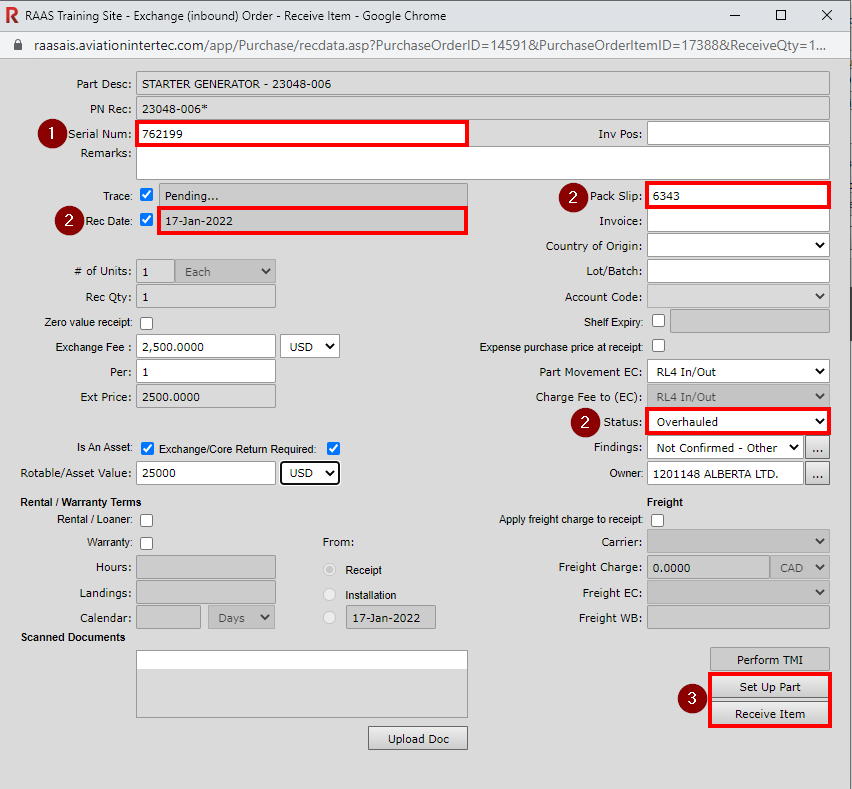
Receiving Items on an Exchange Order (Inbound) - Wizard Page 3 - Receive Item
-
Enter the Serial Number of the item being received.
-
Enter the remaining receipt data provided on the packing slip. The mandatory fields include Packing Slip, Rec Date and Serviceability Status.
-
The Exchange Fee will be populated based on the value entered when adding the item to the order and can be changed if necessary.
-
An important data item is the Trace number which is used to track a particular part item back to its supplier. Complete trace information for an item can be viewed from the serial number detail screen – see TRACE INFORMATION. RAAS will automatically assign a Trace number if the checkbox is selected, or the checkbox can be removed to enter a Trace number manually.
-
The Owner will be populated based on the Owner selection in the order header.
-
-
Once all details are entered on the Receive Item page, the user can choose to Set Up Part, or Receive Item.
Set Up Part – this action will receive the item and then allow the item to be set up through inventory by opening the Serial Number screen.
Receive Item – this action will receive the item.
The items received will now appear on the Items Received tab of the Exchange Order. If the full quantity of the item ordered was received, the item status will be changed to Closed on the Items Applied tab. If less than the full quantity was received, the item status will remain Open on the Items Applied tab. If the final item of the order is being received, you will be asked if you want to close the order.
Note:
The Exchange/Core Return Required flag must be selected in order for this item to appear on the Outstanding Core Returns report, on the Stores - Consignment and Loans screen, and to be included in the “Select Core to be returned” dropdown on Shipping Bills.
Outstanding borrows can be tracked in a few ways:
-
Stores – Consignment and Loans screen (filtered for Exchange In; can be used to reconcile as well)
-
Outstanding Order Items Report (filtered for Exchange In)
-
Rental Loaner Expiration Forecast Report (for parts borrowed from 3rd party; must select Rental / Loaner when receiving and enter term; Item Management header). The Rental/Loaner Forecast Report can be found in the Item Management Reports and Dashboard menu.
Reconciling Loans
To reconcile loans for parts on Exchange Orders (Inbound), see Reconciling a loan received on an Exchange - Inbound Order.