The Expense Center Transactions sub-module is a centralized collection of all financial transaction data for all activities relating to parts, labour, and services. Expense Centers are financial ledgers that receive transaction data. They allow for the centralized collection of all expense data that is in turn used to generate various financial reports.
Expense Centers are defined in the Settings module of RAAS. Depending on the Item Type of the Affected Part of the Expense Center, the Expense Center will be categorized as Aircraft, Inventory, or Other/Misc.
Expense Centers are specified when creating a job card or part request, and when issuing parts directly from the Expense Centers Transactions sub-module.
Expense Center Items appear on a particular Expense Center in the following ways:
-
Adding Expense Center Items Manually
-
Receiving items on Purchase Orders and upon sending Sales Orders
-
Importing - this imports Parts, Labour, and Order Transactions (aside from Purchasing and Sales)
-
Adjusting the receipt price or reversing an item on an order or adjusting the price or reversing an item on a sent Sales Order
-
By issuing parts to an Expense Center on the Stores – Part Issues page
-
By processing Traces on the Stores – Expired Parts List page
-
By committing an Inventory Count on the Stores – Inventory Counts page
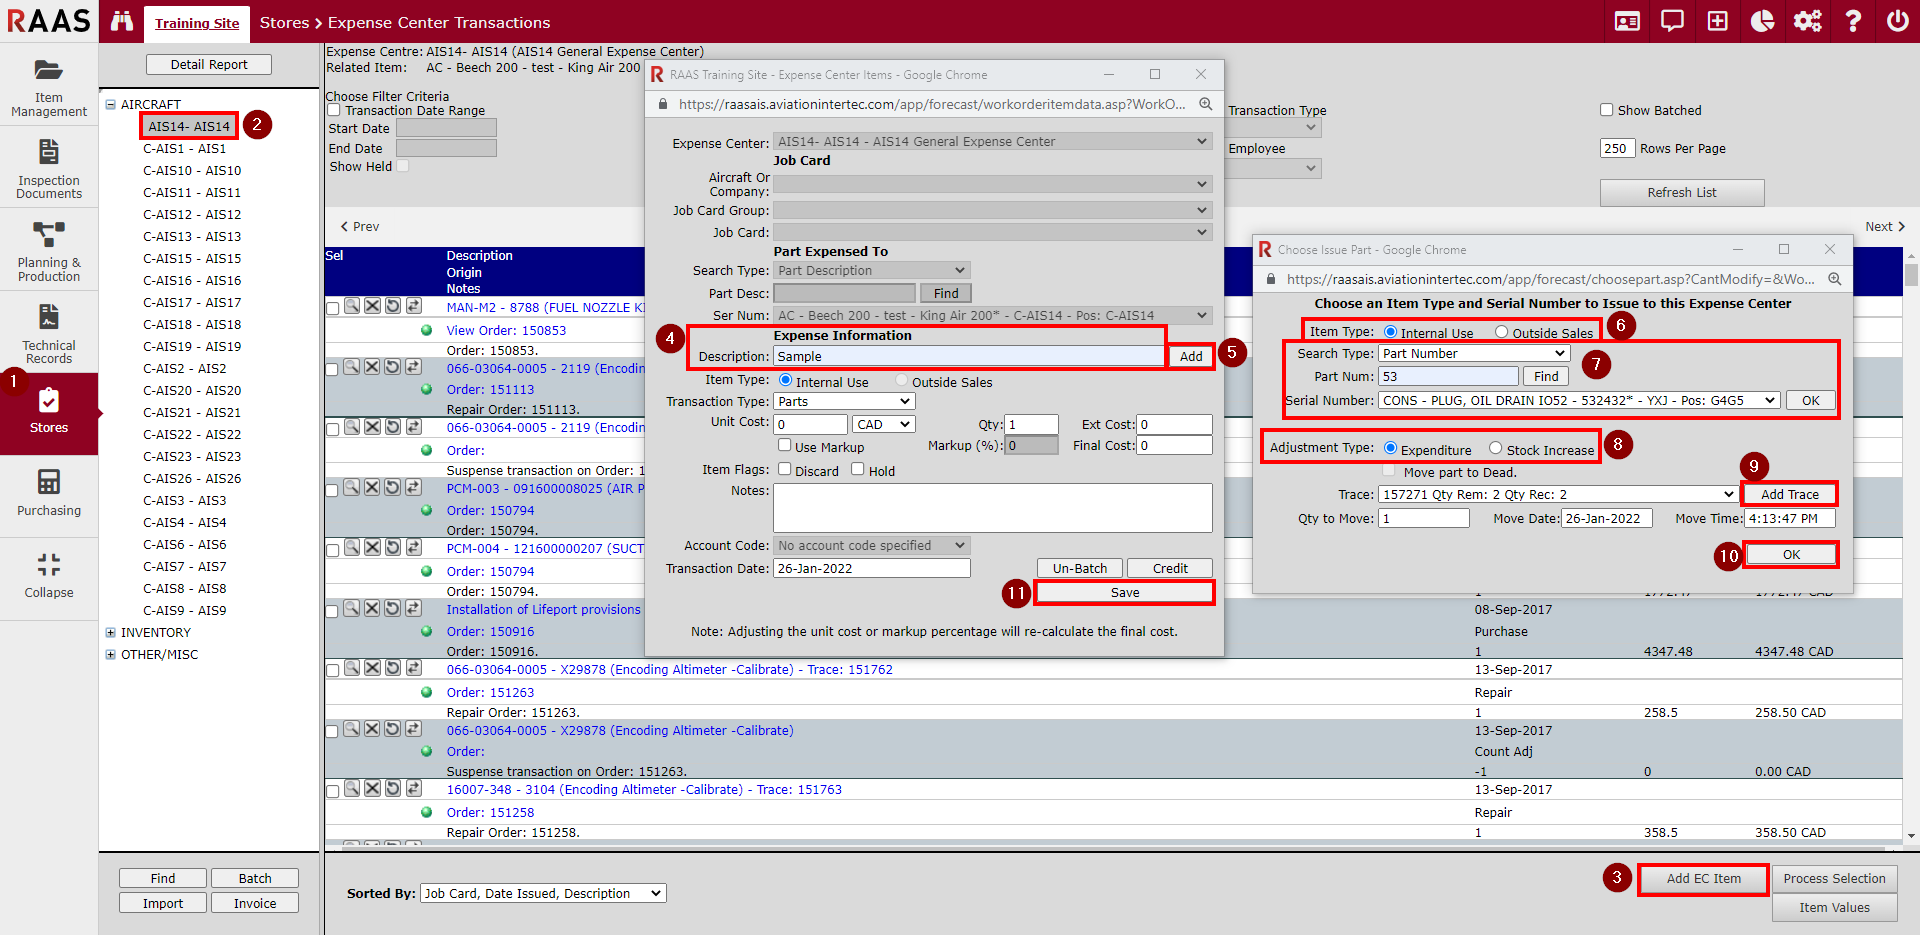
Adding Expense Center Items Manually
The most common reason for adding Expense Center Items manually is to perform a one-off Trace qty adjustment.
-
Click on Stores and select Expense Center Transactions.
-
Generate Expense Center Transactions by clicking Aircraft, Inventory or Other/Misc and selecting one of the Expense Centers from the tree.
-
Click the Add EC Item button at the footer of the window to add an expense center item to the generated list of Expense Center Transactions.
-
Non-part transaction types (Adjustment, Freight Charge, Labour, Non-Tracked, Other or Repair), are manually entered by typing a description. These transaction-type expense entries cannot be reversed or un-issued because they are not an expenditure or stock increase.
-
Expenditures or stock increases (consumable parts only) can only be created for tracked parts. To select the part to be affected, click the Add button.
-
Indicate if the transaction item is for Internal Use or Outside Sales.
-
Enter the search criteria for a Part Number or Serial Number and click Find. Select the resulting Serial Number and click the OK button.
-
Select an adjustment type:
For Expenditures: Select a Trace where the quantity remaining is greater than 0 (zero).
For Stock Increases: Select a Trace where the quantity remaining is less than the quantity received. Click OK. -
If a part's quantity must be increased by an amount that exceeds the originally received quantity of a given trace, create a new trace by clicking the Add Trace button. (For more information on adding a Trace, see Trace Information.)
-
Select the newly created Trace from the Trace dropdown and click OK.
-
Click Save.
Note: To update the values of multiple transactions at once, see Item Values.
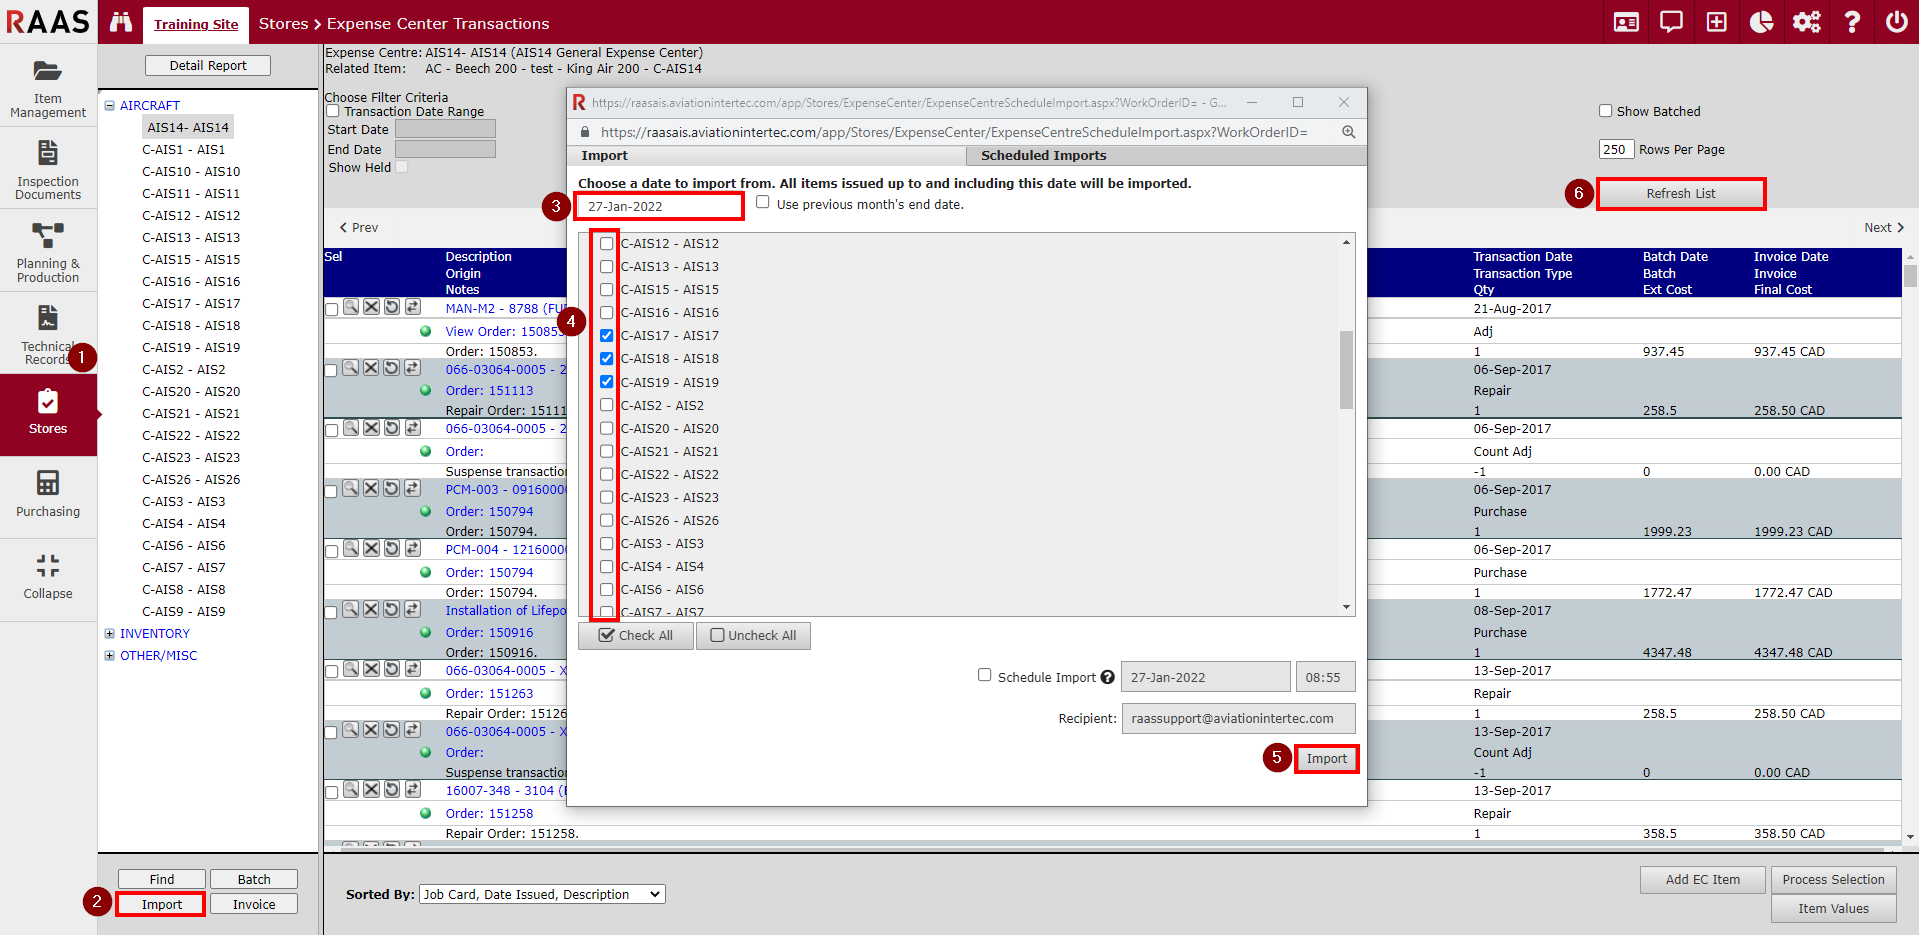
Importing Expense Center Items
The Import process brings forward all transactions that are associated with Part Requests, Job Cards, and most Order transactions that have not yet been imported up to the specified date for the selected expense center(s). It is recommended to perform an Import before beginning month-end reconciliation.
-
Click on Stores and select Expense Center Transactions.
-
Click Import.
-
Enter an import date. All items up to and including this date will be imported for the selected expense center(s).
-
Select the affected Expense Centers from the list.
-
Click Import.
-
After the Import is complete, click Refresh List to view any new transactions that have been imported.
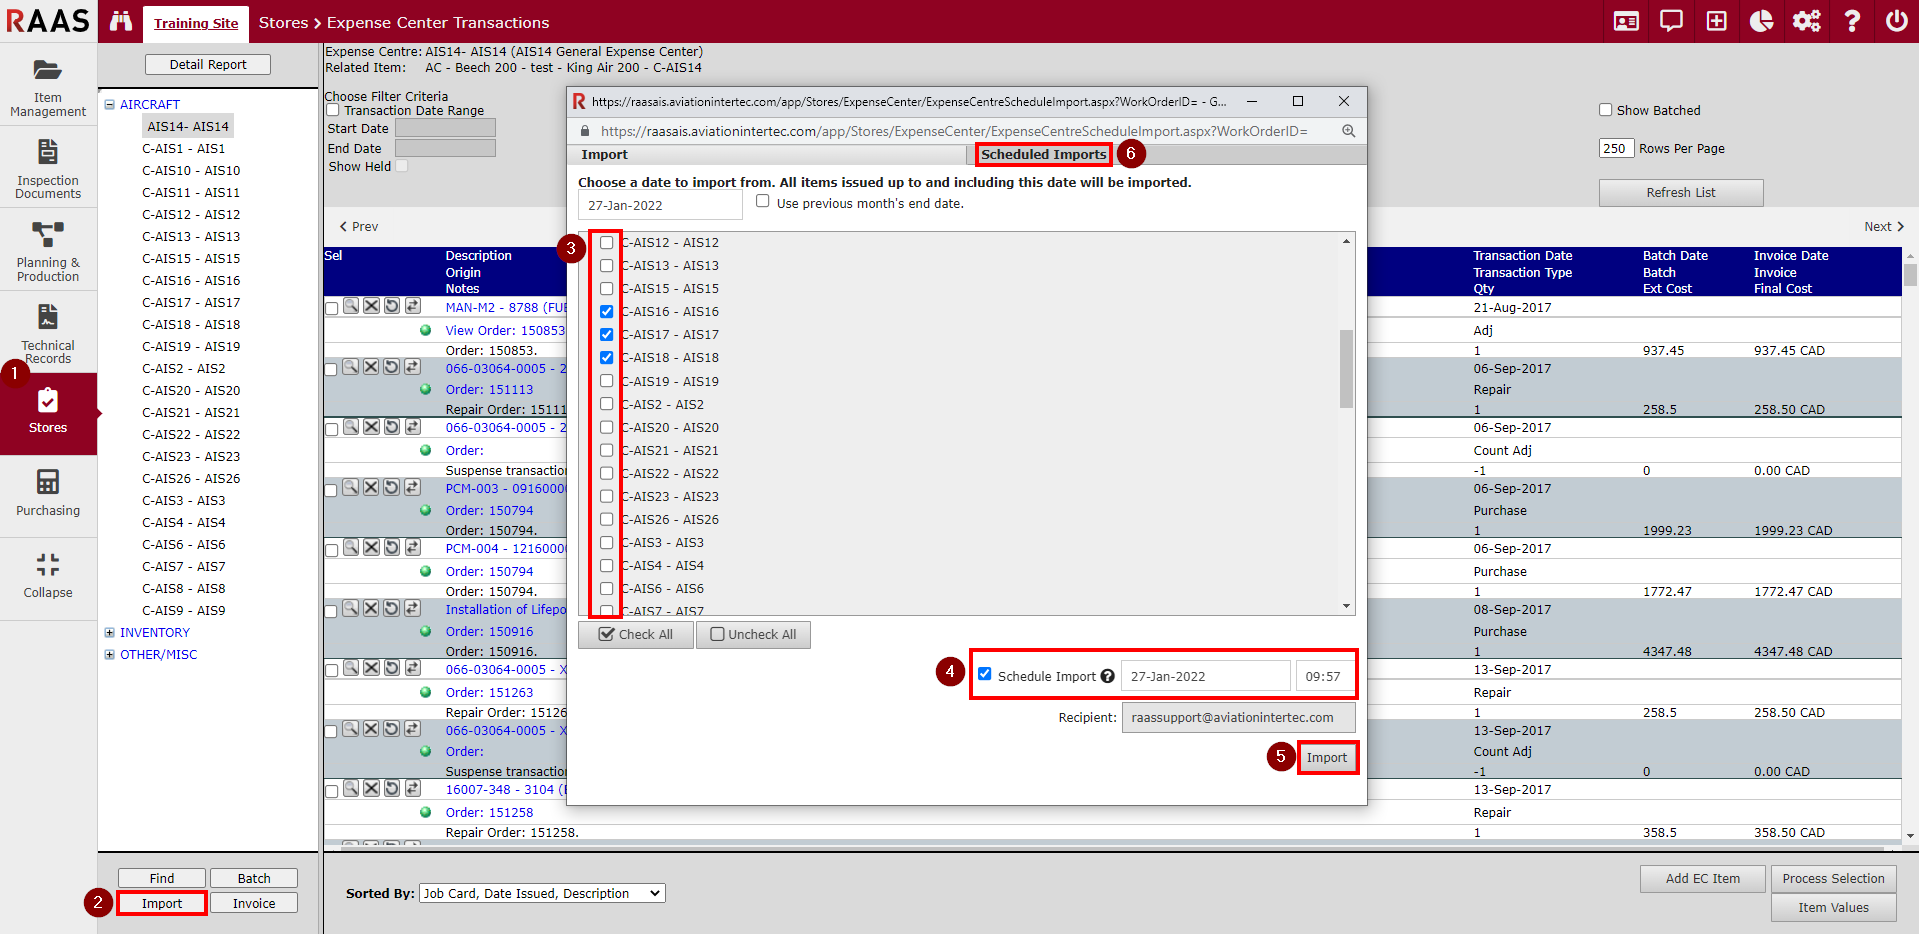
Scheduling Imports
Imports can also be scheduled in advance and any number of Imports can be scheduled.
-
Click on Stores and select Expense Center Transactions.
-
Click Import.
-
Select the Expense Centers from the list that you wish to schedule the Import for.
-
Check the Schedule Import box and enter the date and time you would like the Import to occur.
-
Click Import.
-
To view all Scheduled Imports, click the Scheduled Imports tab at the top of the Import window.