INVENTORY COUNTS
RAAS Inventory Counts allow for full or partial/cycle counts. It is recommended that items more frequently accessed be counted more often, irrespective of the value.
During an Inventory Count, each item in inventory, or a subset of inventory, is counted and recorded. When the inventory count is committed, inventory trace records are updated and transactions are written to an Expense Center. Reports of variances, including cost figures, can be produced from the Inventory Count screen and from the Expense Center.
When an Inventory Count is created, issuing from the included Traces must halt until the count has been committed. Otherwise, exceptions will be encountered and the system will not be able to perform accurate on-hand quantity adjustments. For this reason, smaller inventory counts, which can be completed and committed within a short period of time, are recommended even if performing a full Inventory Count.
To complete an inventory count:
Navigate to Stores -> Inventory Counts.
Select the inventory for which the inventory count will be performed.
Click Add to create a new inventory count.
Enter a List Name.
Select Parts to Include – All Parts, Consumables Only, or Non-Consumables Only. See note 1 below.
Select a Sort Order.
Optionally, select an employee to assign the inventory count to.
Inventory Areas to include correspond to Assembly Tree locations. Select the locations that will be counted.
Specify Items to include by entering a part number range, serial number range, or position range. Using the position range will provide a map through the storeroom for the count.
If the inventory has been categorized using ABC Analysis, inventory counts can be created for specific classifications.
Select any or all Inventory Types.
Click Generate.
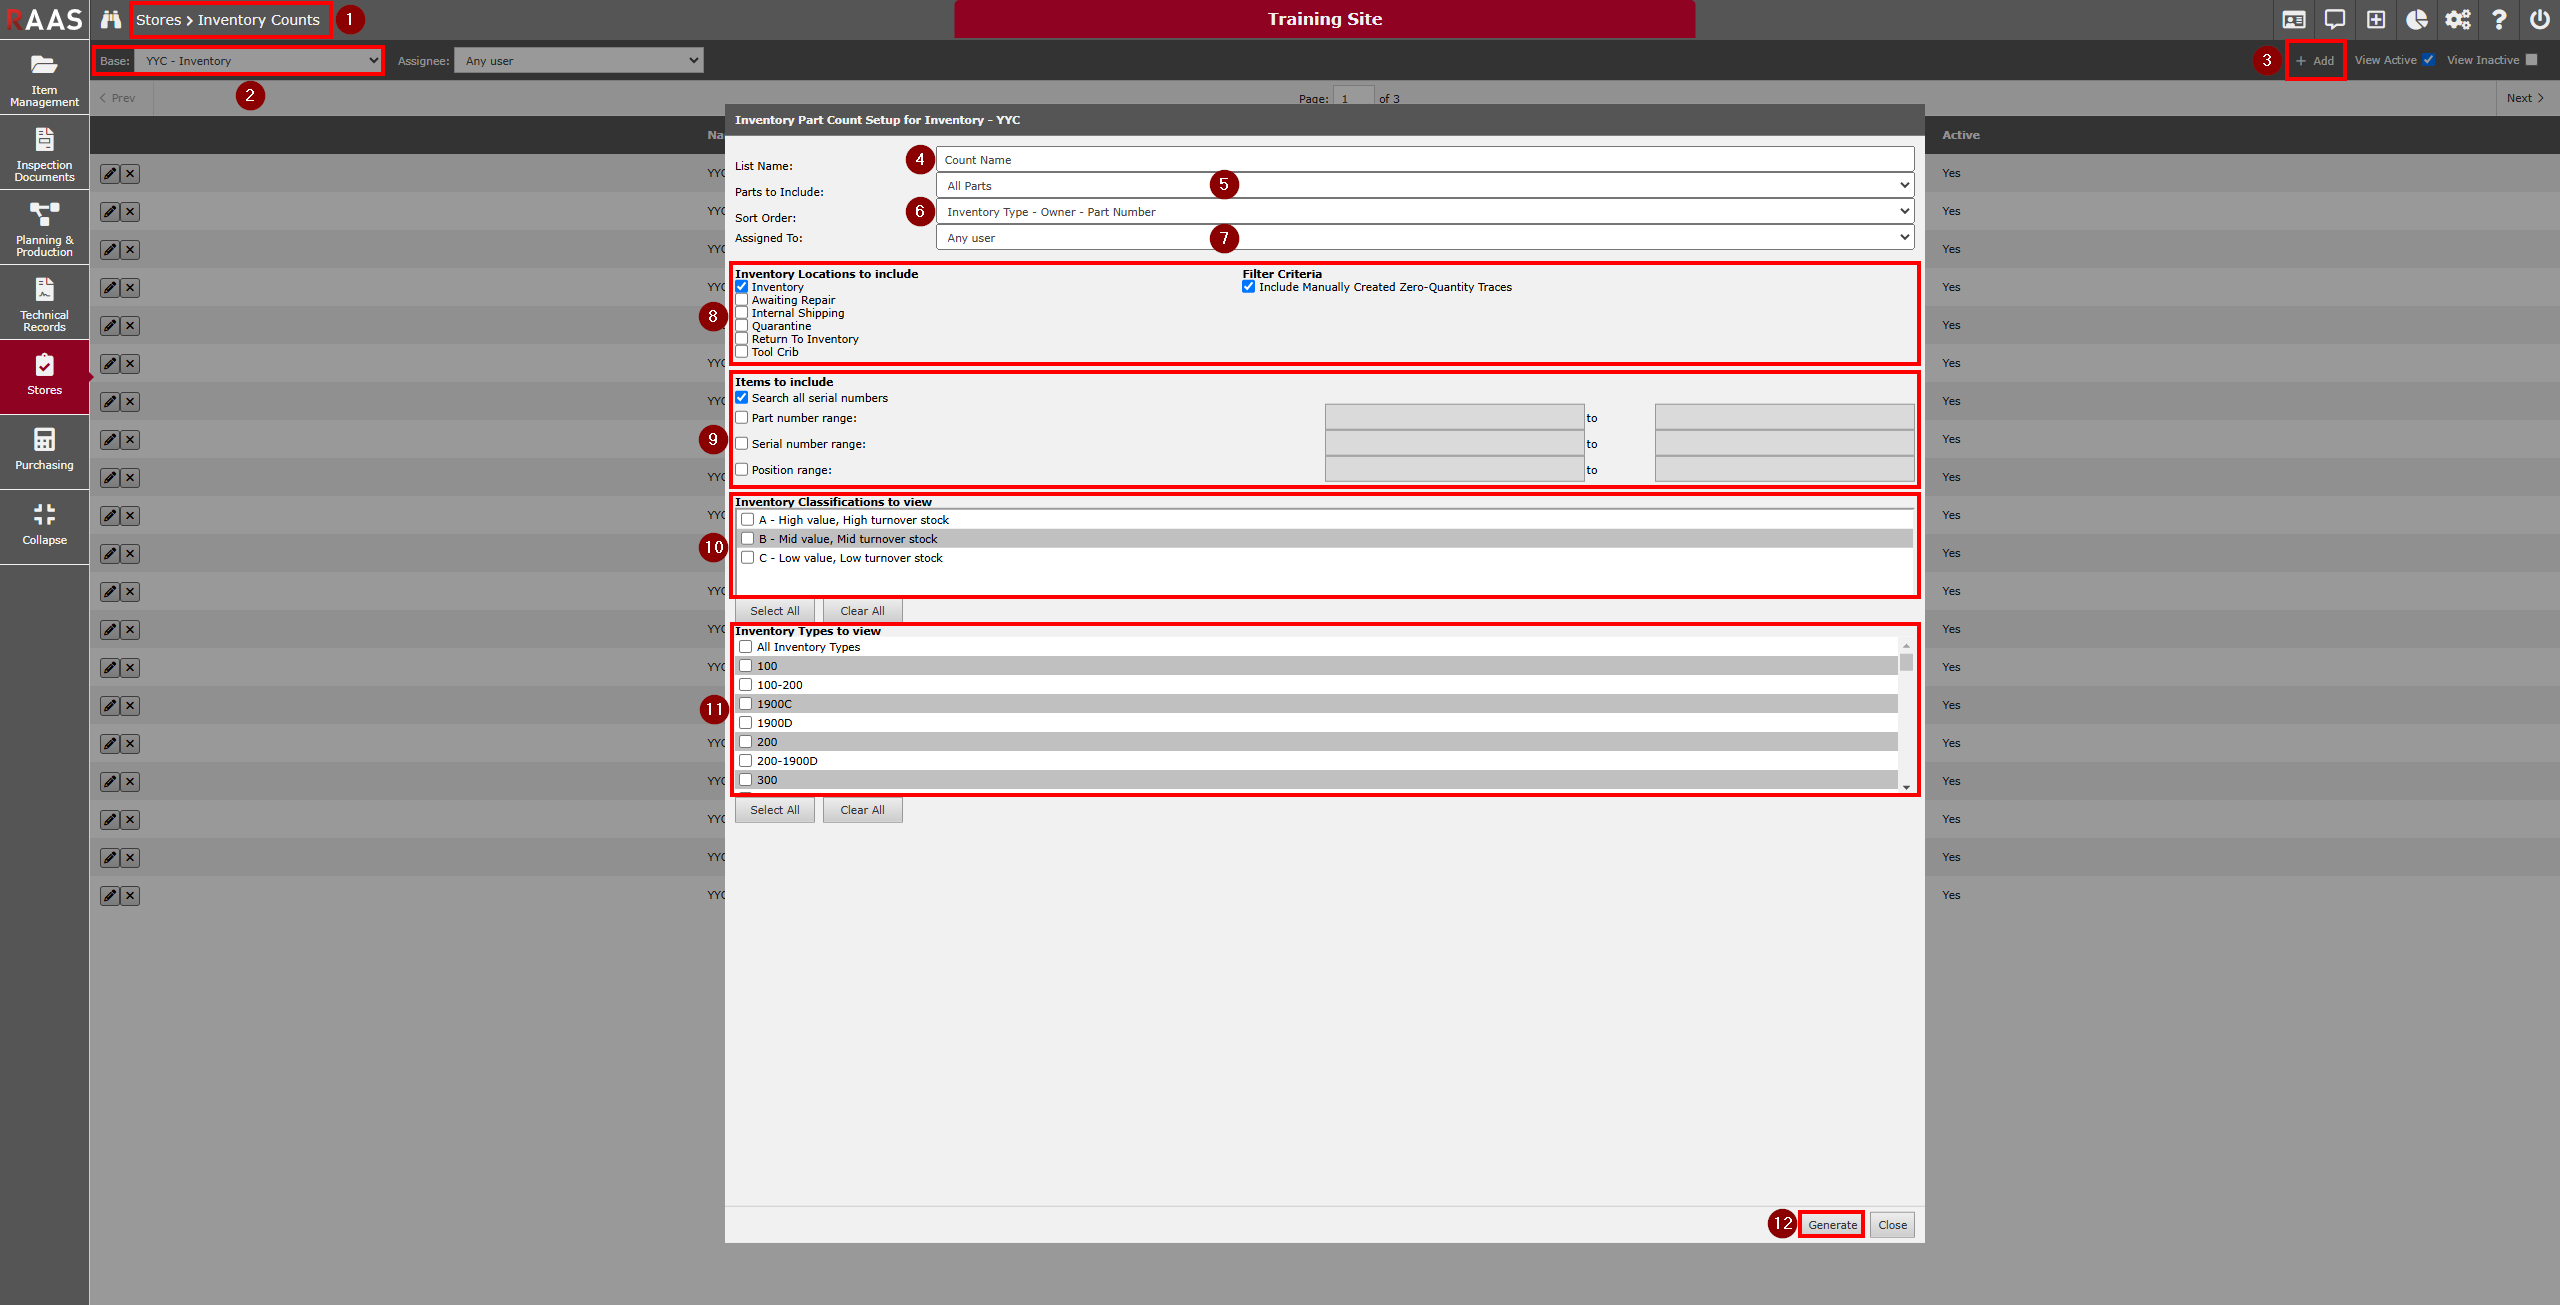
Figure 1: Inventory Part Count Setup
Click the Print button and select one of the Counter Sheet options to print the Inventory Count Sheet Report, which will be used by the counter(s) to record counted quantities. There are also various administrative reports that can be generated from here. (See Figure 3.)
Note: Some of the options presented may be greyed out depending on the user’s security roles (hovering over a greyed out checkbox will inform the user of the required user role). If you believe you should be able to select a certain option, please contact your RAAS Administrator.To find an Item to update the quantity counted, click the Find button. Items can be searched by Trace, Part Number, or Item Number. If the flag for ‘Search all Active Count Sheets for this Inventory’ is on, the search results will show all occurrences of that item from all active count sheets within the current inventory. Items within other count sheets will be in red text while items in the current count sheet will be in black text. After selecting the item, click the Go button to be taken to the page the item is on within the current count sheet. (See Figure 4.)
Items can be added to an inventory count if an item is not found in the Inventory Count list by clicking Add. Search for Item by ATA, Part Description, Part Number, Serial Number or Trace. If the Part does not exist in RAAS then click Add PN, Add SN, or Add Trace as required. Click Save. (See Figure 5.)
Once the physical count is completed, transcribe the counted quantities from the Inventory Count Sheet Report.
If the On-hand text boxes show as ‘Suppressed’ it means the user does not have the required user role (Stores: Inventory Counts - On Hand Quantity - View) to view the on-hand quantities of items.
Committed counts will have the Counted fields greyed out as these cannot be edited once committed.
Editing the Counted field of an item and clicking off of that field will automatically save that value.
Note: If multiple users are updating the same page of a count sheet and one user changes the value of a count that has already been changed by another user beforehand (without reloading the page), the 2nd user will see a warning that the value has already been changed (This record has been more recently modified by USERNAME and your changes will not be saved. The page will now reload.). The page will then refresh for this user and they will see the updated count value(s).
When the count update is completed, click the Commit button.
Note: Only items that have a value entered in the Counted fields and that have the Process flag turned on will be committed. A count sheet does not need to be fully completed to commit it, but any items that have been committed cannot be edited afterwards if doing a partial commit.Select an Expense Center, enter the effective date and click Commit. At this point, RAAS will make the qty adjustments and write Expense Center transactions for each adjustment.
Note: Only non-inventory Expense Centers (ECs) can be selected to commit inventory counts to. Upon committing, two transactions are written. If the quantity is decreasing, a debit transaction is written to the Inventory EC from which the part originated and a credit transaction is written to the EC selected when committing the count. If the quantity is increasing, a credit transaction is written to the Inventory EC from which the part originated and a debit transaction is written to the EC selected when committing the count.The Inventory Count can be opened in a new Tab by selecting the Tab button. This is convenient for tablet users to have the count on a full screen.
The count list name, assigned user, and whether the count list is active or not, can be edited by clicking the Options Icon and changing the respective values or unchecking the Active checkbox and clicking Save. (See Figure 6.)
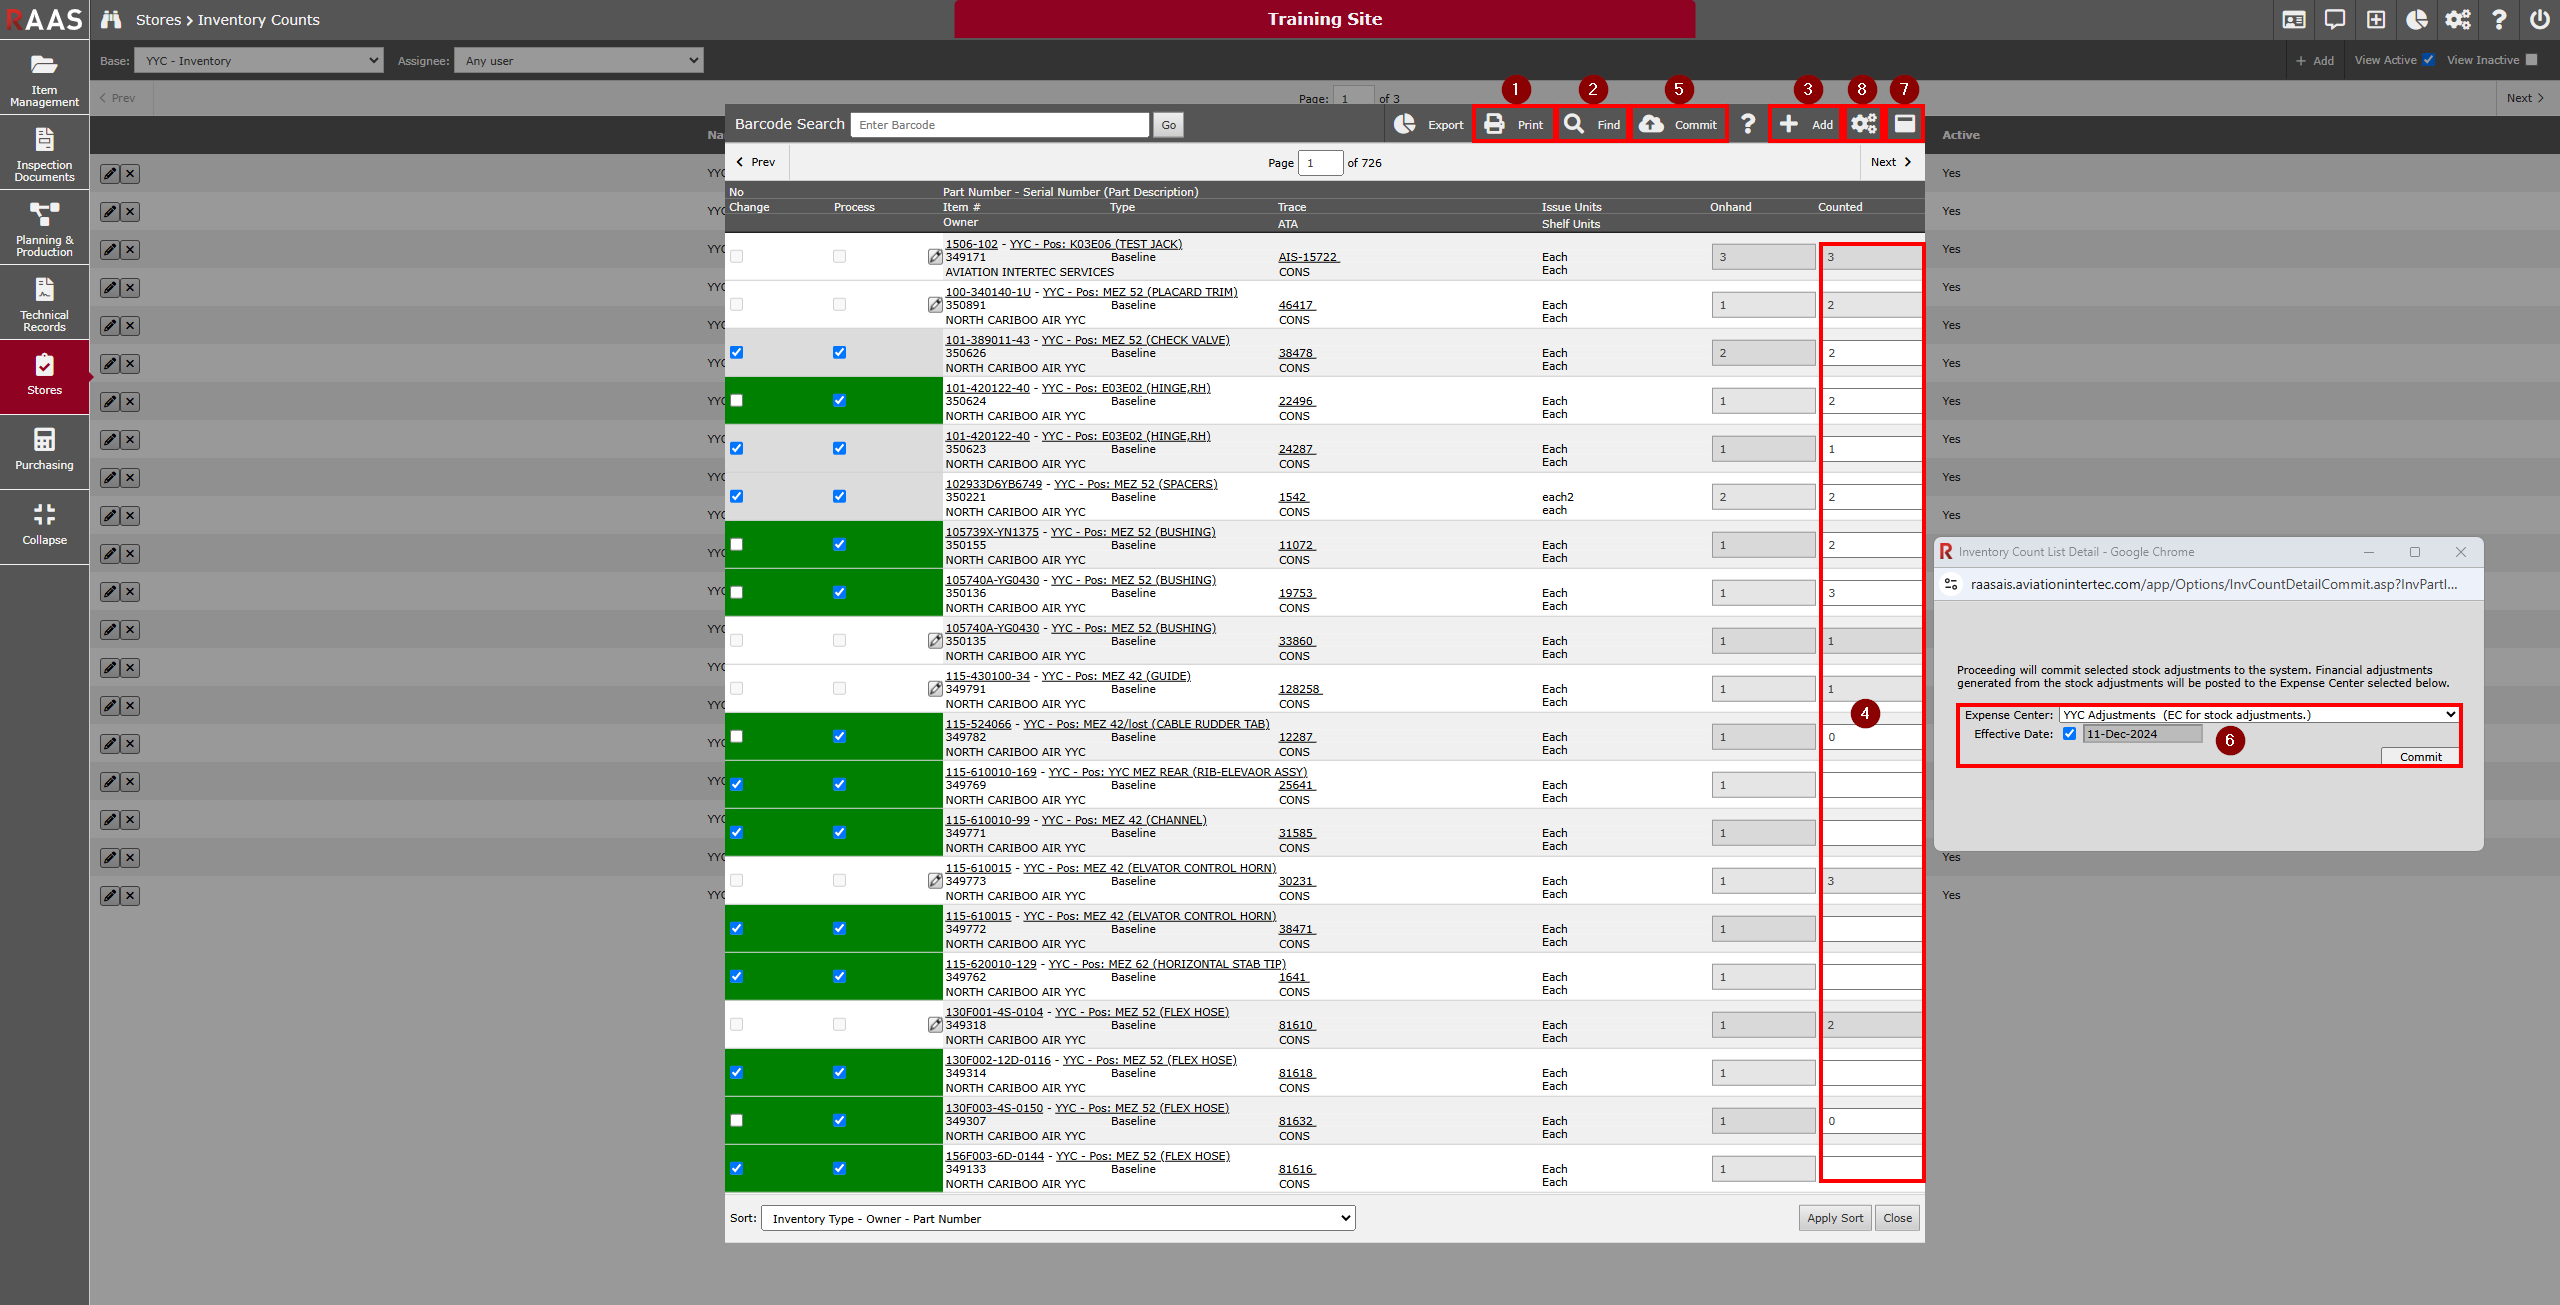
Figure 2: Inventory Counts
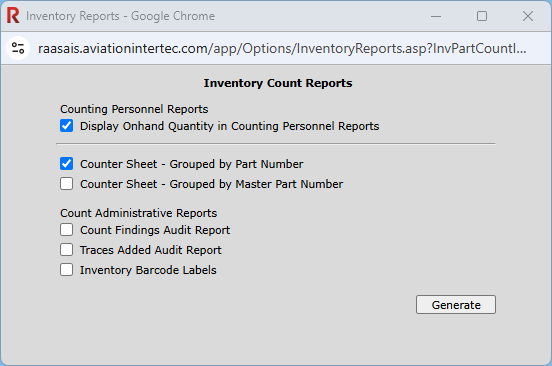
Figure 3: Report Selection
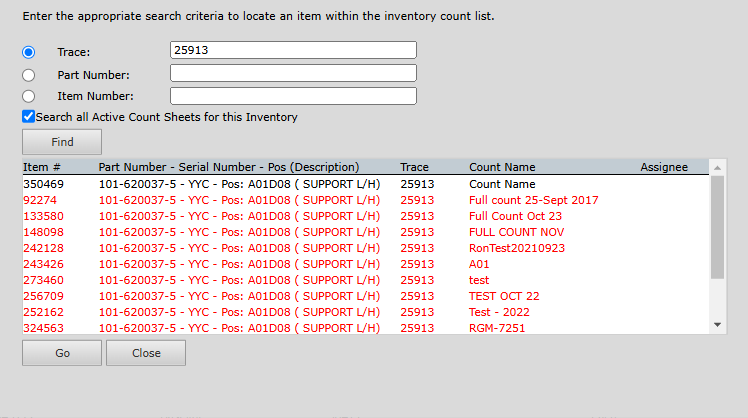
Figure 4: Find
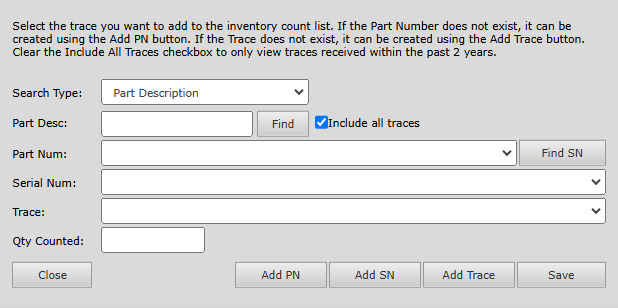
Figure 5: Add Line Item
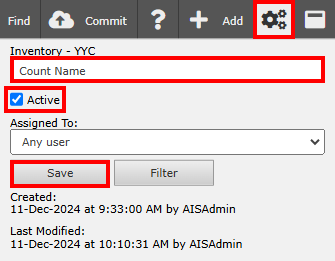
Figure 6: Inventory Count Settings
Relevant User Roles
There are many User Roles pertaining to Inventory Counts within RAAS. A list of them along with a brief description of each can be found below. Additionally, there is special behavior for Inventory Counts permissions in that any user who is only assigned Inventory Counts permissions will be restricted from accessing anything in RAAS other than Inventory Counts. This is especially useful for outside-organization counters who are conducting inventory counts.
Stores: Inventory Counts - Access
Allows a user to access the Inventory Counts Module.
Stores: Inventory Counts - Add Count Item
Allows a user to manually add an item to an inventory count sheet.
Stores: Inventory Counts - Add Count Sheet
Allows a user to create a new inventory count sheet.
Stores: Inventory Counts - Commit Count
Allows a user to commit an inventory count sheet.
Stores: Inventory Counts - Delete
Allows a user to delete an inventory count sheet.
Stores: Inventory Counts - Export Count
Allows a user to export an inventory count sheet as an Excel file.
Stores: Inventory Counts - On Hand Quantity - View
Allows a user to see the listed on-hand quantity of all items.
If this is disabled, users will instead see the text ‘Suppressed’ instead of a number in the On-hand fields.
Allows a user to check/uncheck the ‘Display Onhand Quantity in Counting Personnel Reports’ checkbox within the Inventory Count Reports section after clicking the Print button.
If this is disabled, the checkbox will be unselected and greyed out, disallowing the user from changing it.
Stores: Inventory Counts - Print Count Administrator Reports
Allows a user to select any of the below Count Administrative Reports to generate/print.
Count Findings Audit Report
Traces Added Audit Report
Inventory Barcode Labels
If this is disabled, the above checkboxes will be unselected and greyed out, disallowing the user from changing them.
If this is disabled in conjunction with the ‘Stores: Inventory Counts - Print Counting Personnel Reports’ user role, the user will not be able to access the Inventory Count Reports section when clicking the Print button.
Stores: Inventory Counts - Print Counting Personnel Reports
Allows a user to select any of the below Counting Personnel Reports to generate/print.
Counter Sheet - Grouped by Part Number
Counter Sheet - Grouped by Master Part Number
If this is disabled, the above checkboxes will be unselected and greyed out, disallowing the user from changing them.
If this is disabled in conjunction with the ‘Stores: Inventory Counts - Print Count Administrator Reports’ user role, the user will not be able to access the Inventory Count Reports section when clicking the Print button
Stores: Inventory Counts - Settings - Edit
Allows a user to edit/save an inventory count sheet’s settings.
Count sheet name.
Assigned user.
Active checkbox.
Stores: Inventory Counts - Settings - View
Allows a user to view an inventory count sheet’s settings.
Notes:
When committing an inventory count containing non-consumable items, exceptions could occur based on the location of specific non-consumable parts. Regular movement rules will be applied and it may be necessary to process individual parts outside of the inventory count.
