Invoice Matching is a process used to ensure that the invoices received from suppliers accurately reflect the goods or services provided. It typically involves comparing three key documents: the Purchase Order (PO), the receiving report (or goods receipt), and the supplier’s invoice. The goal is to verify that the quantities, prices, and terms all align, preventing overpayment, underpayment, or errors.
Electronic invoice matching in RAAS automates the process, making it faster, more accurate, and less prone to human error. It also reduces the need for paper storage, enhances visibility, and improves compliance.
Invoice Matching Listing
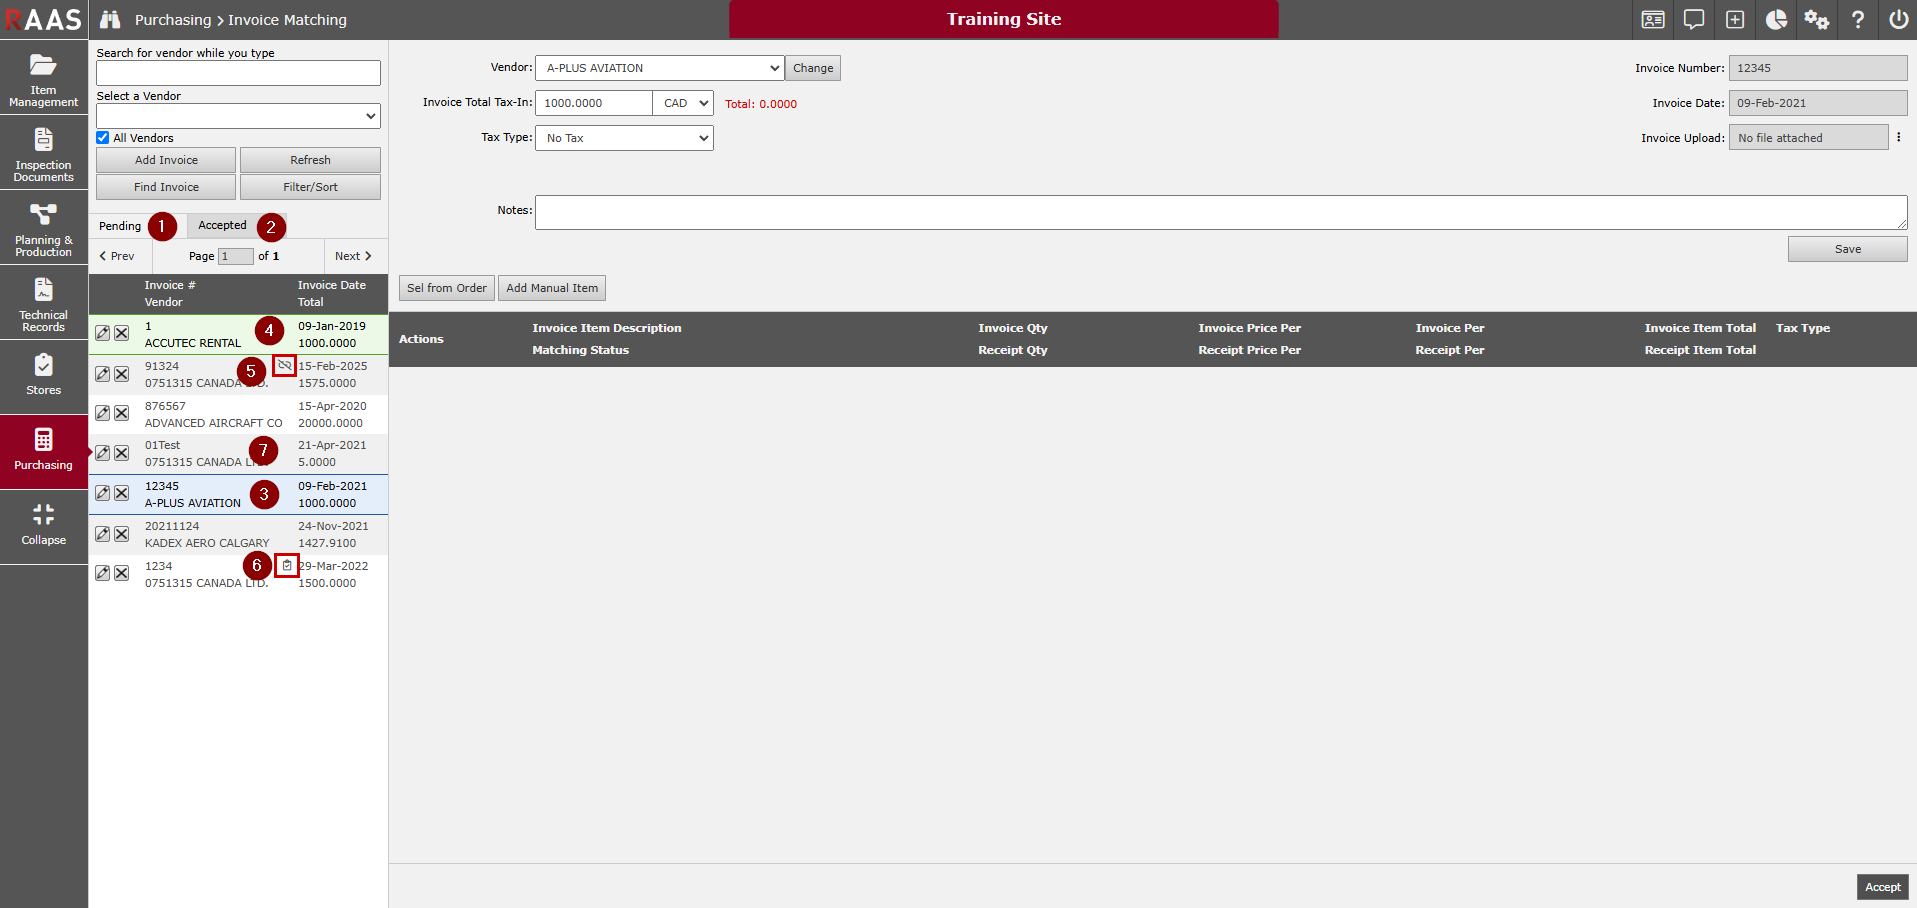
The Invoice Matching submodule is comprised of a list of invoices on the left pane, with invoice details on the right.
-
Pending - list of invoices that have been added, but not accepted
-
Accepted - list of invoices that have been added and accepted
-
Invoice highlighted in blue - the invoice that is currently being viewed on the right side of the screen will appear blue in the Invoice list
-
Invoice highlighted in green - the invoice is ready to be accepted (the invoice total matches the total of the invoice items and there are no discrepancies or unaccepted discrepancies)
-
Broken link icon - the invoice contains unmatched items
-
Clipboard icon - the invoice contains discrepancies that must be accepted or corrected before it can be matched
-
No color or icon - no items have been added to the invoice
Adding an Invoice
-
Click Purchasing and select Invoice Matching.
-
Click Add Invoice.
-
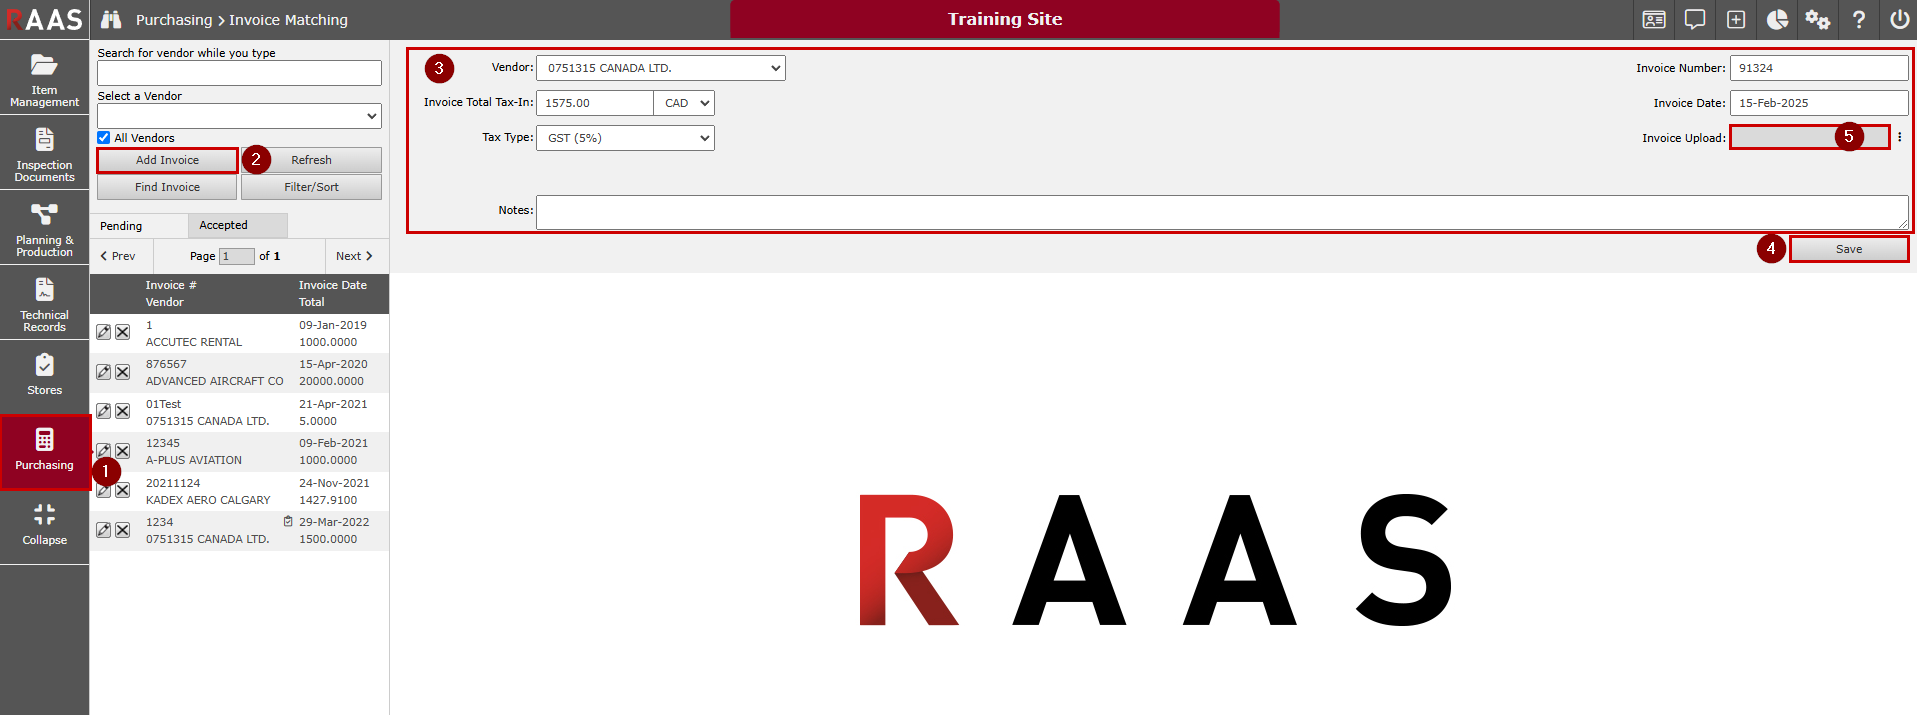
Add details to the Invoice header:
-
Vendor - if a Vendor was already selected in the left-hand pane, it will be pre-populated in the Vendor dropdown. If not, select a Vendor.
-
Invoice Number
-
Invoice Total Tax-In - this is the invoice total including taxes
-
Currency - this will default to the currency set for the vendor on their Vendor Information page, but can be changed if necessary. The currency selected will apply to each invoice item and can only be changed from the invoice header as all items on an invoice must have the same currency.
-
Invoice Date
-
Tax Type - this will default to the currency set for the vendor on their Vendor Information page, but can be changed. The tax type selected will be the default tax type applied to each item on the invoice, however, tax types can be changed for each invoice item as required.
-
Notes (if required)
-
-
Click Save.
-
Once the Invoice header has been saved, a copy of the invoice can be added in the Invoice Upload section.
Once saved, the invoice will appear on the Pending tab and items can now be added to the invoice. A Total will also appear beside the invoice total. This total is the value of all items that have been added to the invoice, including taxes. It will be black if the total matches the Invoice Total and red if the total does not match the Invoice Total.
Adding Items to an Invoice
Invoice Items can be added to an Invoice from an order, or manually. Selecting items from an Order will automatically populate the invoice details to match the order details, rather than manually inputting them to later be matched to a receipt. Adjustments can also be added to an invoice, which do not require a match.
Adding Invoice Items from an Order
-
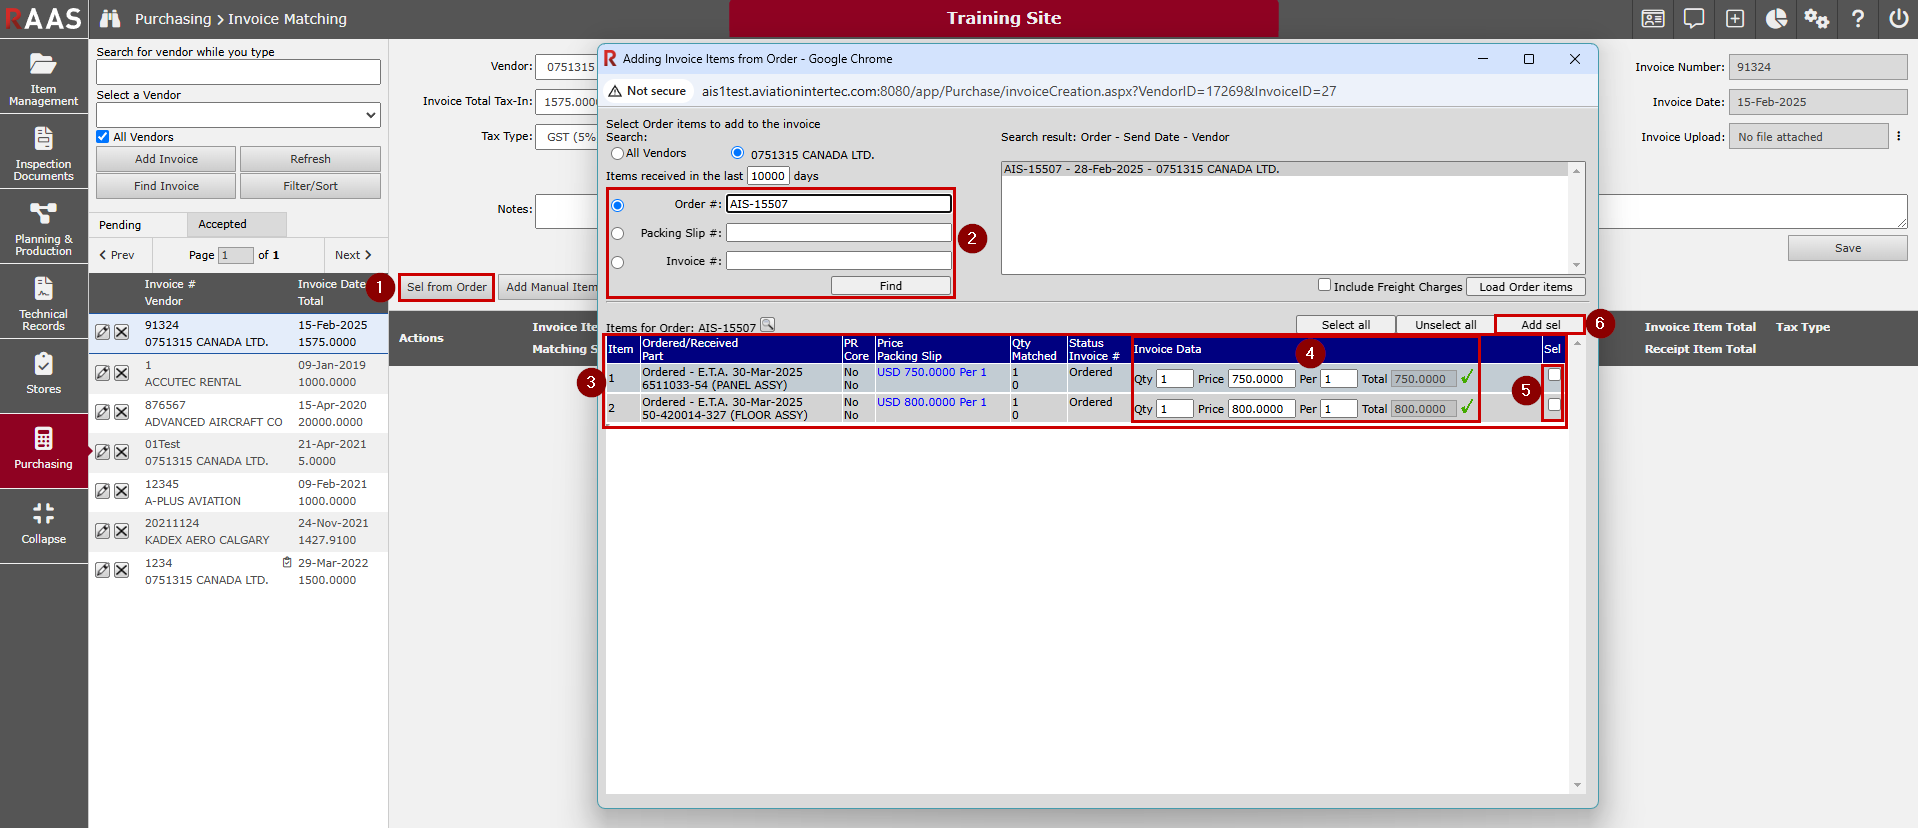
Click Sel from Order.
-
Search for the order items by Order #, Packing Slip #, or Invoice # and click Find.
Note: The Packing Slip # and Invoice # are details that can be entered while receiving items on orders. A Packing Slip # is mandatory while an Invoice # is optional. If Freight was included on the invoice, you can click the "Include Freight Charges" checkbox, but Freight is often invoiced separately by the carrier. -
All items that match the search criteria will be listed in the lower section of the window.
-
The Invoice Data section of each item will be populated with the details from the RAAS order and can be manually changed, if necessary. A green checkmark indicates that the invoice price matches the order price and if the price is changed, a red X will indicate that the invoice price does not match the order price.
-
Review the items and click the Sel checkbox to select the items to be added to the invoice.
-
Once all desired items have been selected, click Add sel to add the items to the invoice.
Additional items can be added using different search criteria, if necessary.
Adding Invoice Items Manually
-
Click Add Manual Item.
-
Ensure Invoice Item is selected from the dropdown.
-
Enter the following invoice details:
-
Item Description
-
Qty
-
Unit Price
-
Per
-
Units of Order
-
Tax
Note: The Invoice Price Total is calculated from the Qty, Unit Price and Per values and cannot be edited manually. The Currency is inherited from the invoice header.
-
-
Click Save.
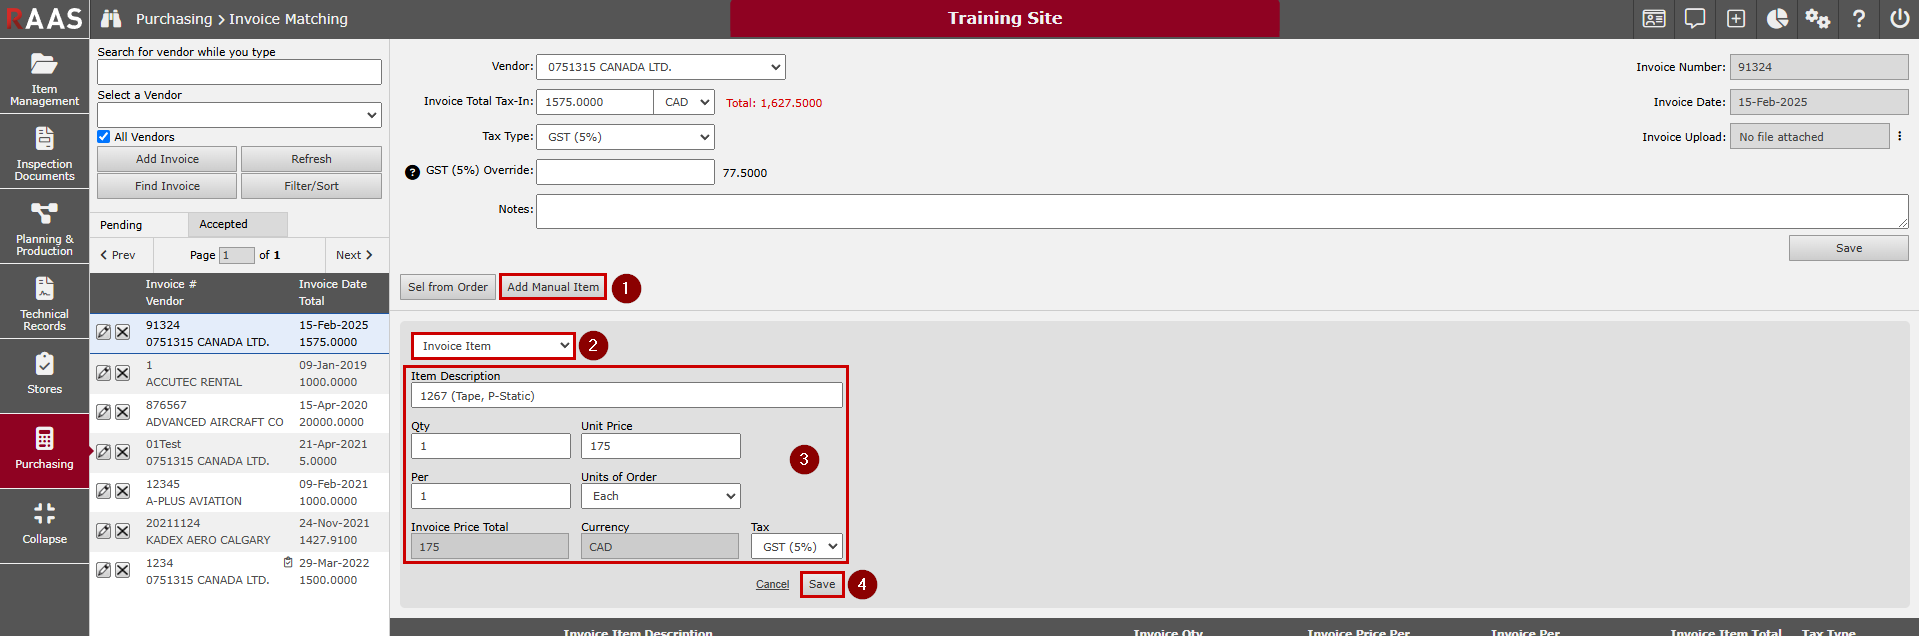
After saving the manual invoice item, it will be in Unmatched status.
Adding Adjustments to Invoice
-
Click Add Manual Item.
-
Select Adjustment from the dropdown.
-
Enter an Item Description, Invoice Price Total, and select a Tax type.
-
Click Save.
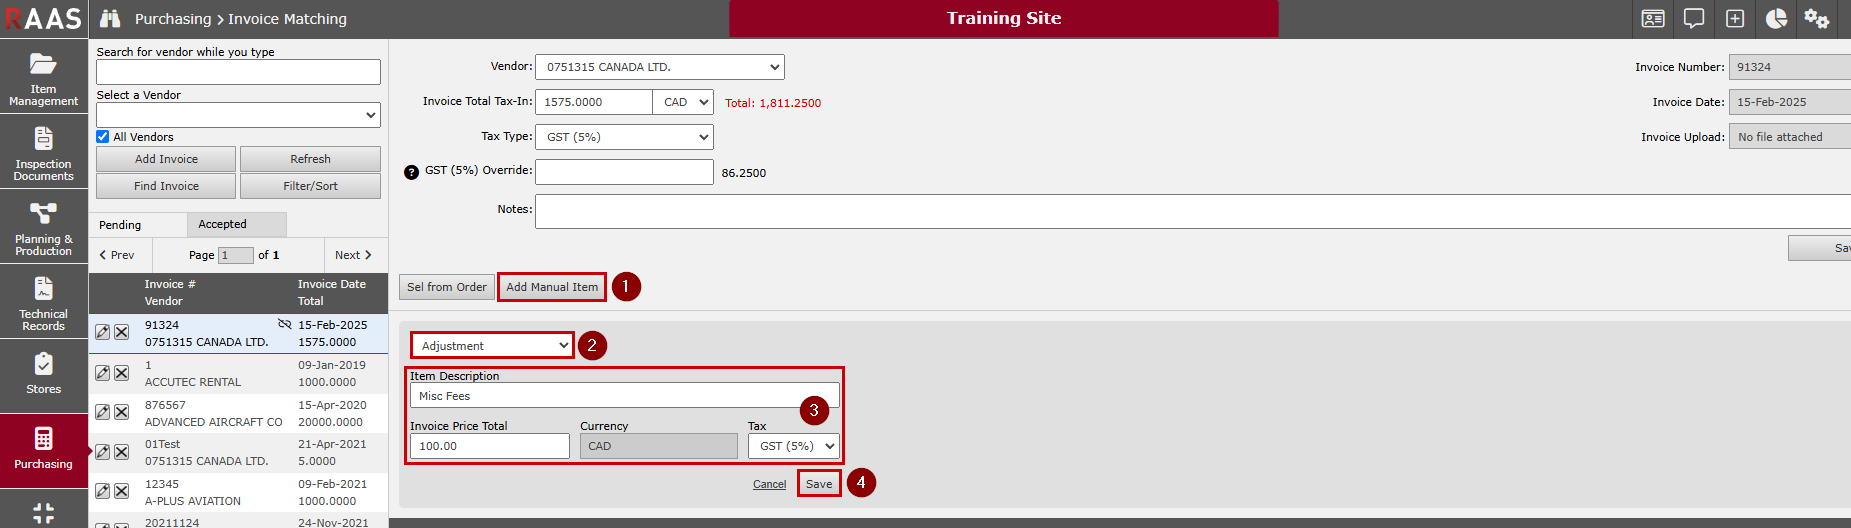
After saving, Adjustments will appear as an Invoice Item, but will not require a match from a RAAS order receipt.
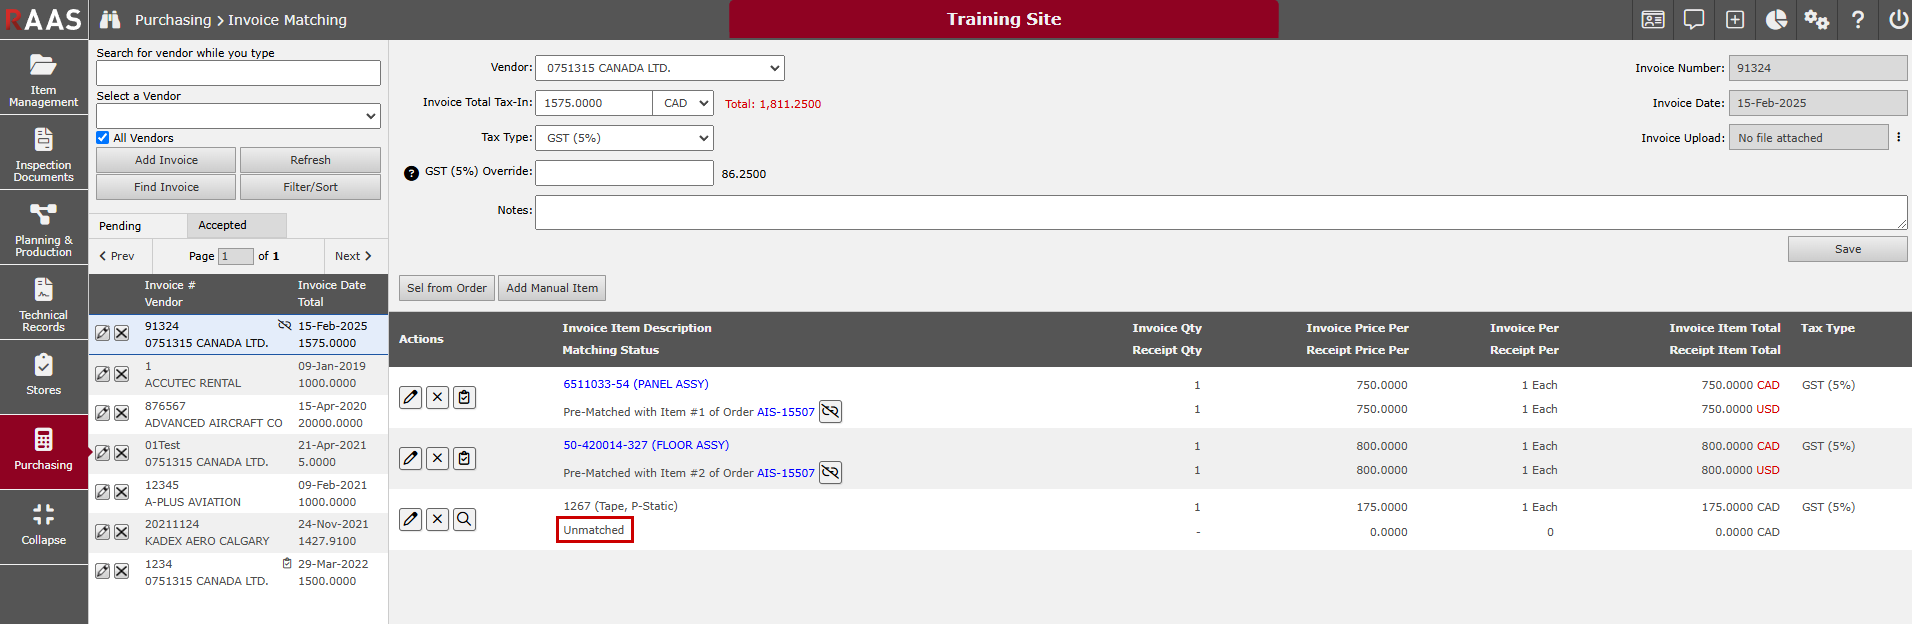
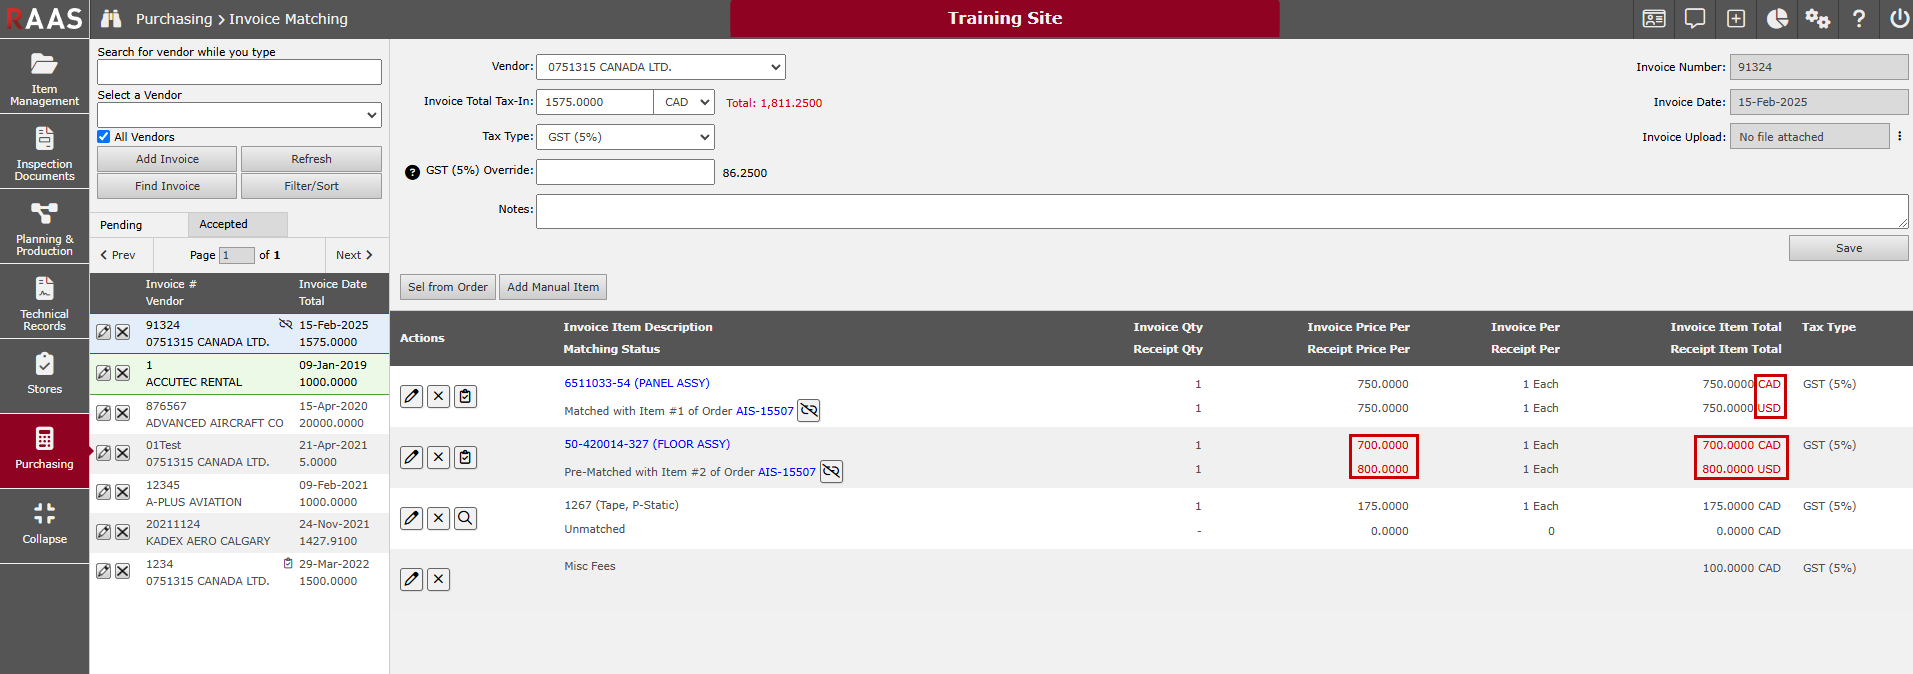
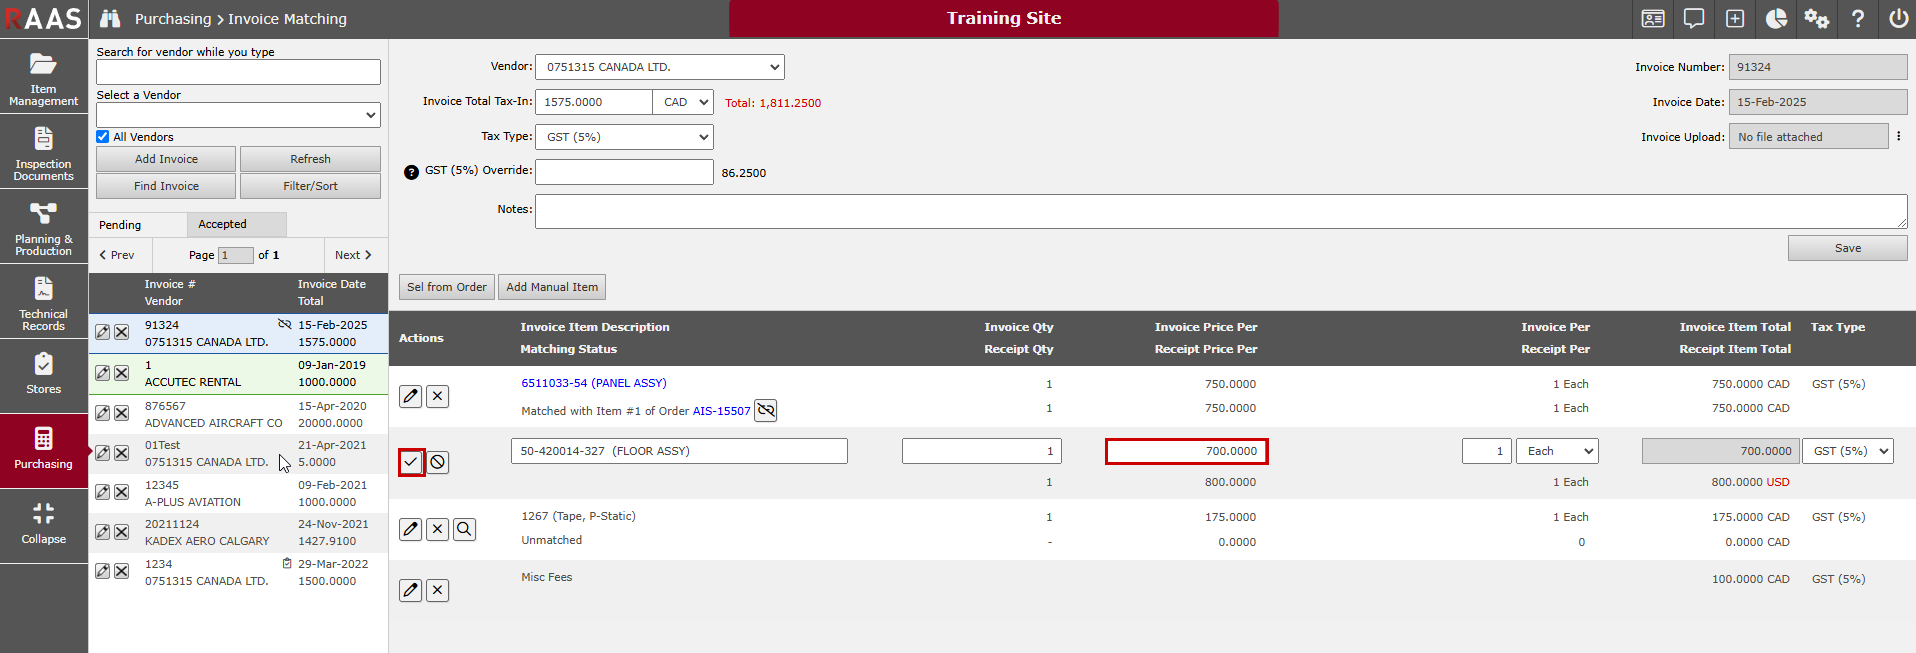
Discrepancies
When there are discrepancies between the details of an Invoice Item and a Receipt Item, the differences will be highlighted with red text and an Accept Discrepancies icon will be available. All discrepancies should be reviewed carefully to ensure no errors have been made.
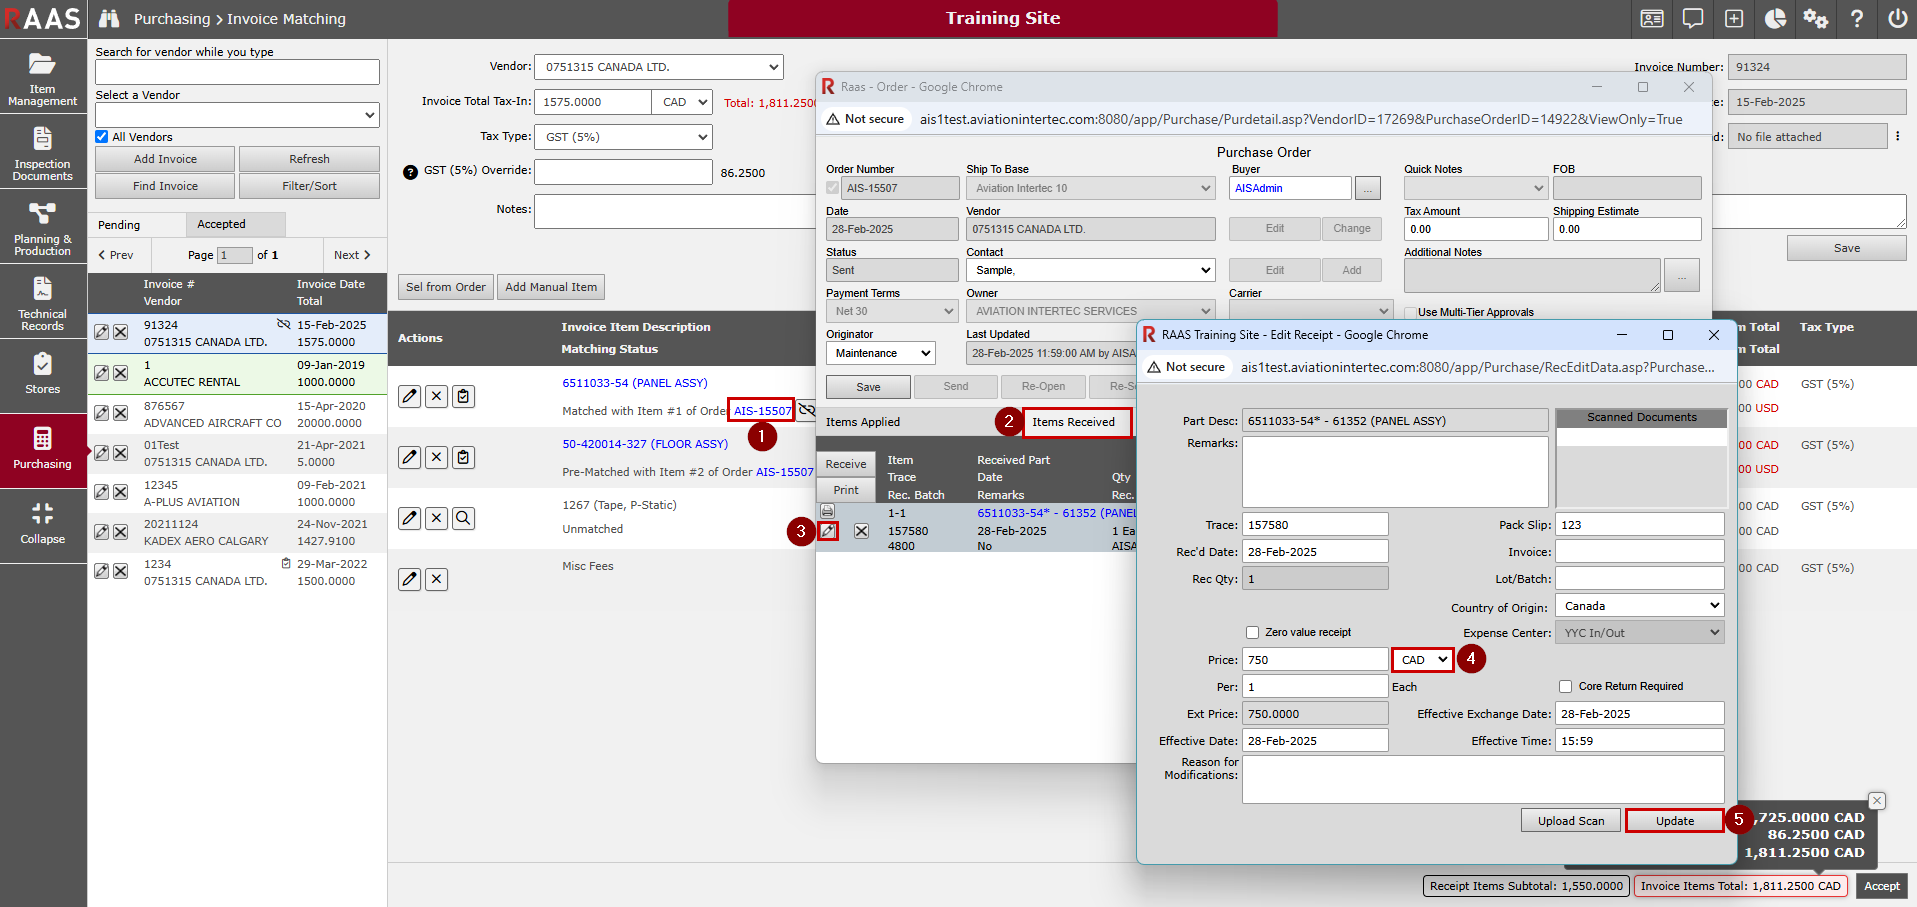
If a correction is required on an order receipt, the receipt can be corrected by clicking on the order link and editing the receipt.
If a correction is required to an invoice item, it can be done by clicking the Modify the Invoice Item icon and updating the details. Once the details are edited, click Save (checkmark button).
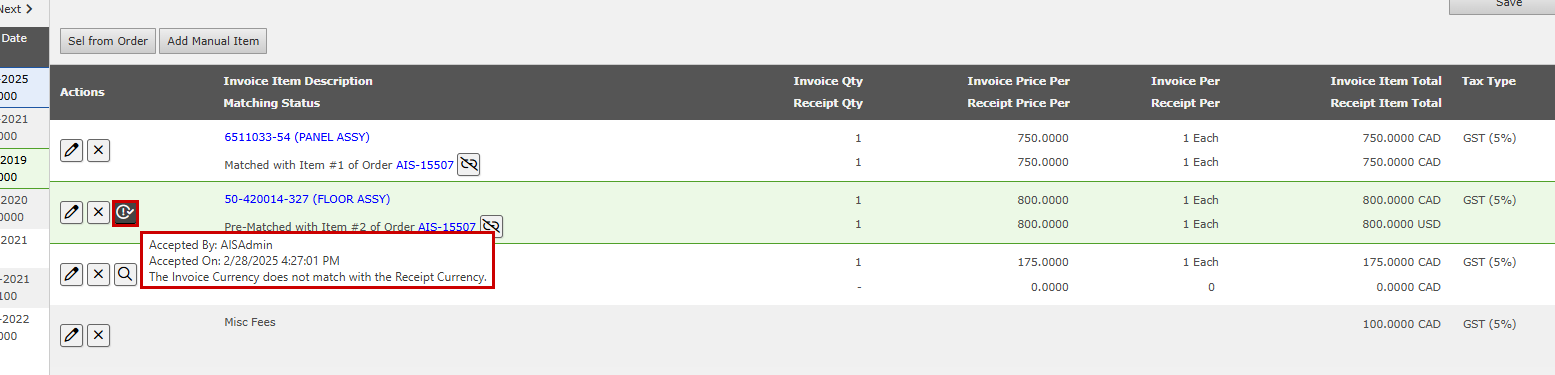
If discrepancies have been reviewed and the user wishes to accept the discrepancies rather than correct them, the Accept Discrepancies button can be clicked. A warning will come up listing all discrepancies for the user to accept. Once accepted, the invoice item will be highlighted in green and a new icon will appear which when hovered over, will show who accepted the discrepancy, when it was accepted, and what discrepancies were accepted.
Revoking Discrepancy Acceptance
After a discrepancy has been accepted, the Accept Discrepancies button is replaced with a new icon which can be clicked to revoke the acceptance.
Modifying Invoice Items
-
To modify the description or pricing details of an item already added to the invoice, click the edit icon to the left of the item. Make the necessary corrections and click Save.
-
To delete an item from the invoice, click the X icon to the left of the item.
-
If a manual item was added to an invoice that later can be matched to an item from an order, click the Match Item icon (magnifying glass) beside the item to search for the item to match.

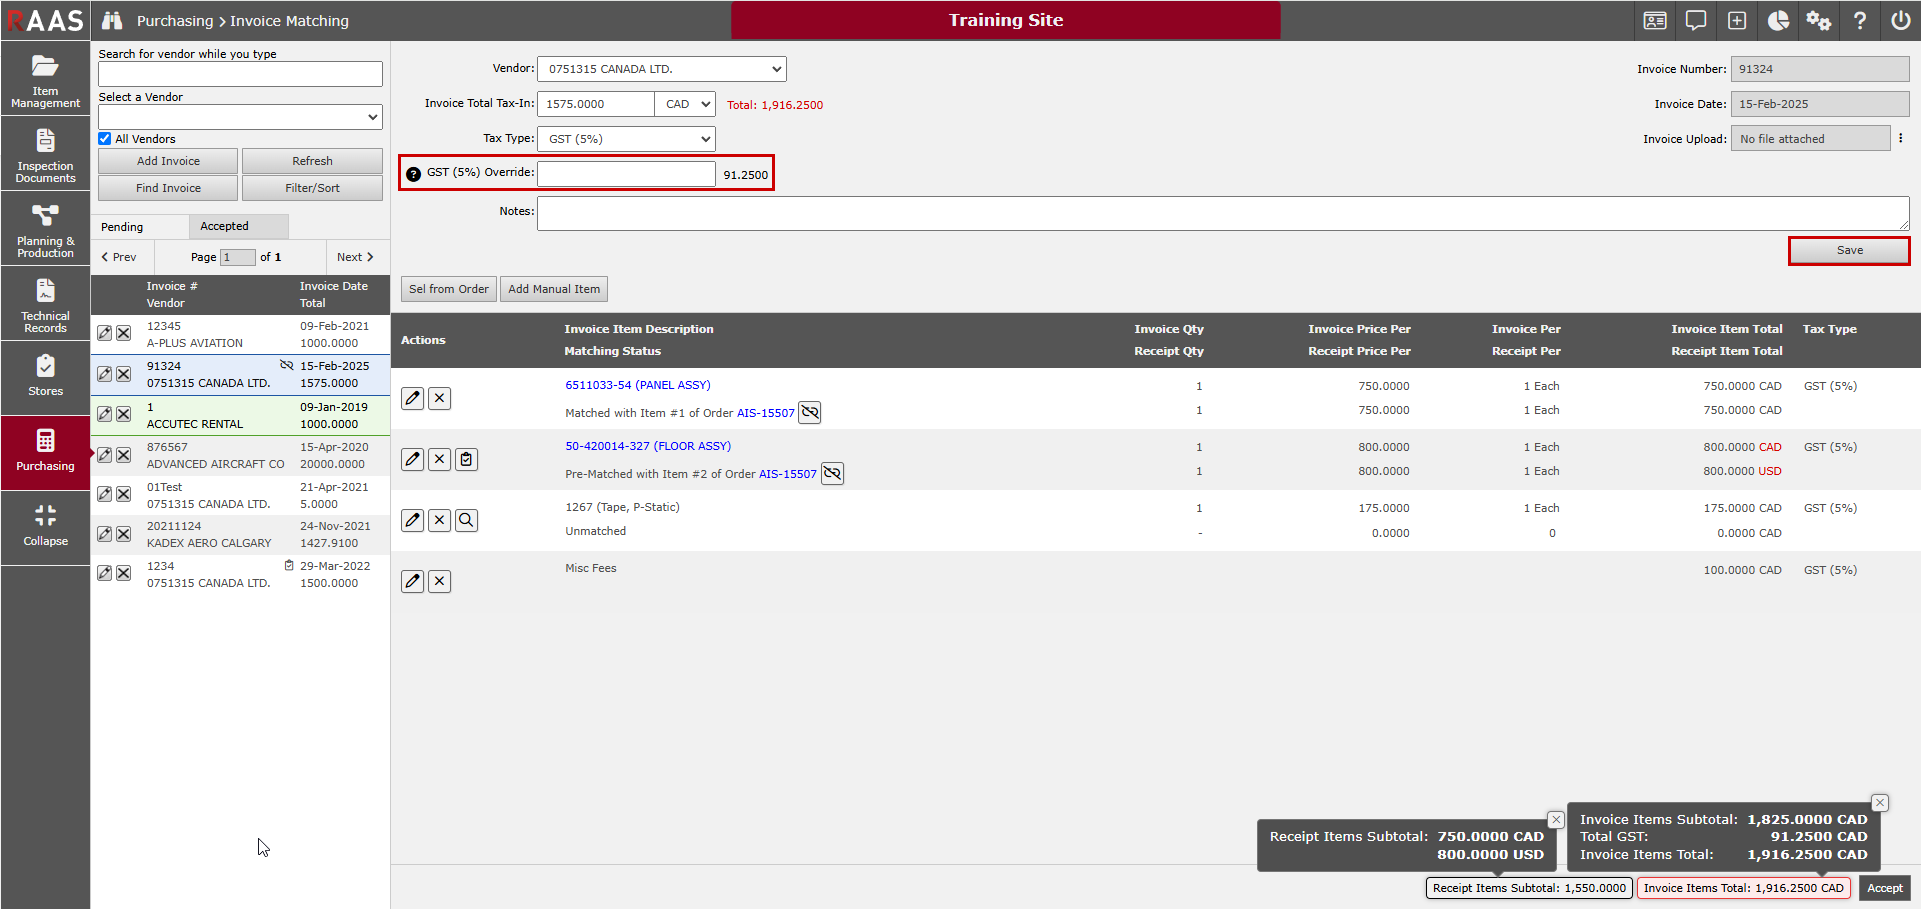
Receipt Items Subtotal and Invoice Items Total
After at least one item has been added to an invoice, a Receipt Items Subtotal and Invoice Items Total button will appear at the bottom of the screen.
The Receipt Items Subtotal will display the total of all receipt items on the invoice. Clicking on the button will show an expanded view that includes the receipt currencies. Note that if there is more than one receipt currency, the total will not include conversion rates.
The Invoice Items Total will display the total of all Invoice Items including taxes. Clicking on the button will show an expanded view that includes the Invoice Items Subtotal and a total for each Tax Type on the invoice. The Invoice Items Total value will match the total seen to the right of the Invoice Total Tax-In in the invoice header. The button will be green if the total matches the Invoice Total Tax-In and red if the total is different.

Tax Override
Once tax type has been applied to an invoice item, a Tax Override field will appear in the invoice header. Entering a tax override value will override the total tax amount that has been calculated for that tax type to accommodate rounding differences. After saving the override value, the total for that tax type will be updated in the Invoice Items Total section at the bottom of the page. Once an override value is entered, the tax total will not be updated by adding or removing additional items with the same tax type, so an override value should only be entered once all invoice items have been added.
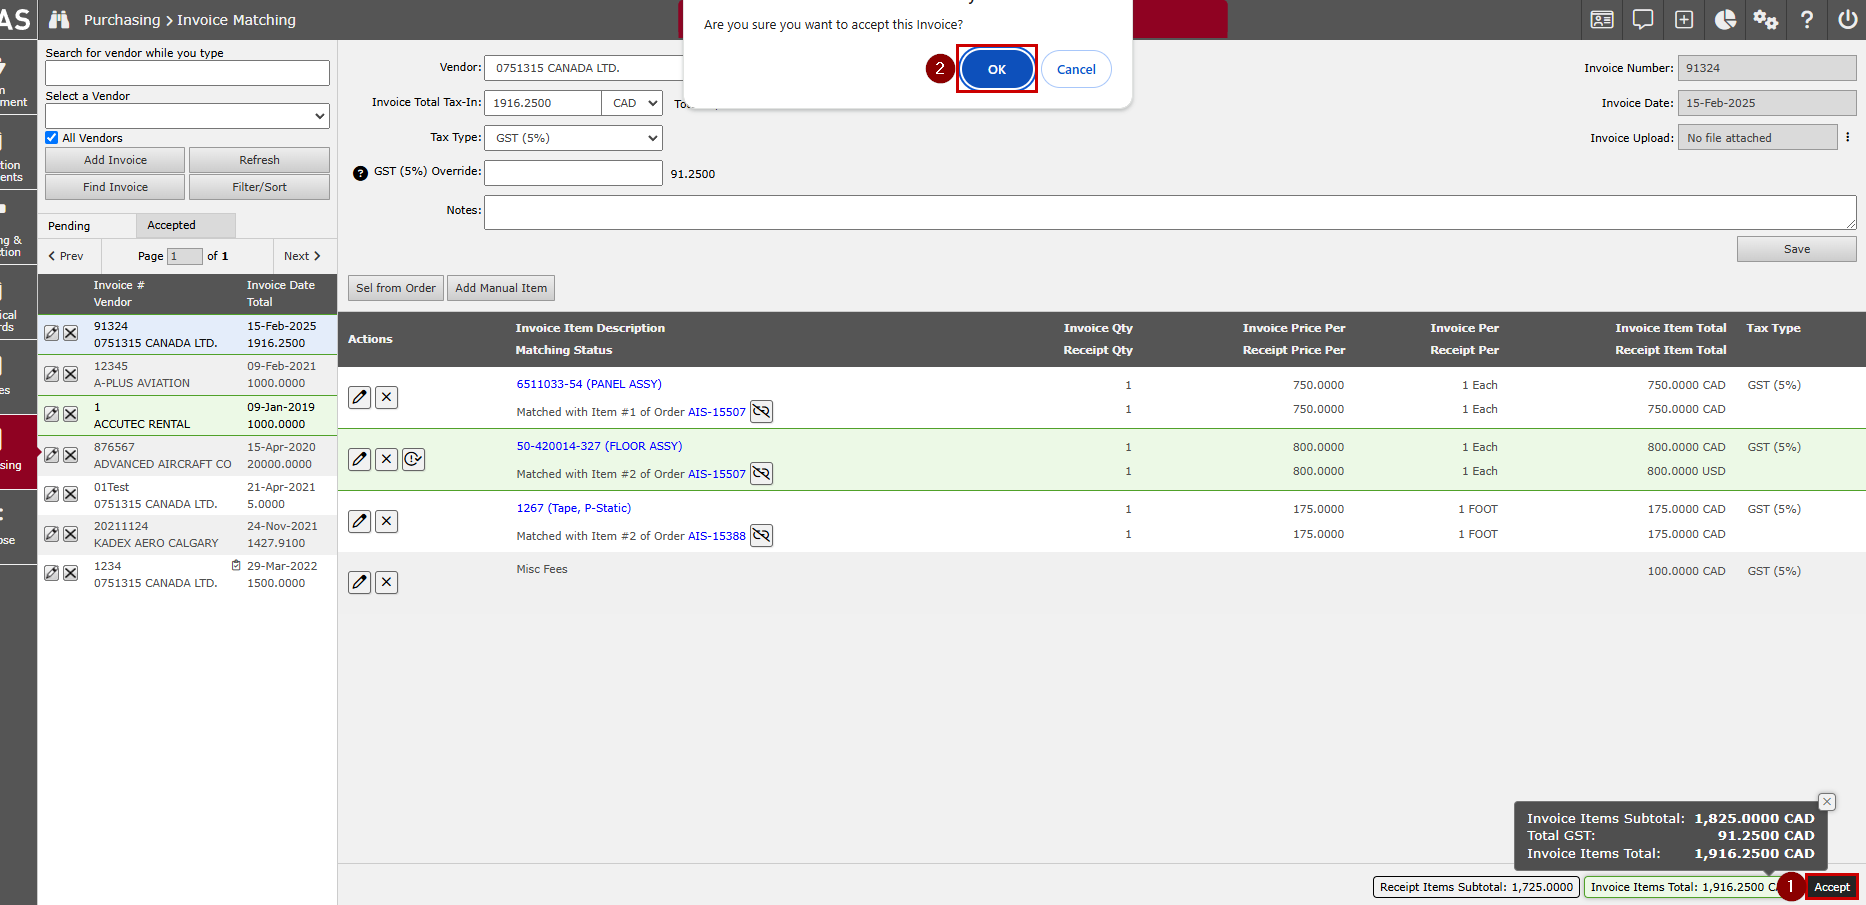
Accepting an Invoice
Before an invoice can be accepted, all discrepancies must be accepted, all item must be received (not in pre-matched status) and the Invoice Items Total must match the Invoice Total Tax-In. Once the invoice is ready to be accepted, click Accept at the bottom right. If the invoice cannot be accepted, a message will come up indicating why. If the invoice can be accepted, it will be moved to the Accepted tab.
Once accepted, the invoice will be moved to the Accepted tab and items can no longer be added, edited, or removed from the invoice. The Invoice field on the order receipt will be back-populated with the invoice number from the invoice it was matched to.
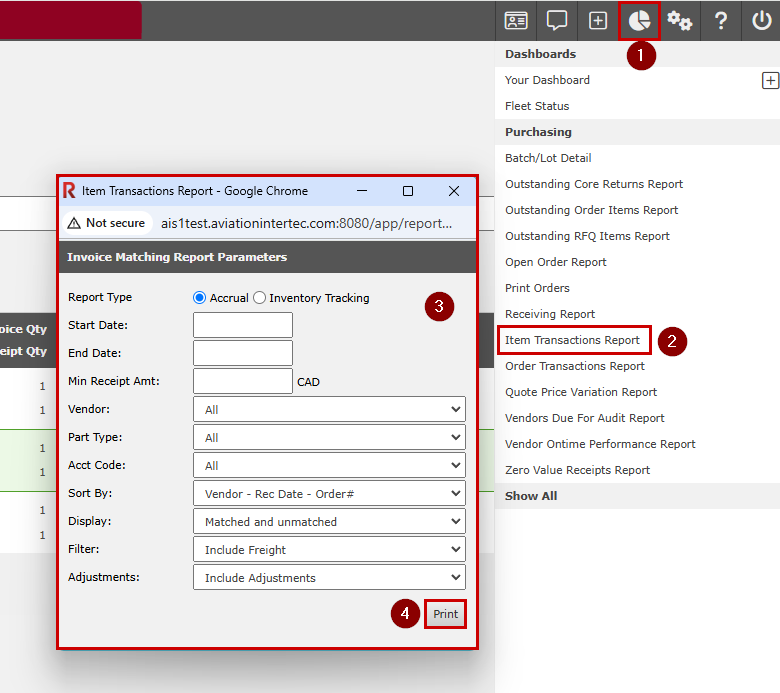
Invoice Matching Reports
-
Click on the Reports and Dashboards menu.
-
Select Item Transactions Report.
-
The Invoice Matching Report Parameters allow users to filter the report using various criteria. The Display selection can be changed to view only items that have been matched, unmatched or both.
-
Click Print to view the report.
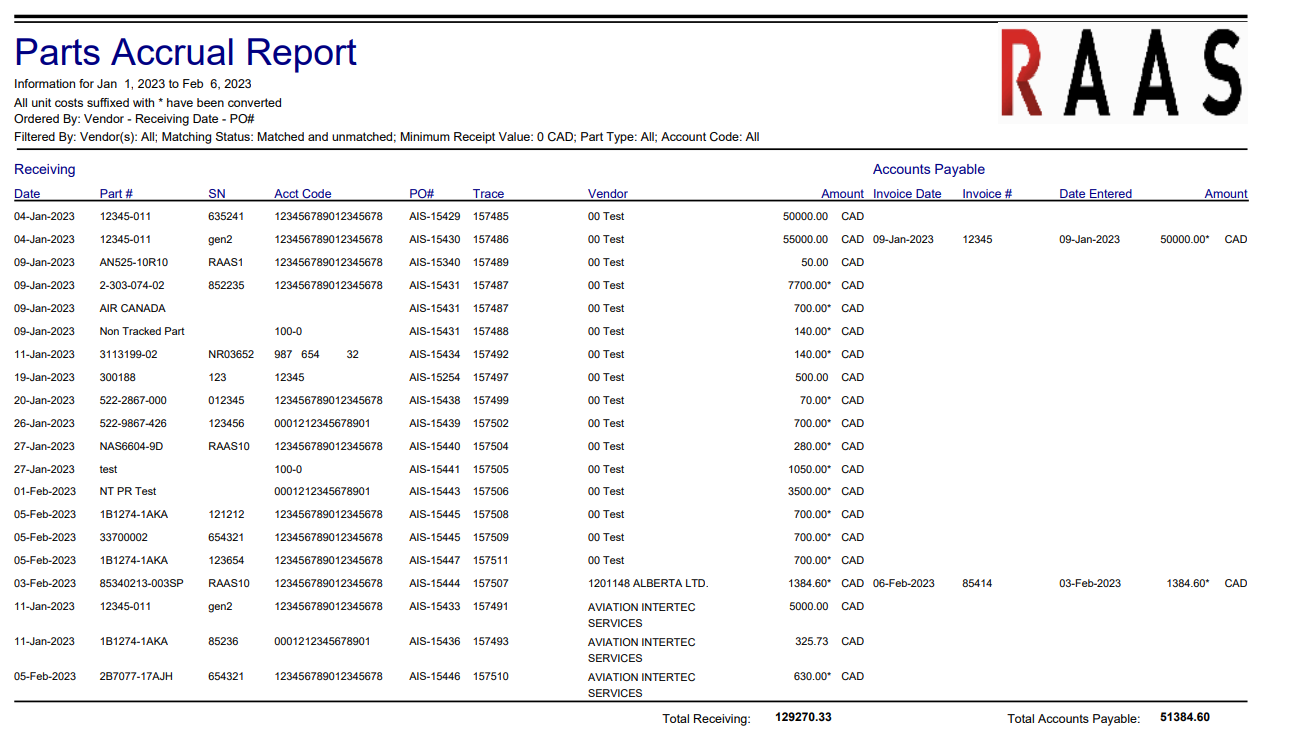
Parts Accrual Report
The Parts Accrual Report contains a Receiving section that lists all received items matching the specified report parameters. The Accounts Payable section of the report shows the details of the invoice that the items have been matched to.
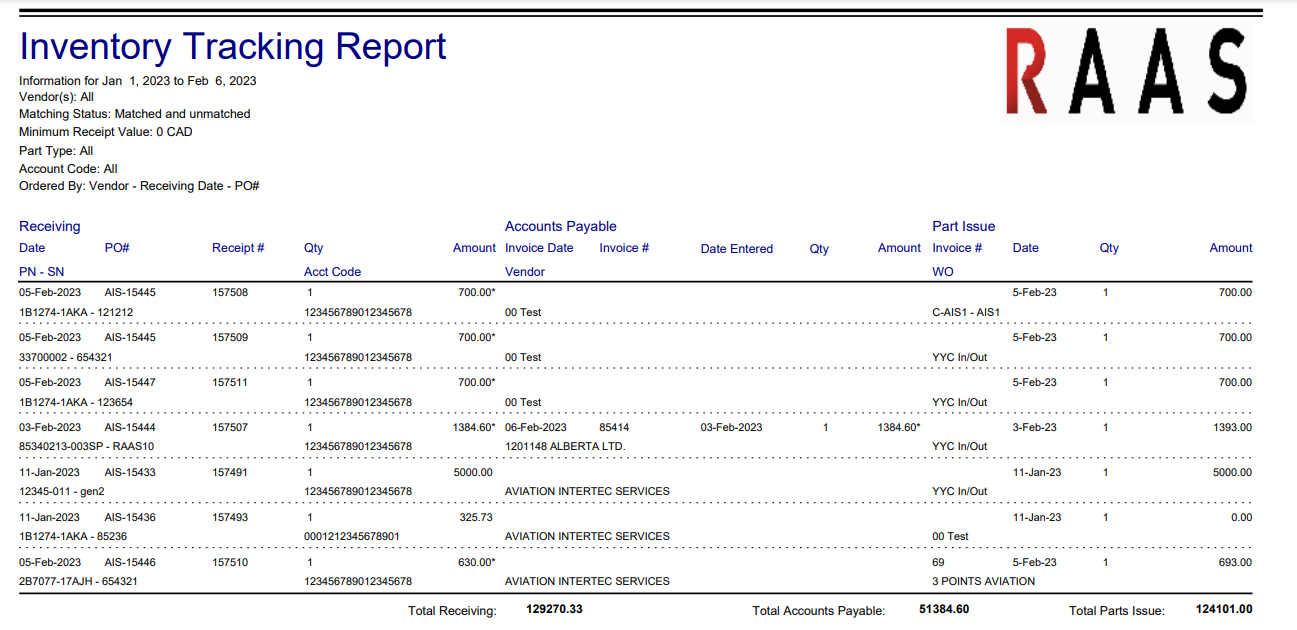
Inventory Tracking Report
The Inventory Tracking Report includes all of the information from the Parts Accrual Report as well a Part Issue section that shows the Expense Center Transaction details from the item receipt. The Expense Center (WO) shown will be the Charge Price to (EC) that was selected on the order. The Invoice # will be populated only if the transaction has been invoiced in RAAS through Expense Center Transactions. Note that the Part Issue section will not be populated if the order transactions have not yet been imported.