
The Maintenance Forecast sub-module is used to generate a forecast of all upcoming maintenance requirements within a given forecast period. Maintenance requirements are determined based on the configured Next Due value on the serial number details of a part which is tracking a constraint within RAAS. By using a variety of filter criteria and specifying the forecast period, a user is able to generate a listing of all required maintenance tasks coming due within the specified period. Once the forecast has been generated, a user is able to raise NEW Job Cards by issuing from the forecast results (see Create Job Cards - Maintenance Forecast).
RAAS understands that there may be many different departments that are involved in the planning process (technical records staff, planning staff) who all may be responsible for discrete functions. To support this, RAAS breaks the forecasting and planning process into stages which allows for a flexible process that supports all stakeholders involved.
Navigation Option 1 - Maintenance Forecast
-
Select Maintenance Forecast from the Planning and Production module.
-
Generate a forecast.
-
In the bottom right corner of the page click the Print button.
-
Select one of the two checkboxes labelled Maintenance Forecast Details/Summary, then select Print.
Generate a Maintenance Forecast Listing (Basic Filters)
To generate a maintenance forecast, a user will need to specify the header of the part they wish to forecast against (an aircraft), specify a utilization rate and forecast period, and configure filters as needed. This process is described below.
-
Click on Planning & Production and select Maintenance Forecast.
-
Select a Search Type, enter the Search Criteria, and click the Find button. Select the desired Serial Number from the drop-down list.
-
Note: Maintenance forecasts cannot be generated for items in the Dead location.
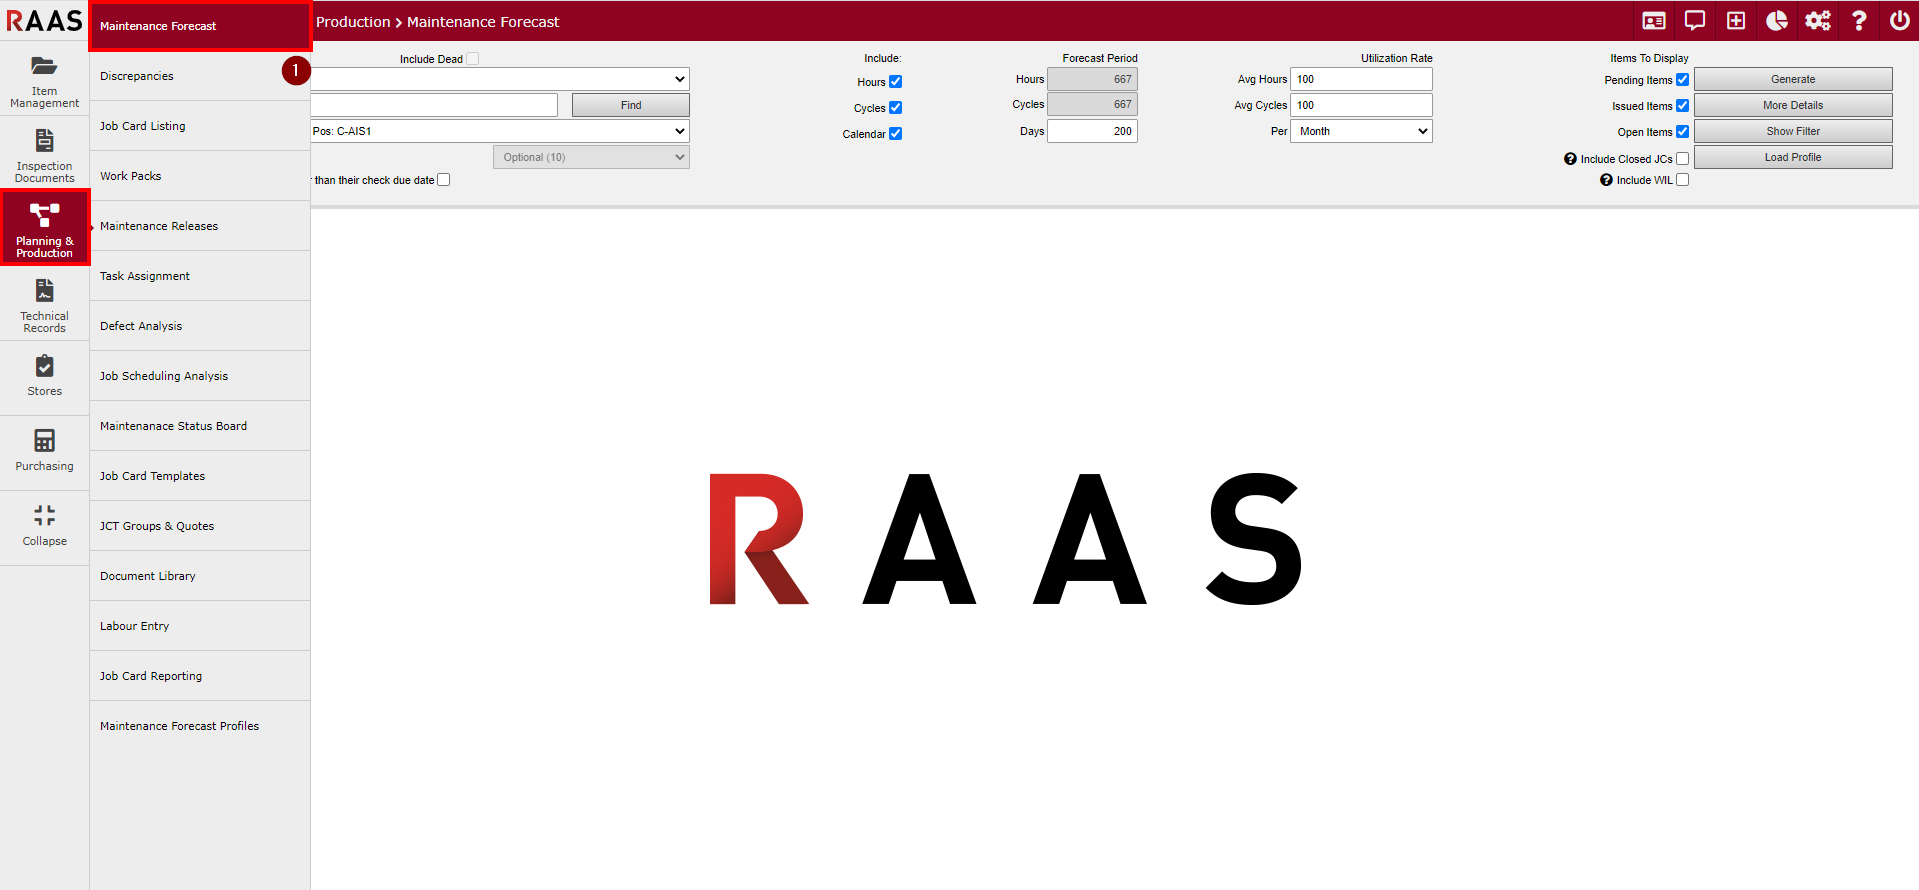
Figure 1: Maintenance Forecast Listing Navigation
-
-
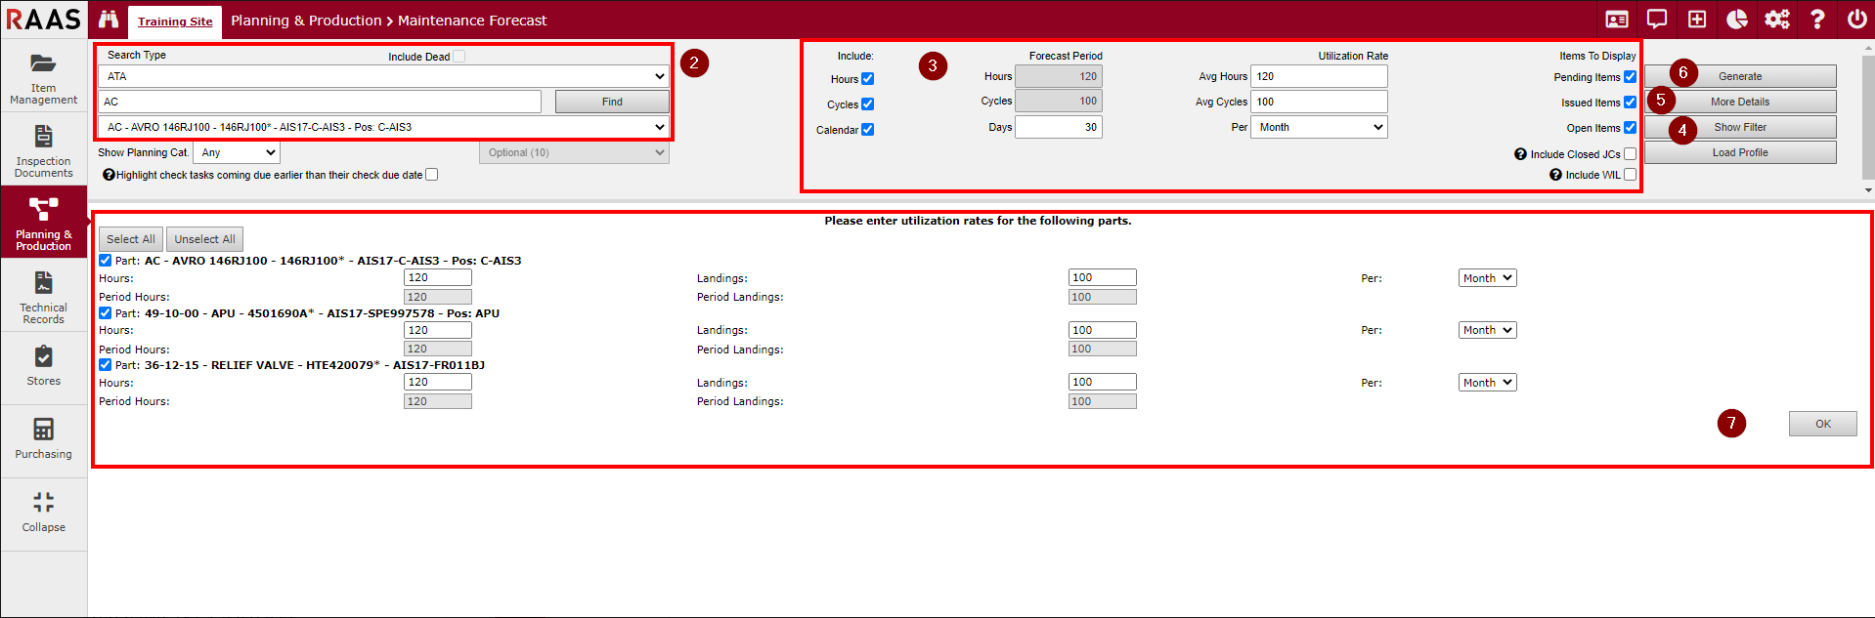
Configure the appropriate filter criteria as required within the Maintenance Forecast header.
-
Show Planning Cat. - This is used to filter forecast results based on the Planning Category as configured on the Part Number details;
-
Include Hours/Cycles/Calendar - This is used to include/exclude constraints based on Hours/Cycles/Calendar limitations respectively;
-
Forecast Period and Utilization Rate - Combined, these filters will determine the scope of the maintenance forecast generated. By entering in an average utilization of hours/cycles per unit of time, and specifying the number of days to forecast within the Forecast Period, RAAS will calculate the required hours/landings to be used in the forecast scope;
-
Note: RAAS will use the utilization rate to determine the Estimated Due of a line item. This calculation takes the remaining value of the constraint, divides by the utilization rate (to determine the number of theoretical days until the line item would be due) then adds this value to the Last Updated Date of the constraint.
-
-
Items to Display Filters
-
Pending Items - Those items where the underlying constraint has not yet been issued to a Job Card;
-
Issued Items - Those items where the underlying constraint has been Issued to a Job Card (on a New Job Card);
-
Open Items - Those items where the underlying constraint has been Issued to a Job Card (on an Open Job Card);
-
Include Closed JCs - Those items which have been issued to a Job Card and the Job Card has since been closed, however the Serial Number constraint remains Issued or Open (not Pending or Suspended);
-
Include WIL - Those items which have been configured as Whichever Is Later however the latest limit of the configured constraint is not due within the forecast period;
-
Note: Those items in which the latest limit of the configured constraint is due within the forecast period cannot be suppressed using this filter;
-
-
-
-
Click Show Filter for additional filter settings.
-
Item Class - Configure the specific Item Class you wish to forecast against (no selection will use all Item Classes);
-
Item Type - Configure the specific Item Type you wish to forecast against (no selection will use all Item Types);
-
Trade Requirements - Configure the specific Trade Requirements you wish to forecast against;
-
Note: This is based on the configured trades entered on a Job Card Template. Should all Trade Requirements be selected within this filter, only JCTs which have Trade Requirements will be displayed. You will need to unselect all if you wish to see the full forecast listing regardless of Trade Requirements.
-
-
-
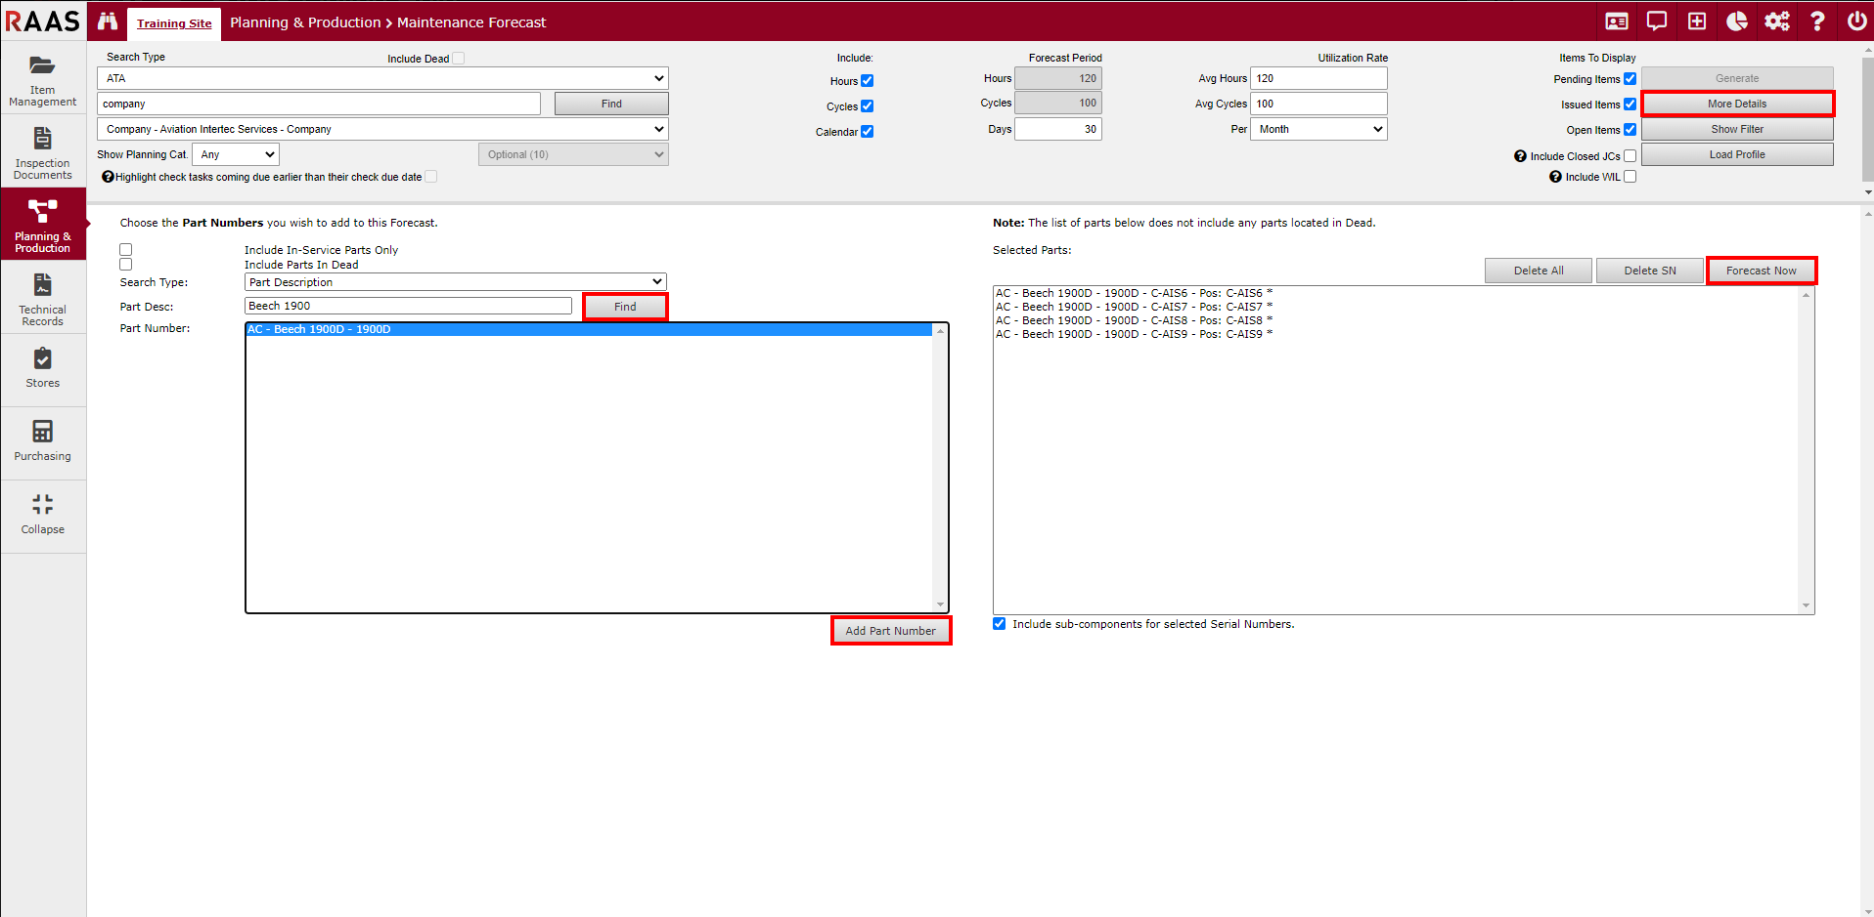
Continue to step 6 or click More Details (see Figure 2) to further refine the specific items you wish to forecast against. The More Details window will allow for the user to specify a more specific listing of components within the given Serial Number (as specified in Step 2). This can be useful for forecasting requirements against specific Part Numbers or Part Descriptions. Also, the More Details filter is used to run a Fleet Forecast for items of interest. By using a Serial Number of a Base or the Company itself (as specified in Step 2), you can forecast against specific Part Numbers within that particular Base or Company.
-
Select a search type, enter the search criteria and click Find.
-
To add all Serial Numbers for a given Part Number to your forecast select a part number and click Add Part Number or double-click a part number.
-
Continue to add part numbers until the Selected Parts list contains all desired parts.
-
To remove a Serial Number from the Selected Parts list, select the Serial Number and click Delete SN or double-click a serial number.
-
Click Delete All to remove all Serial Numbers from the Selected Parts list.
-
By default, the Include sub-components for select Serial Numbers option is selected. This will result in all items installed on selected Serial Numbers with due values within the forecast period being included in the forecast results.
-
Click Forecast Now to generate the forecast.
-
-
Click Generate to generate the Maintenance Forecast.
-
If the Serial Number specified in Step 2 has Separate Time Tracking items (ie, Engines, APUs), RAAS will present the user an opportunity to specify a custom utilization rate for those assemblies. This will default to the utilization rate specified in Step 3c. Click OK once the utilization rates have been verified.
MPD Task Issuance Status
When generating a maintenance forecast, if the forecasted constraint is applicable to one or more MPD Tasks, a button will be presented on the Maintenance Forecast that allows a planner to review the issuance status of associated MPD tasks.
Based on the status of the MPD Tasks associated, the button will be colored in one of three ways:
-
Green Font
-
Green font identifies that all of the MPD Tasks associated with this constraint have been issued to one or more Job Cards.
-
Note: While all tasks may be issued, the forecasted constraint may not be.
-
-
-
Red Font
-
Red font identifies one of two scenarios:
-
The constraint has been issued and one or more tasks associated with this constraint have not been issued to any Job Card, or
-
The constraint has not been issued, but one or more tasks (not all) associated with this constraint have been issued to one or more Job Cards.
-
-
-
Black Font
-
Black font identifies that the constraint has not been issued, and no MPD Tasks associated with this constraint have been issued.
-
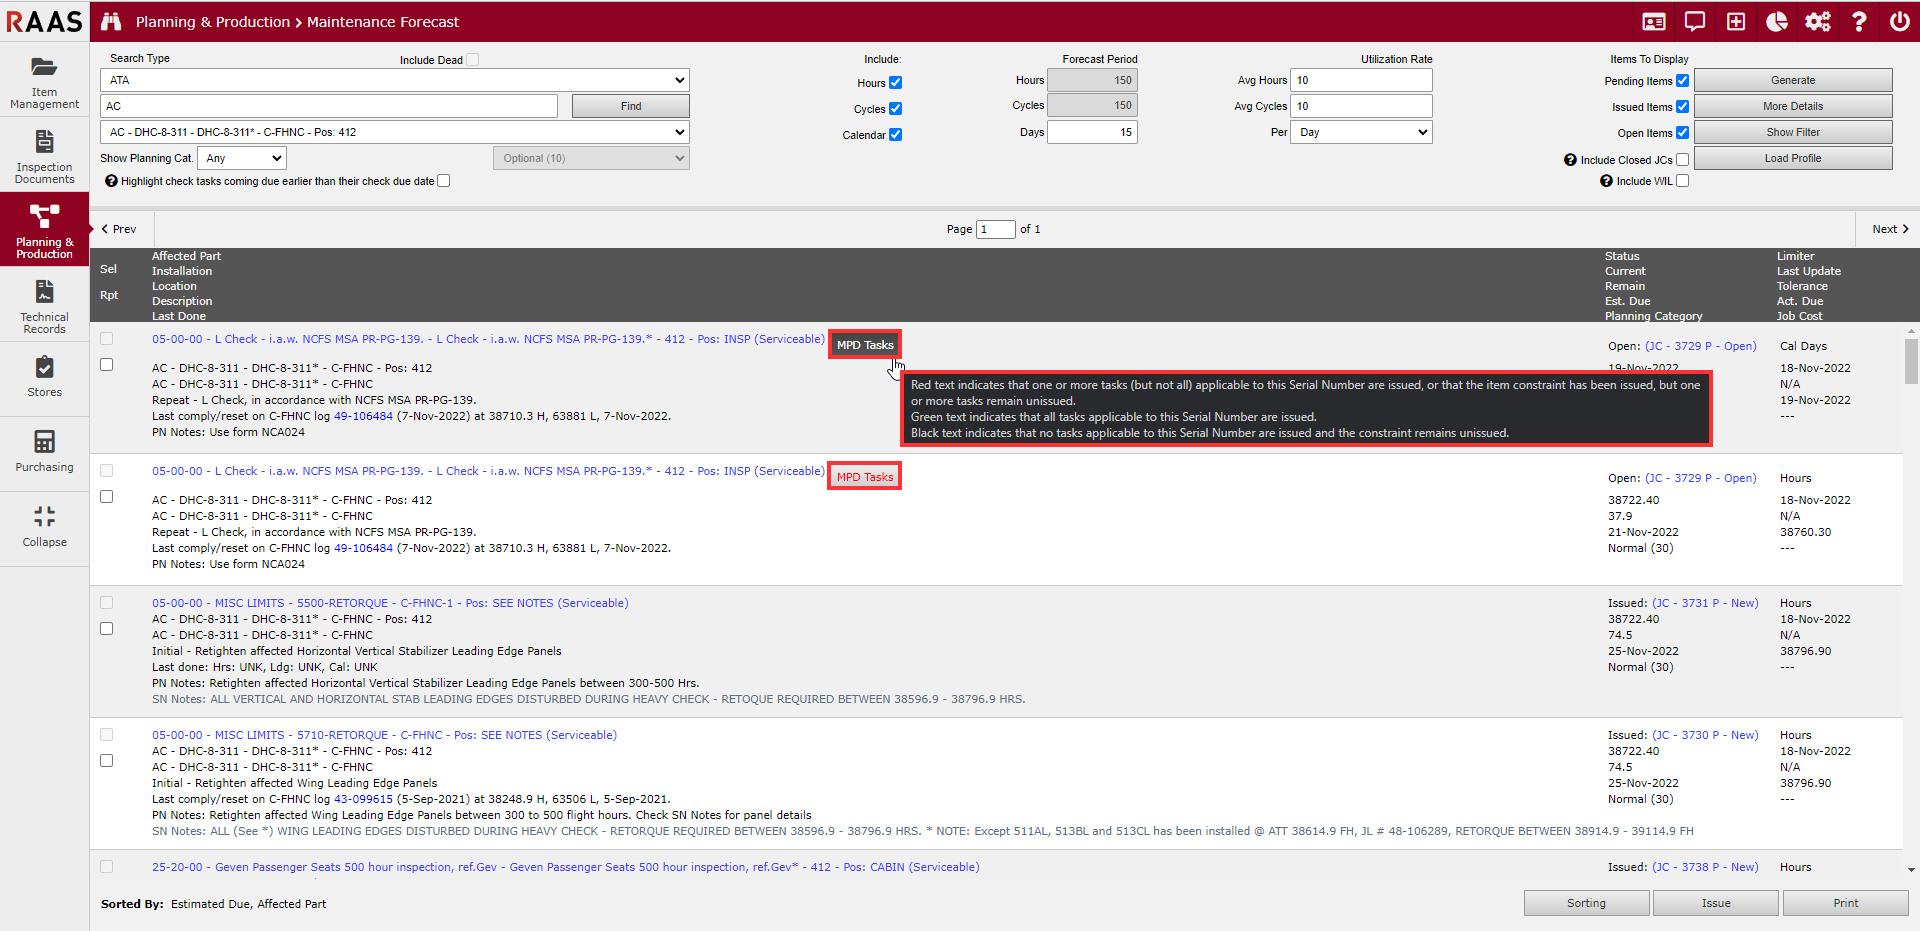
Figure 4: MPD Tasks Button