
Like Tracked items, Non-Tracked Items can also be added to orders by issuing them from the Purchasing Inbox or Request For Quotation sub-modules or by adding them directly to an order. This section shows the user how to add Non-Tracked items to an Open Purchase Order directly from the Orders sub-module.
Adding Non-Tracked Items to a Purchase Order
-
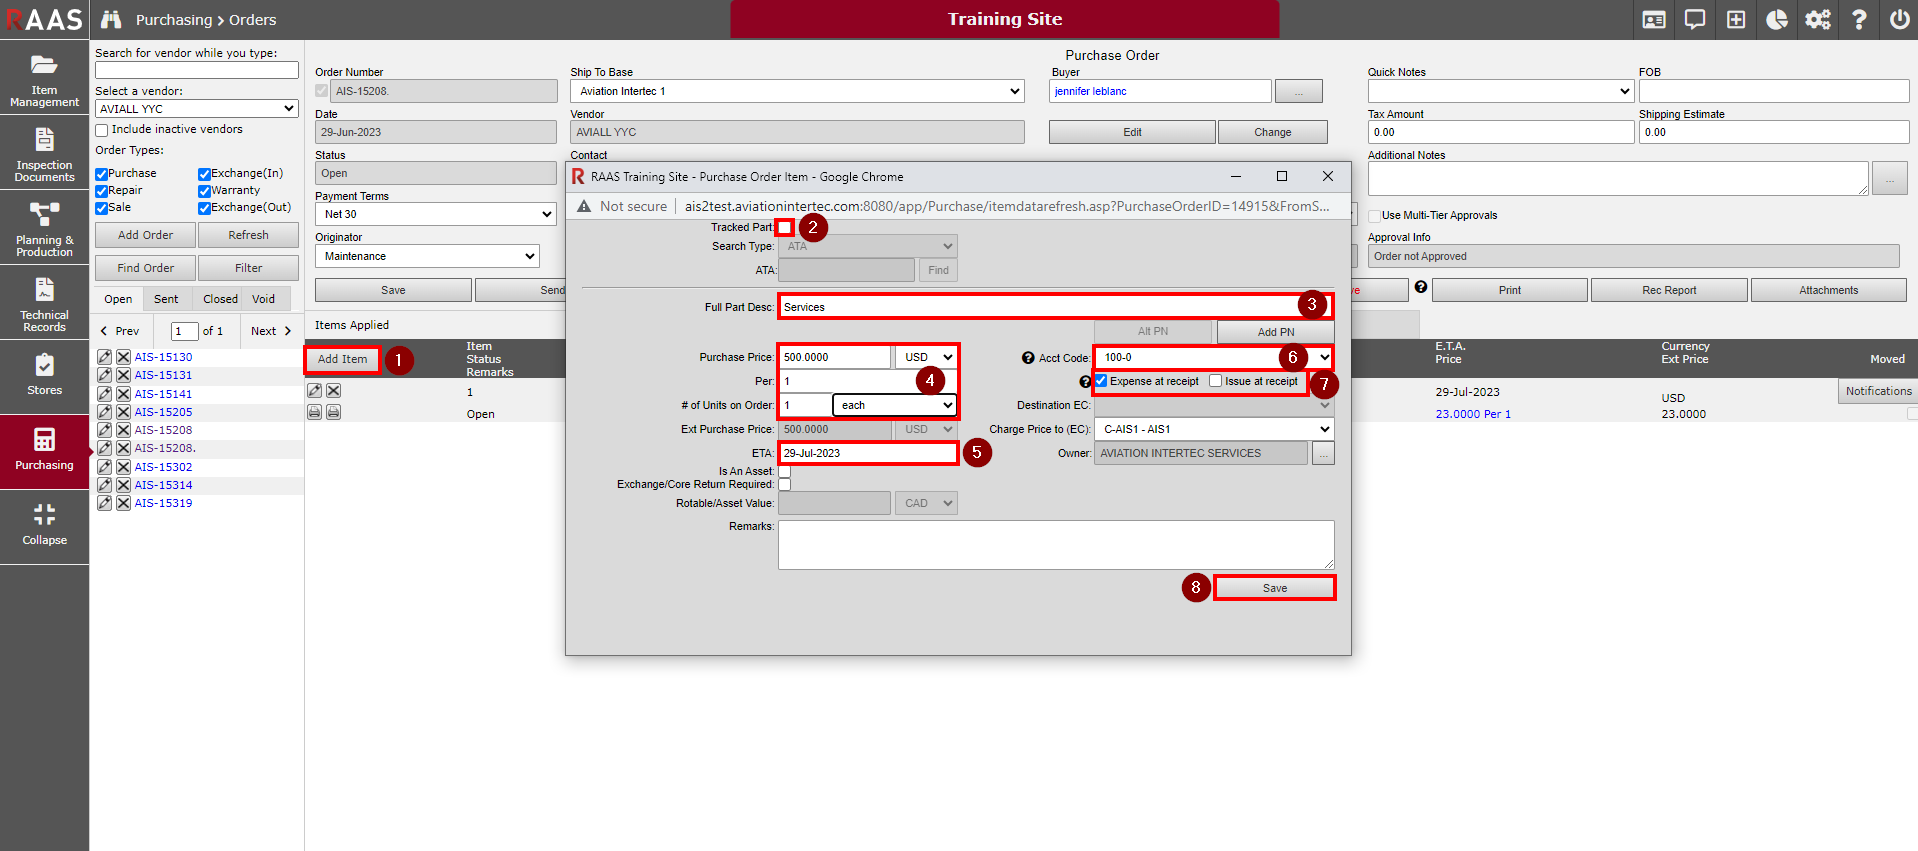
On the Items Applied tab, click the Add Item button to open the Purchase Order Item screen.
-
Deselect the Tracked Part checkbox.
-
Enter the description of the Non-Tracked item in the Full Part Desc field.
-
Enter the Purchase Price (if known) and units.
-
Confirm or edit the ETA.
-
Select an Account Code, if required.
-
Select either Expense at receipt or Issue at receipt.
-
Expense at receipt allows the selection of a non-inventory Charge Price to EC to expense the non-tracked item to. A Destination EC is not required for Non-Tracked items as they are not tracked in inventory.
-
Issue at receipt disables the Expense Center selections as they are not required. Upon receipt, job cards can be selected to issue the item to and the transaction(s) will be written to the Expense Center of the selected job card(s).
-
-
Click the Save button.
Receiving Non-Tracked PO Items
To receive a Non-Tracked item on an order, the order must have been sent and the status of the item you are receiving must not be closed on the Items Applied tab of the order.
Receiving Non-Tracked Items - Expensed at Receipt
Wizard Page 1 - PO Items
-
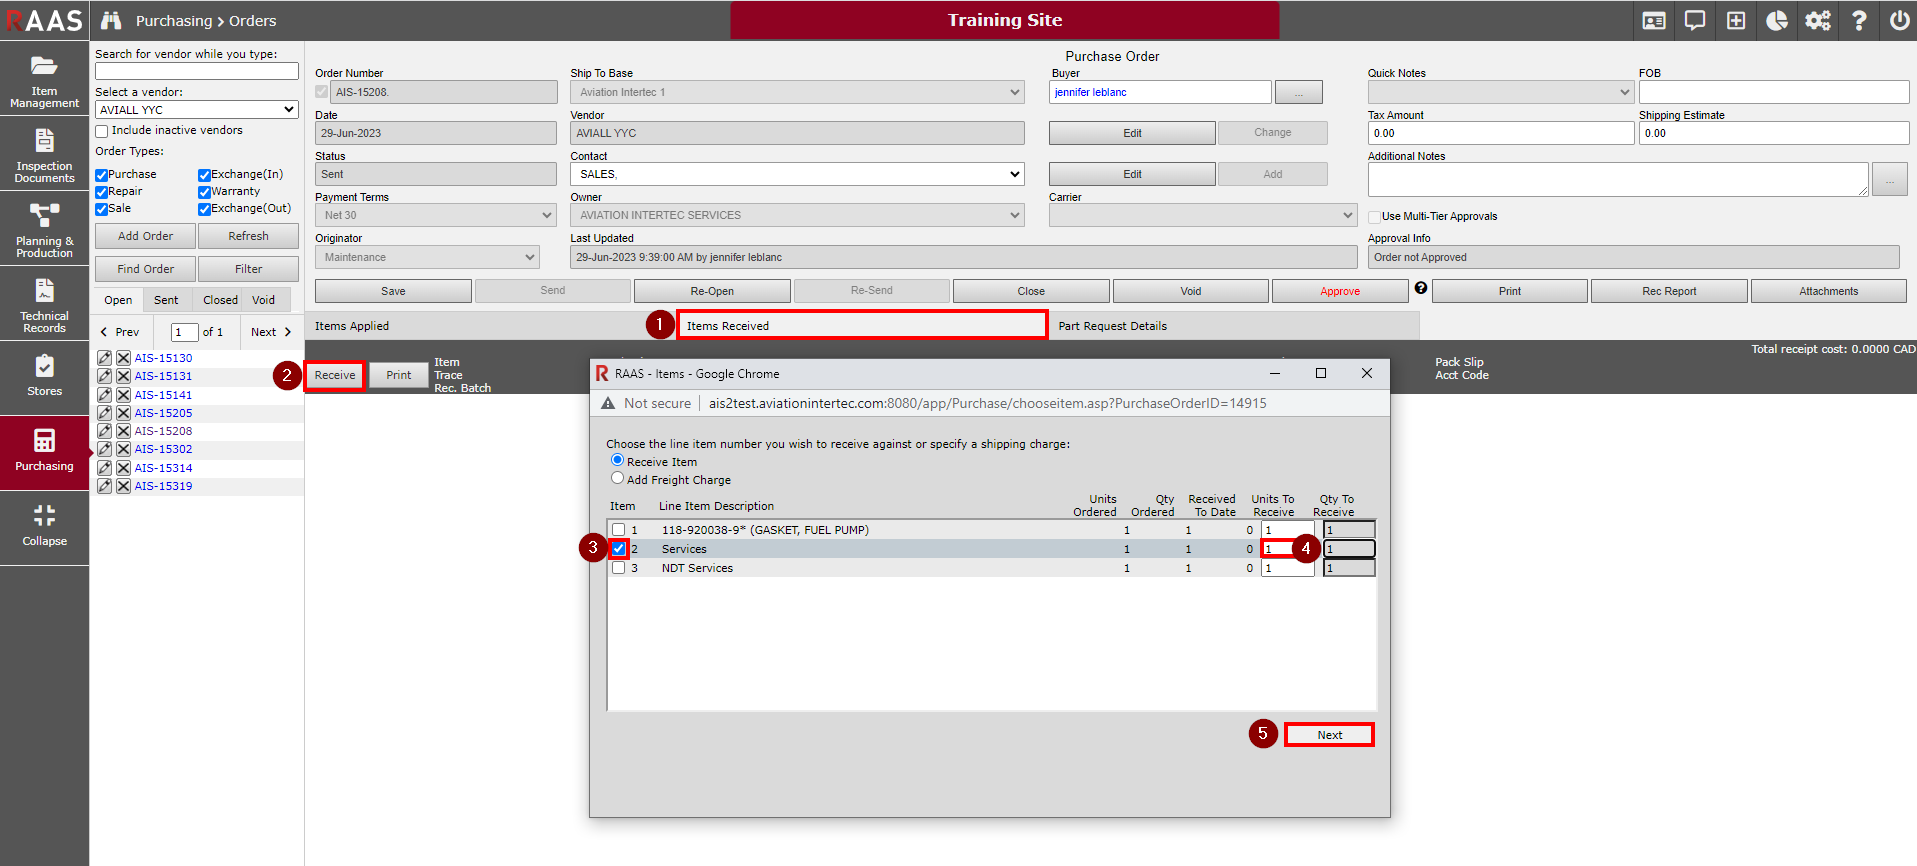
Locate the Purchase Order on which the item to be received was entered and click on the Items Received tab.
-
Click the Receive button to begin receiving the items listed on the PO.
-
Select the item being received.
-
Verify that the number of Units To Receive is correct.
-
Click Next.
Wizard Page 2 - Receive Item
-
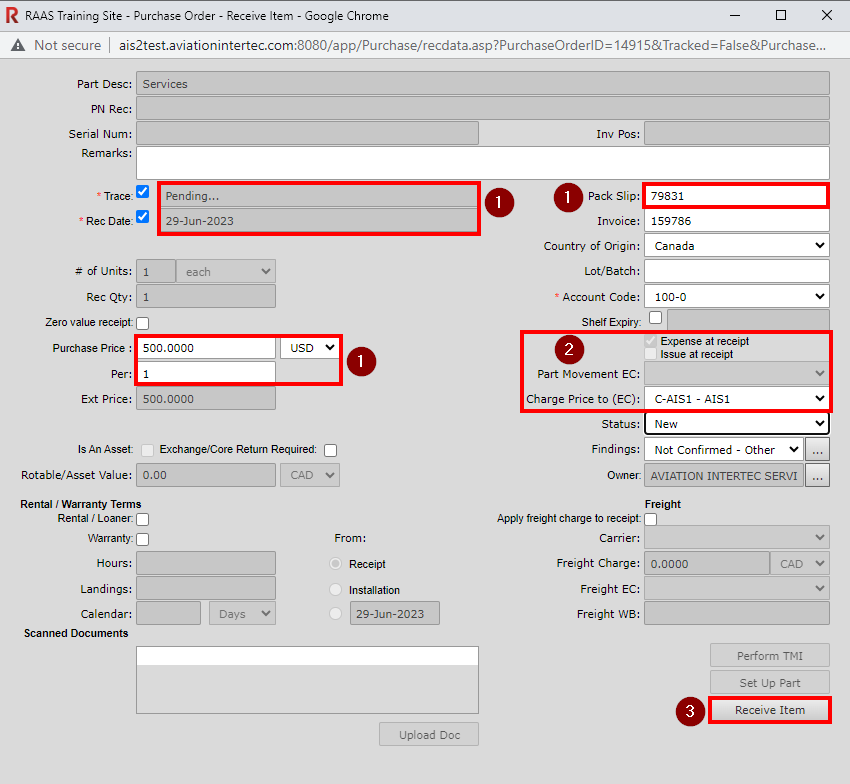
For Non-Tracked items, a Pack Slip number, Trace, Rec Date and Purchase Price are required. An Account Code may also be required based on Company Settings.
-
The Expense at receipt selection cannot be changed but the Charge Price to EC can be changed, if necessary.
-
Enter any other known receipt details and click Receive Item.
When the item is received, a Non-Tracked transaction will automatically be written to the Charge Price to EC selected on the receipt.
The items received will now appear on the Items Received tab of the Purchase Order. If the full quantity of the item ordered was received, the item status will be changed to Closed on the Items Applied tab. If less than the full quantity was received, the item status will remain Open on the Items Applied tab. If the final item of the order is being received, you will be asked if you want to close the order.
Receiving Non-Tracked Items - Issue at Receipt
Wizard Page 1 - PO Items
-
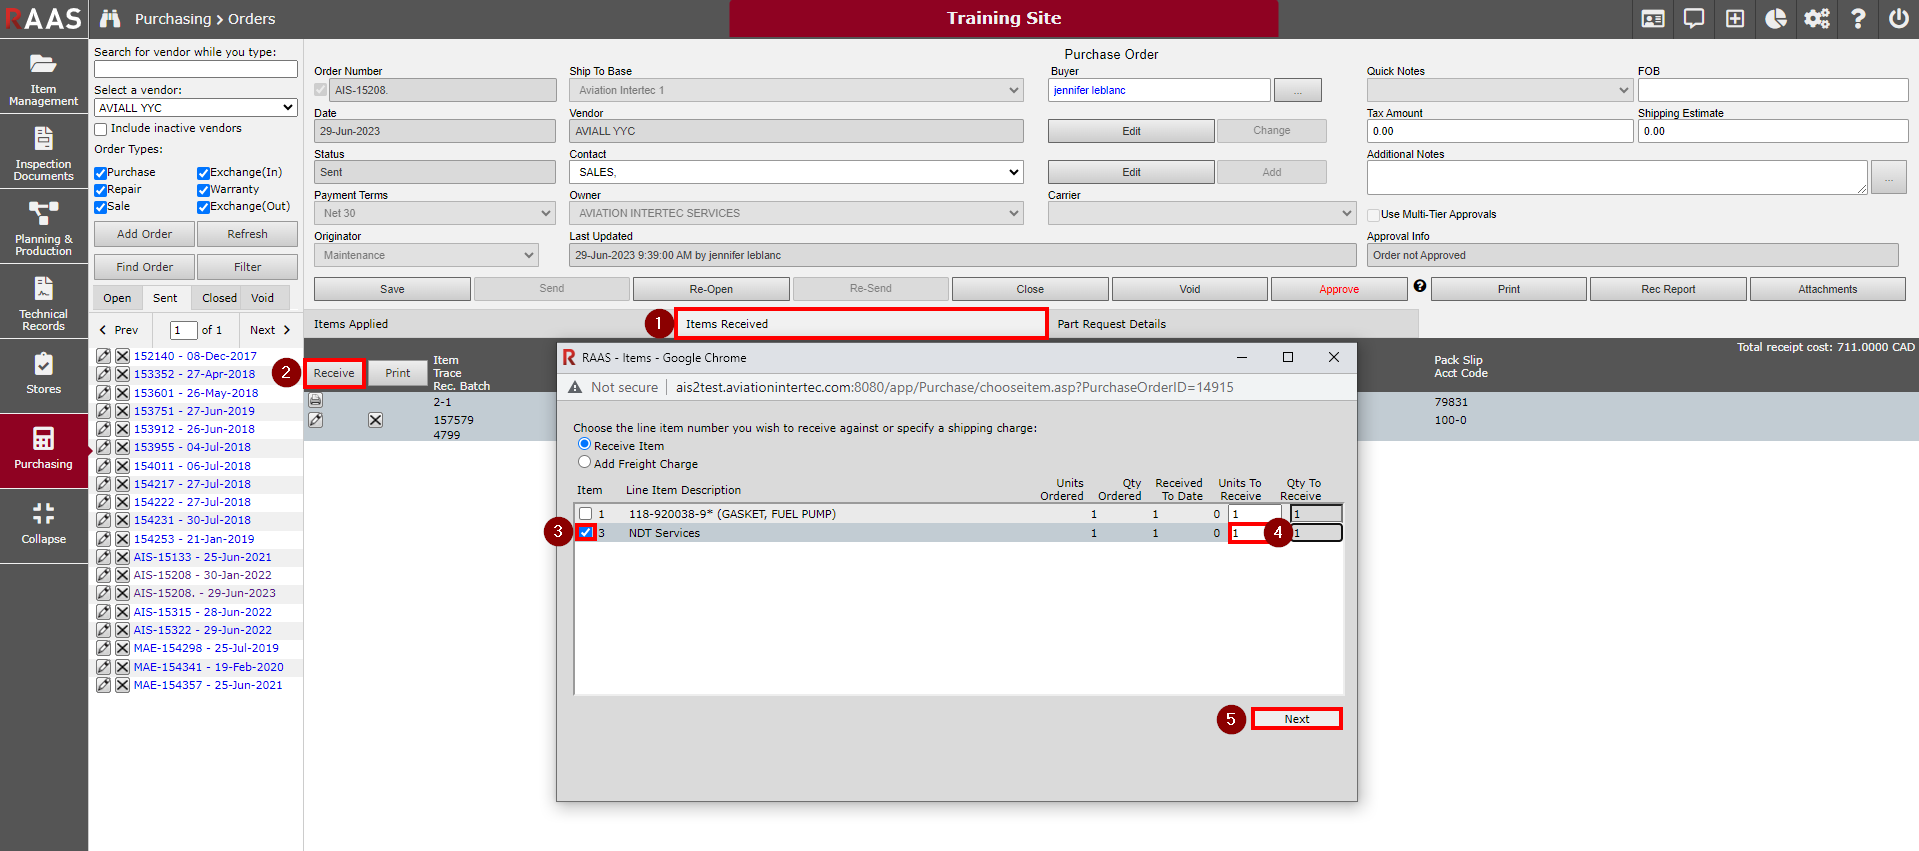
Locate the Purchase Order on which the item to be received was entered and click on the Items Received tab.
-
Click the Receive button to begin receiving the items listed on the PO.
-
Select the item being received.
-
Verify that the number of Units To Receive is correct.
-
Click Next.
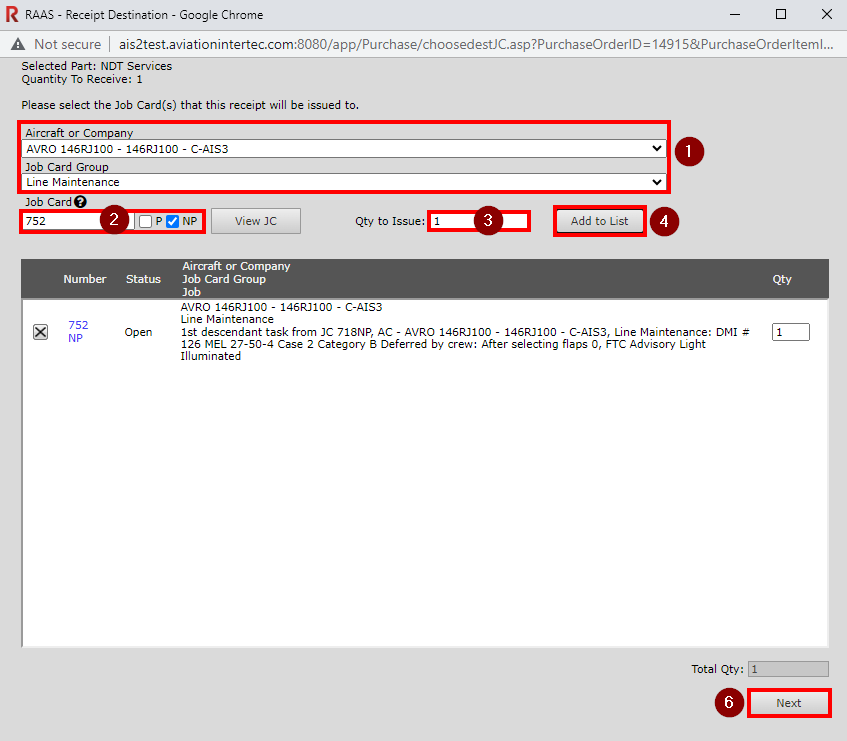
Wizard Page 2 - Receipt Destination
When Issue at receipt is selected for non-tracked items, the Receipt Destination screen allows users to select Job Cards to issue the non-tracked items to.
-
Select the Aircraft or Company and Job Card Group of the Job Card.
-
Enter the Job Card Number and select P or NP (Planned or Non-Planned). The View JC button will open the Job Card number entered in a view-only state.
-
Enter the Qty to Issue.
-
Click Add to List.
-
Repeat steps 1-4 until all Job Cards are added to the list and the Quantity to Receive matches the Total Qty being issued.
Note: the Qty being issued to each Job Card can be changed by changing the number in the Qty field. -
Click Next.
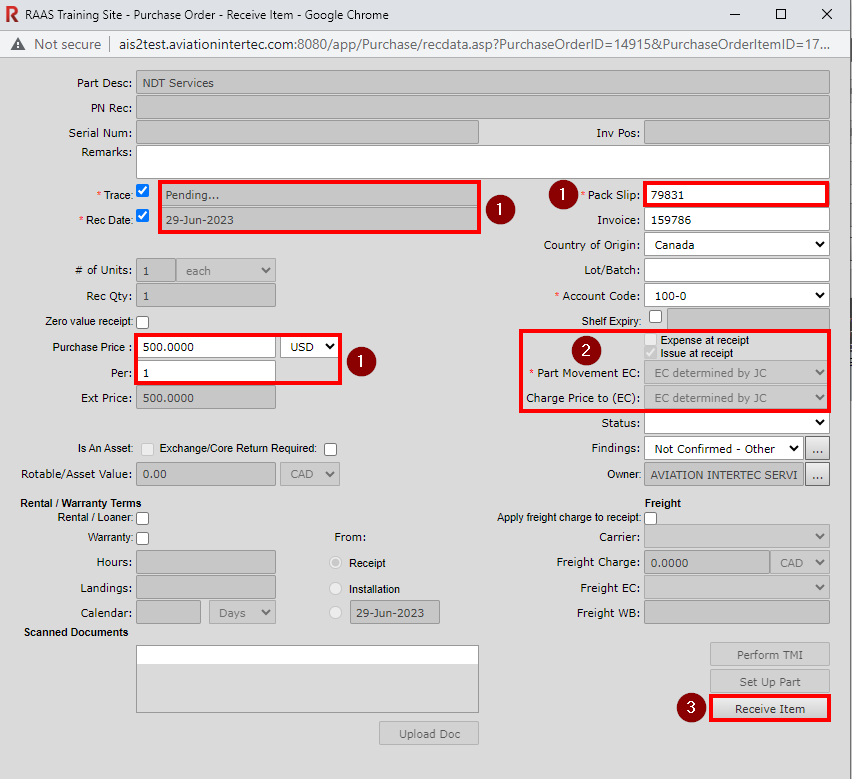
Wizard Page 3 - Receive Item
-
For Non-Tracked items, a Pack Slip number, Rec Date and Purchase Price are required. An Account Code may also be required based on Company Settings.
-
The Issue at receipt selection cannot be changed and the Destination EC and Charge Price to EC will be determined by the Job Cards selected on the previous screen.
-
Enter any other known receipt details and click Receive Item.
When the items are received, the Items Received tab on the order will show a separate line for each Job Card. A Non-Tracked transaction will automatically be written to the Expense Center selected on the Job Card(s) being issued to. The Non-Tracked item will also be listed on the Issued Parts tab of the Job Card.
The items received will now appear on the Items Received tab of the Purchase Order. If the full quantity of the item ordered was received, the item status will be changed to Closed on the Items Applied tab. If less than the full quantity was received, the item status will remain Open on the Items Applied tab. If the final item of the order is being received, you will be asked if you want to close the order.