The Purchasing Inbox sub-module is a listing of parts to be purchased. When purchase requests are made from within the Part Requests Listing sub-module, those requests are sent to the Purchasing Inbox sub-module where the Purchaser responds to them.
There are three key hyperlinks on the Purchasing Inbox listing: Last Vendor (view last closed PO), Req (view Part Request), and JC (view Job Card details).
Item Availability
-
Click on Purchasing and select Purchasing Inbox
-
Click on the Binoculars to view the Availability Details window.
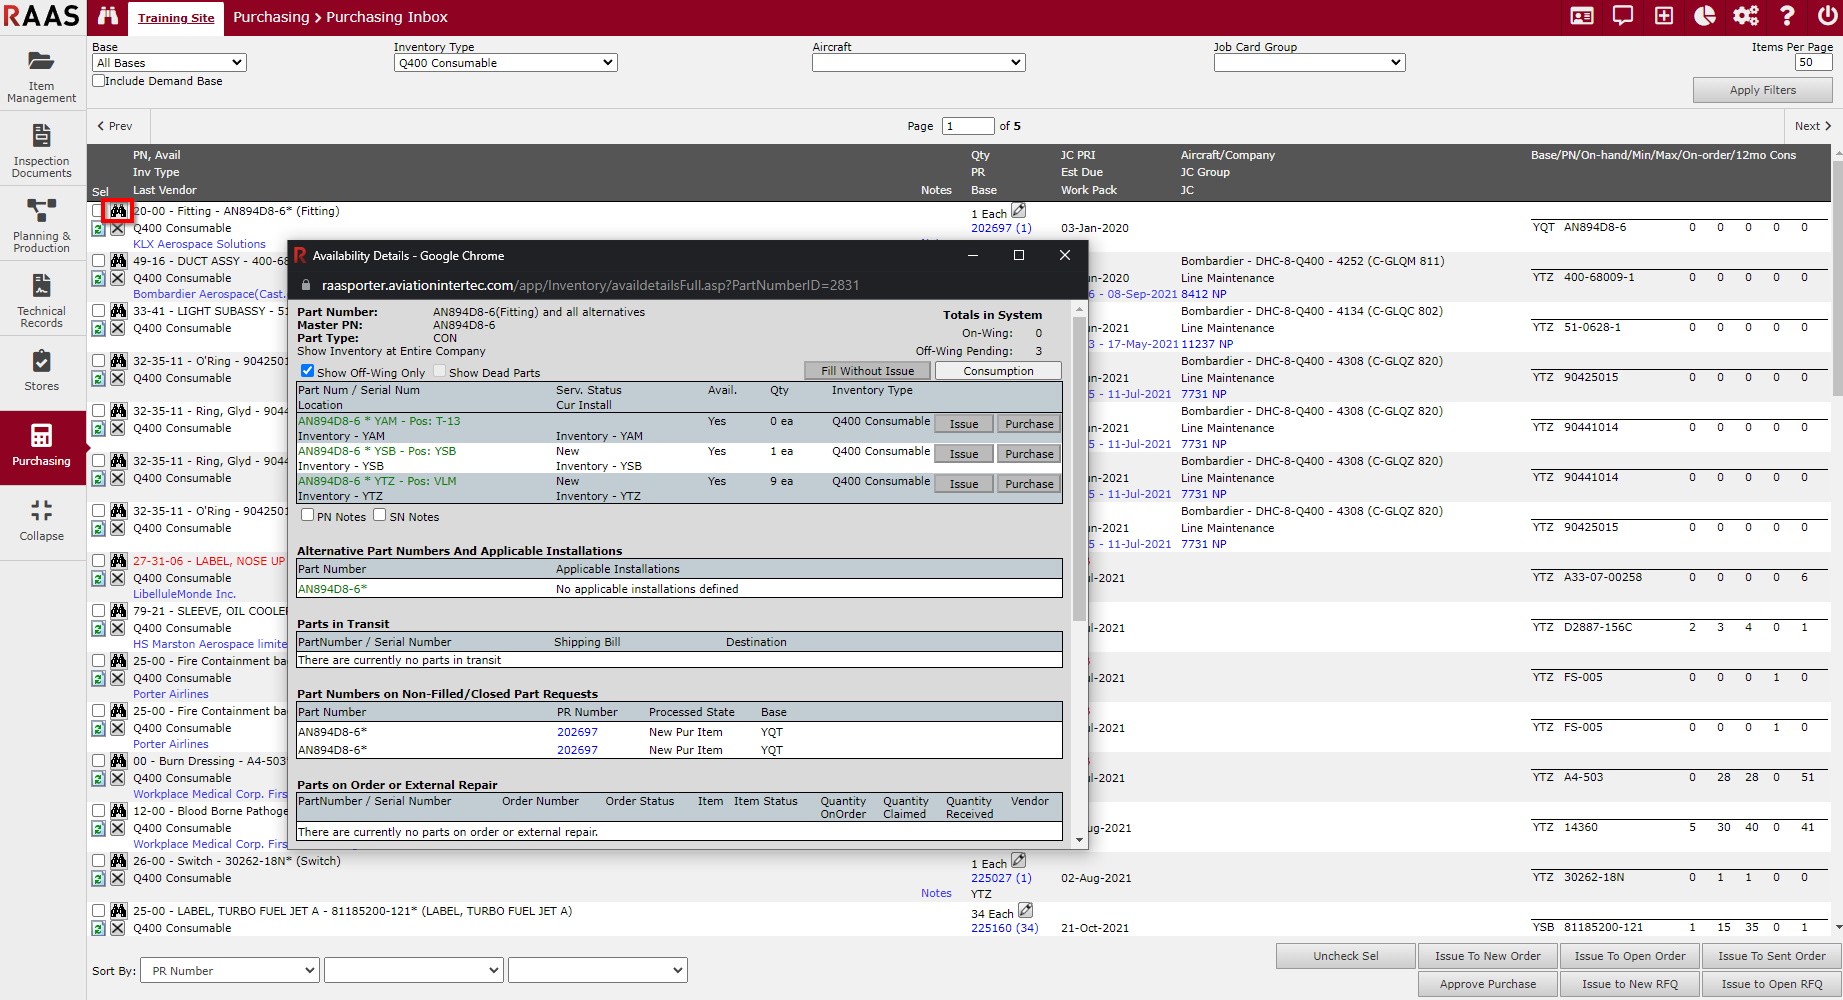
The Availability Details window shows the current and historical purchasing information for a given part. Based on the information seen on the Availability screen, purchase action for the item in question can be decided upon.
For more details see Quick Find - Availability Details.
Rejecting a Request
-
Click on Purchasing and select Purchasing Inbox.
-
A purchaser may Reject a request to purchase an item by clicking the 'X' button for the part in question.
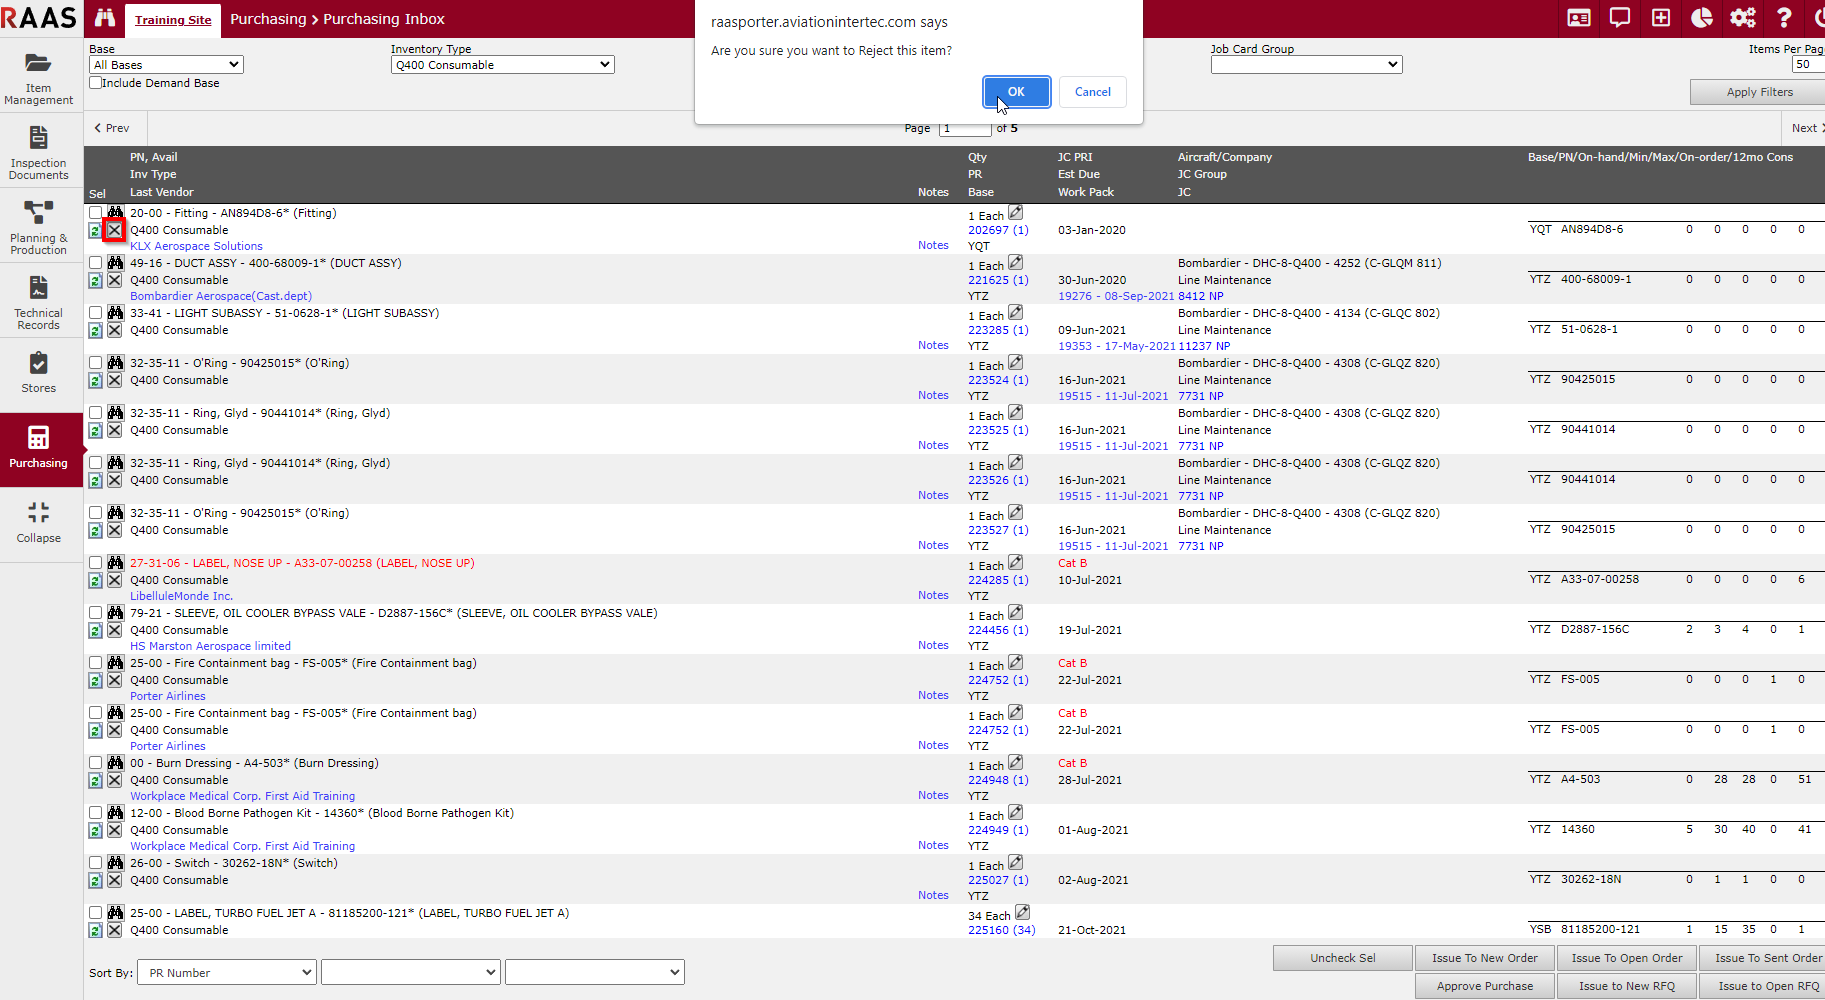
If the purchase request came from a job card part list, the status on the Job Card Part List will change from Open to Rejected.
Changing a Part Number
-
Click on Purchasing and select Purchasing Inbox.
-
Click on the icon with green arrows, which indicate Change.
-
To search for other parts, uncheck the Alternative Only checkbox.
-
Select the Search criteria and select the resulting Part Number.
-
-
Click Save.
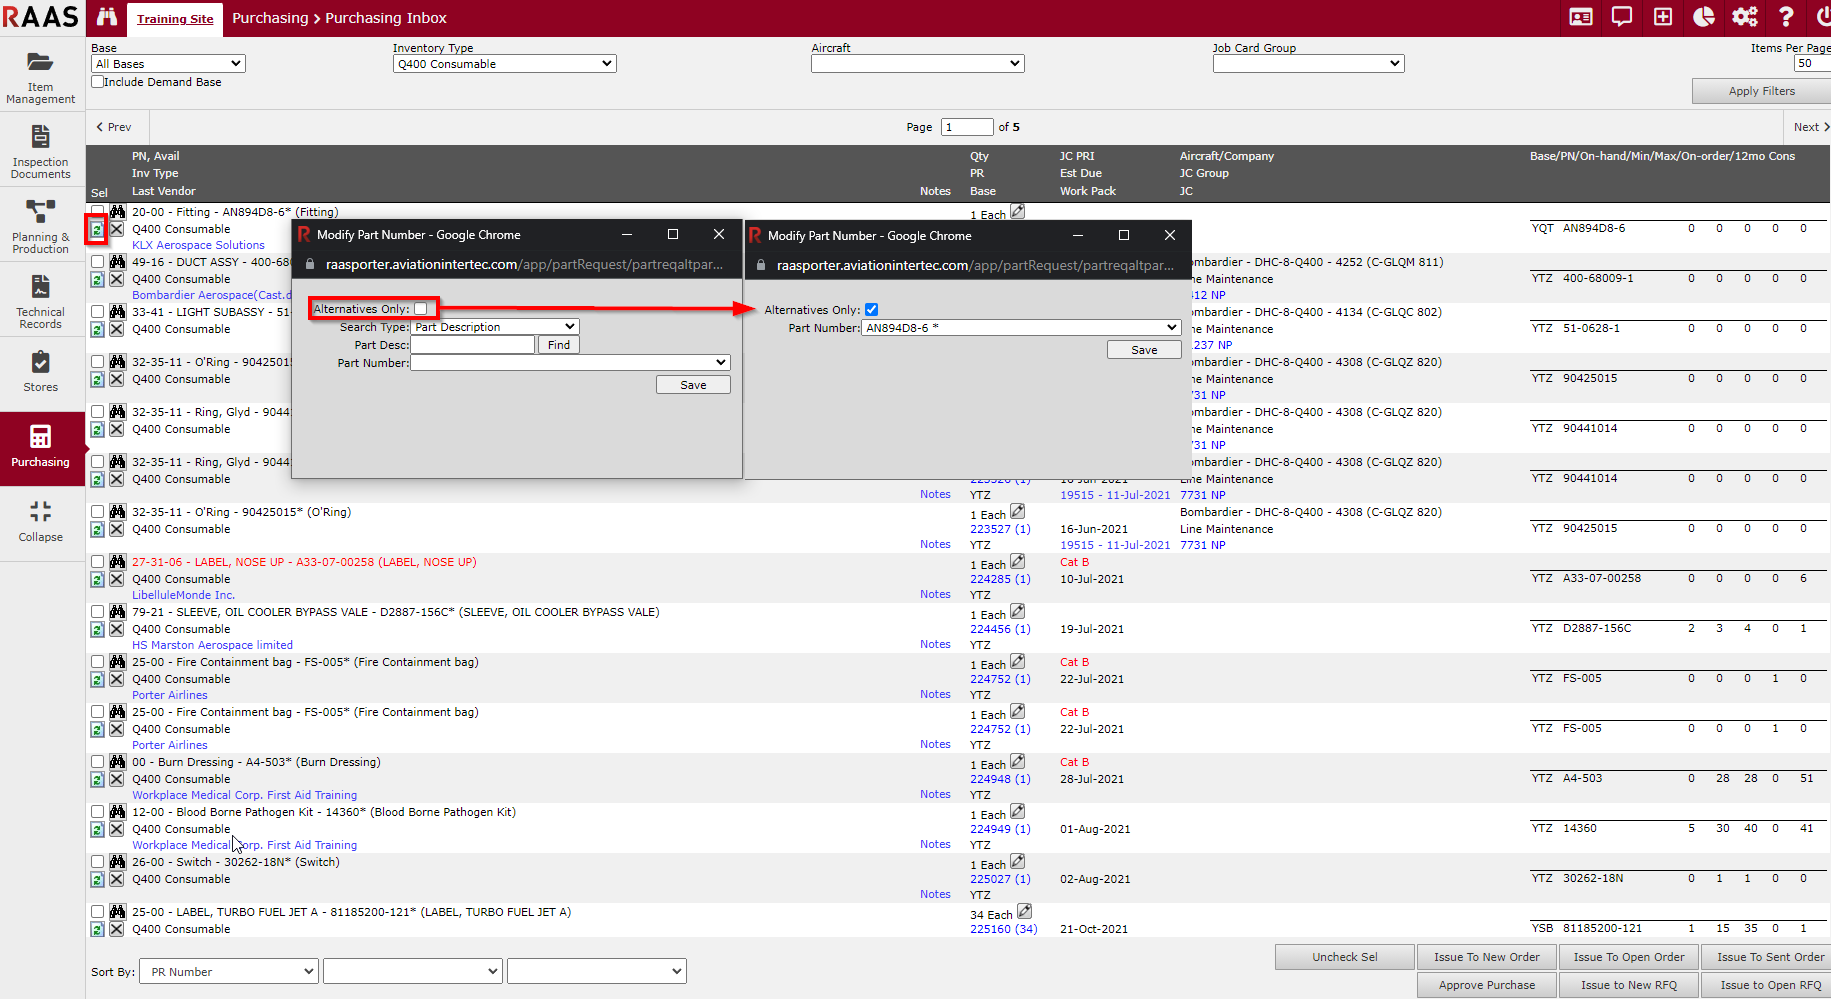
If the purchase request came from a job card part list, the part information on the Job Card Part List will change to Red.
ISSUING TO A REQUEST FOR QUOTATION
Sometimes, a purchaser may need to submit a Request for Quotation or RFQ to one or more vendors before issuing an item to a New, Open or Sent Purchase Order.
Issue to New RFQ
-
Click on Purchasing and select Purchasing Inbox.
-
Locate the applicable PO item and select the checkbox at the beginning of the row. This will highlight the row.
-
Click the Issue to New RFQ button, located at the bottom right of the window.
-
Click OK to continue adding the item to a New RFQ.
-
To further process the PR go to the RFQ.
-
See Request for Quotation on how to complete the RFQ process.

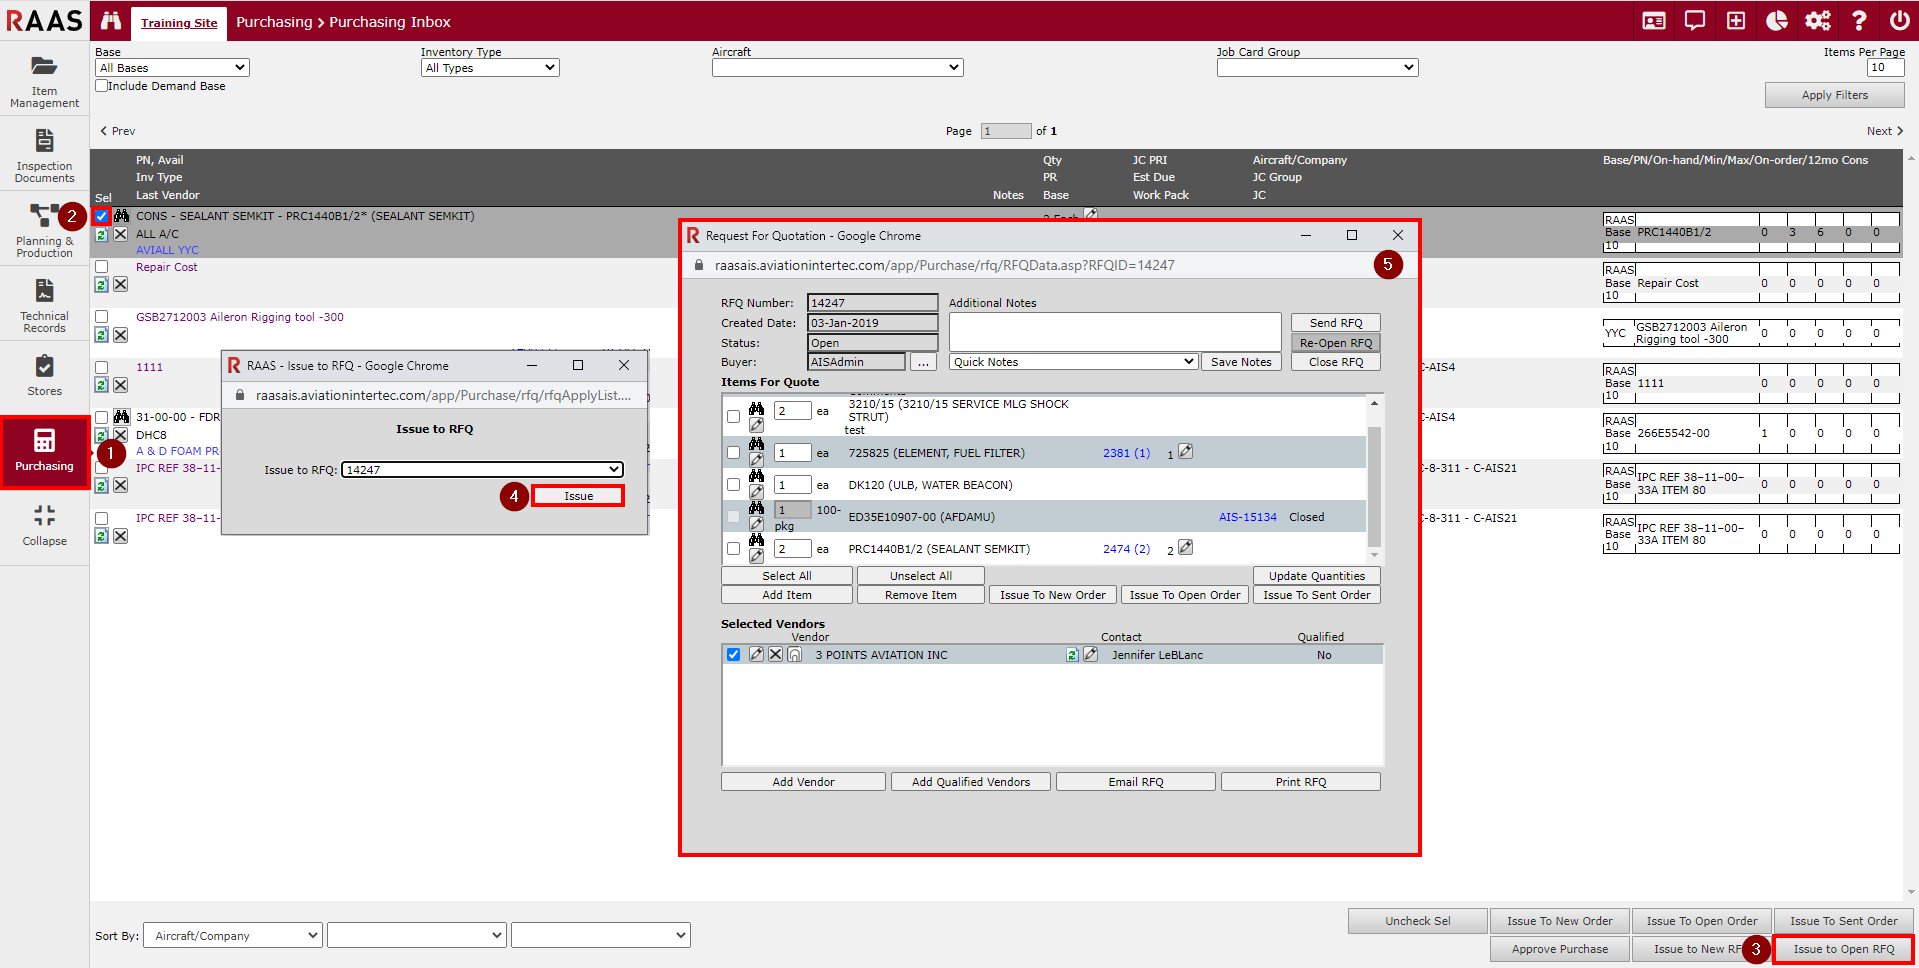
Issue to Open RFQ
-
Click on Purchasing and select Purchasing Inbox.
-
Locate the applicable Purchase Order item and select the checkbox at the beginning of the row. This will highlight the row.
-
Click the Issue to Open RFQ button, located at the bottom right of the window.
-
Select the RFQ to issue to from the dropdown menu and click Issue.
-
After verifying that the item has been added to the selected RFQ, close the Request for Quotation window.
-
See Request for Quotation on how to complete the RFQ process.
ISSUING TO A PURCHASE ORDER
Within the Purchasing Inbox sub-module, a purchaser can issue an item to a New, Open or Sent Purchase Order (PO). Once vendor pricing has been received, the purchaser must re-visit the purchase order to enter valid pricing information.
Sometimes, the purchaser may need to submit a Request for Quotation to one or more vendors before issuing the purchase item to a Purchase Order.
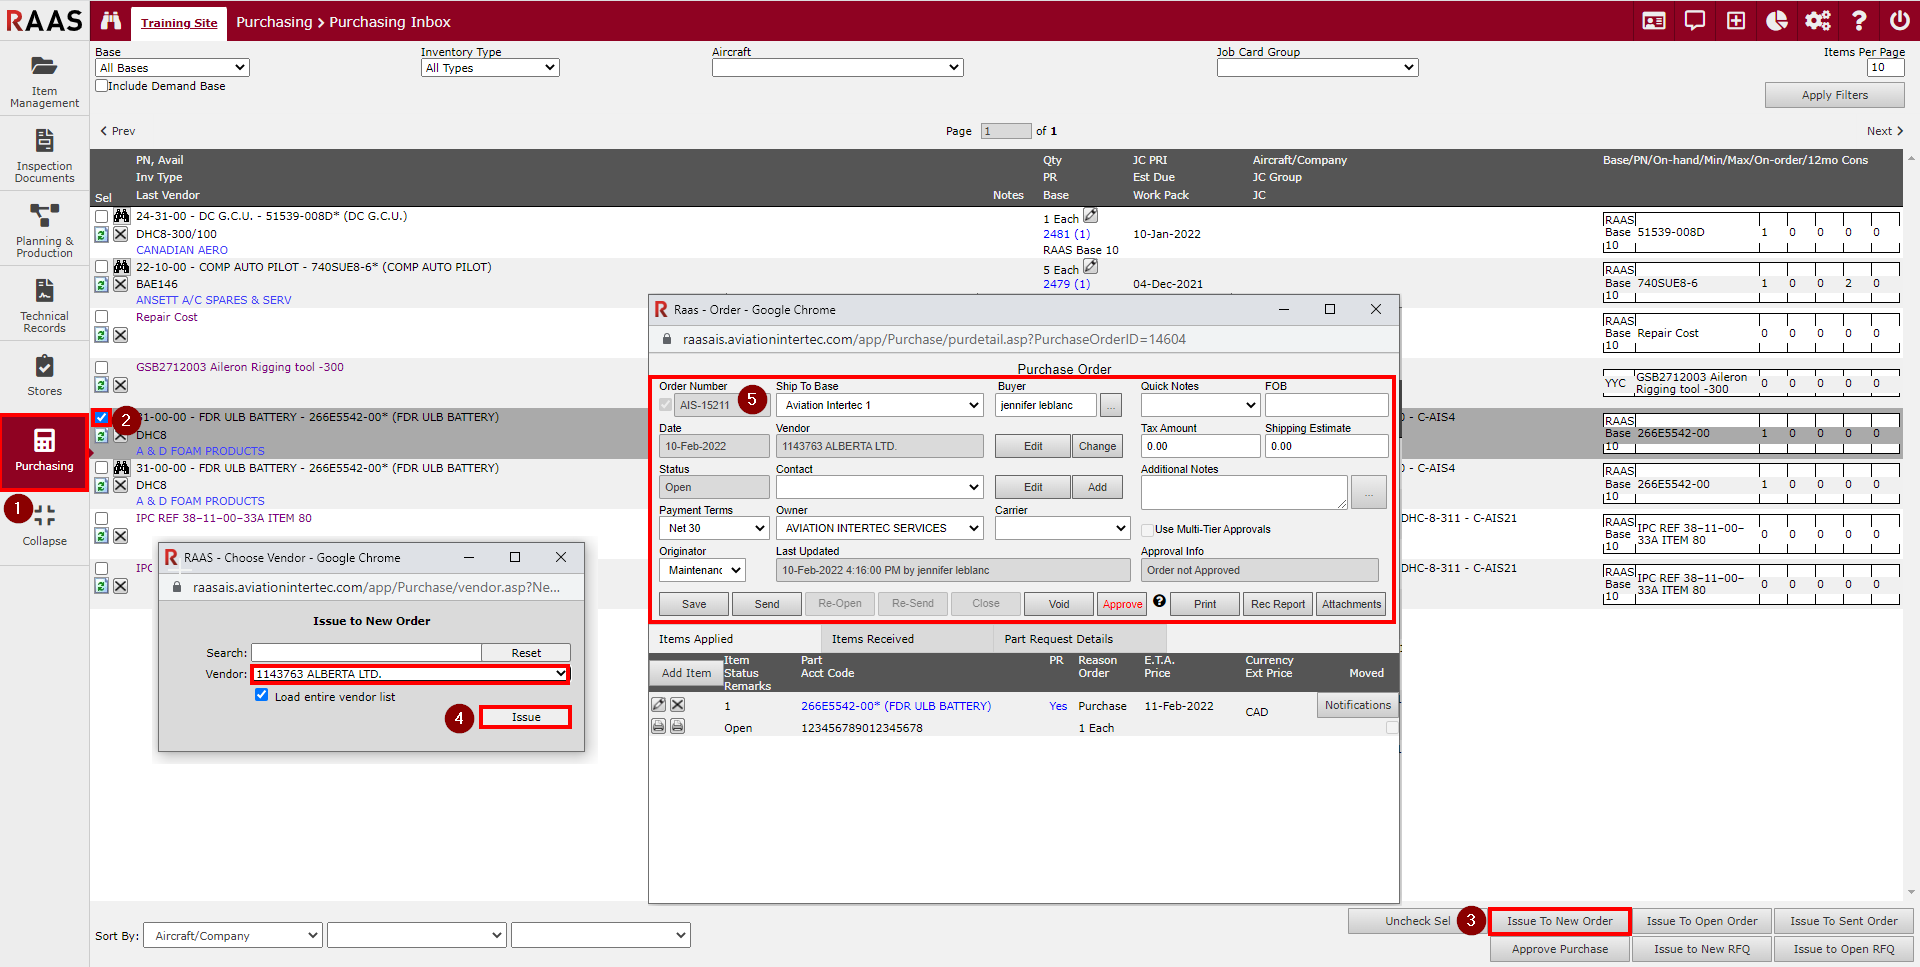
Issue to New Order
-
Click on Purchasing and select Purchasing Inbox.
-
Locate the applicable PO item and select the checkbox at the beginning of the row. This will highlight the row.
-
Click the Issue to New Order button, located at the bottom right of the window.
-
Select the appropriate vendor from the dropdown or begin typing the vendor company name and click the Issue button.
-
When the Purchase Order window appears, continue to complete the remaining fields, such as the Ship To Base. Click Save. Once saved, the item is moved from the Purchasing Inbox to the newly created PO.
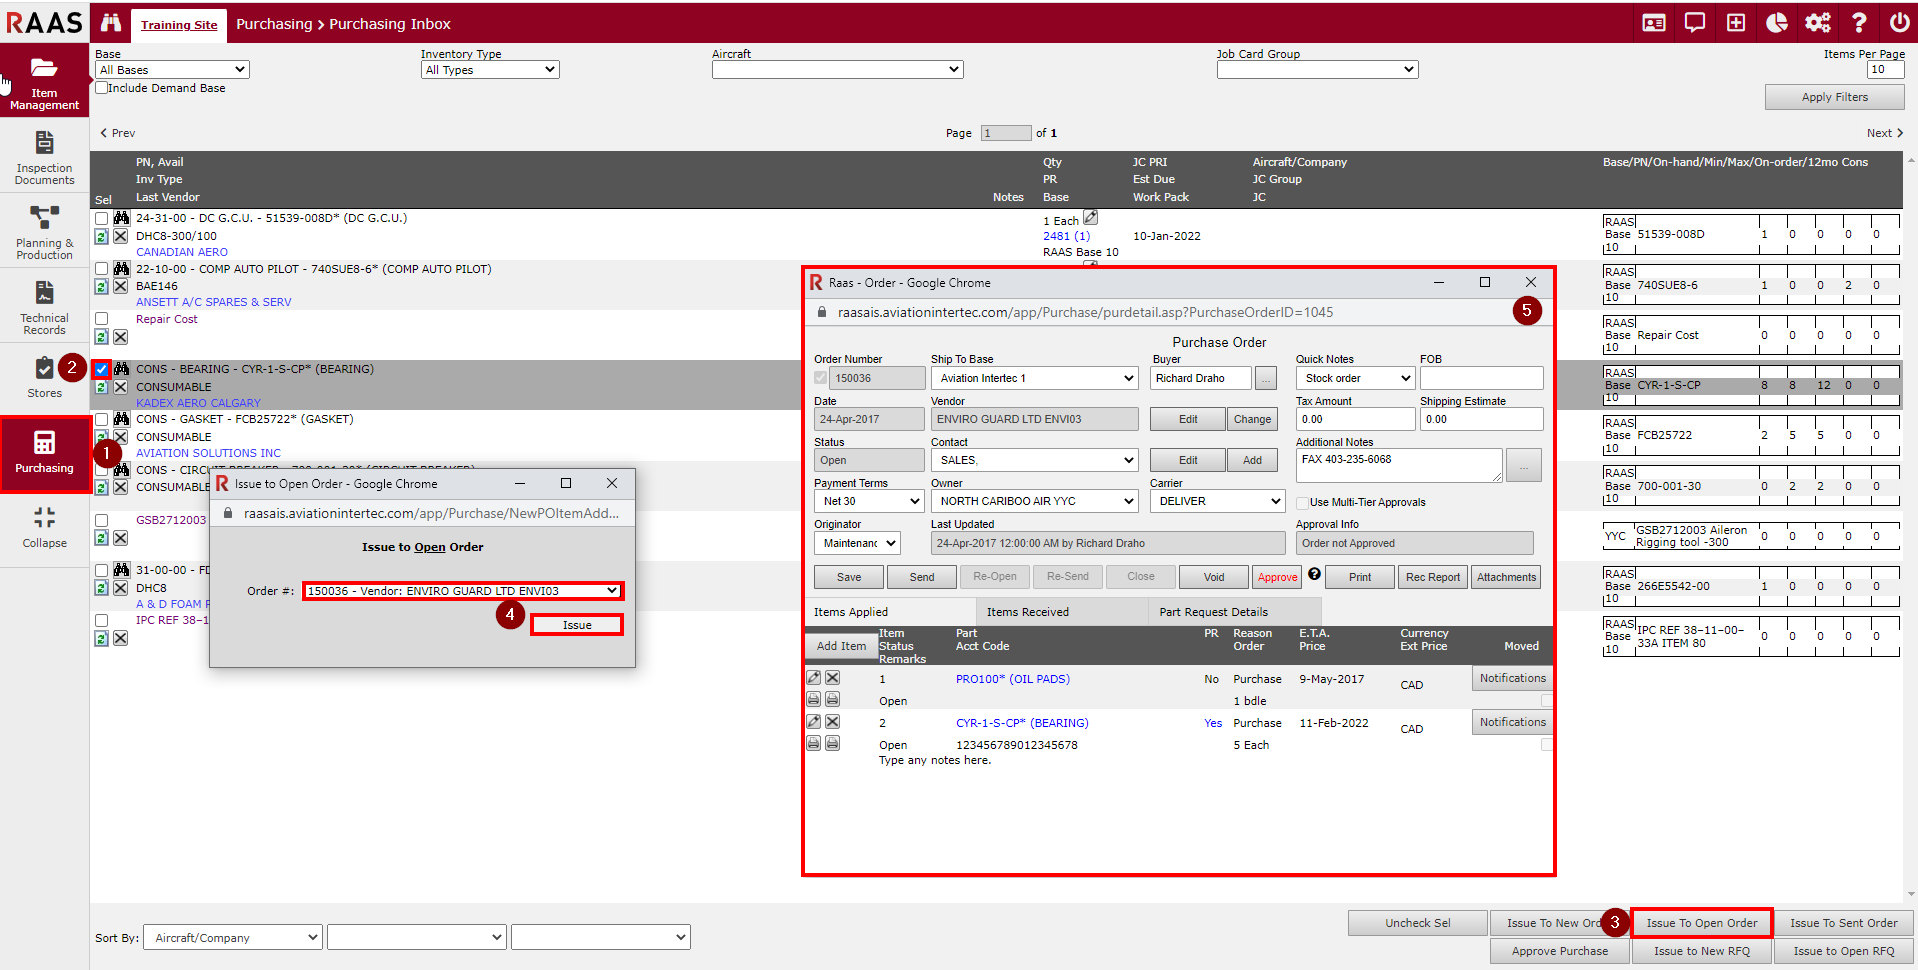
Issue to Open PO
If the purchaser has sufficient security clearance, they can make adjustments to the Purchase Order or PO Items.
-
Click on Purchasing and select Purchasing Inbox.
-
Locate the applicable item and select the checkbox at the beginning of the row. This will highlight the row.
-
Click the Issue to Open Order button, located at the bottom right of the window.
-
Select the desired PO with the applicable Vendor and click the Issue button. Click OK to continue issuing the item to the selected Open Order.
-
After RAAS has added the item to the selected Order, the Purchase Order window appears and the item is removed from the Purchasing Inbox listing. Once the purchaser verifies that the item has been added to the Purchase Order, they can close the window.
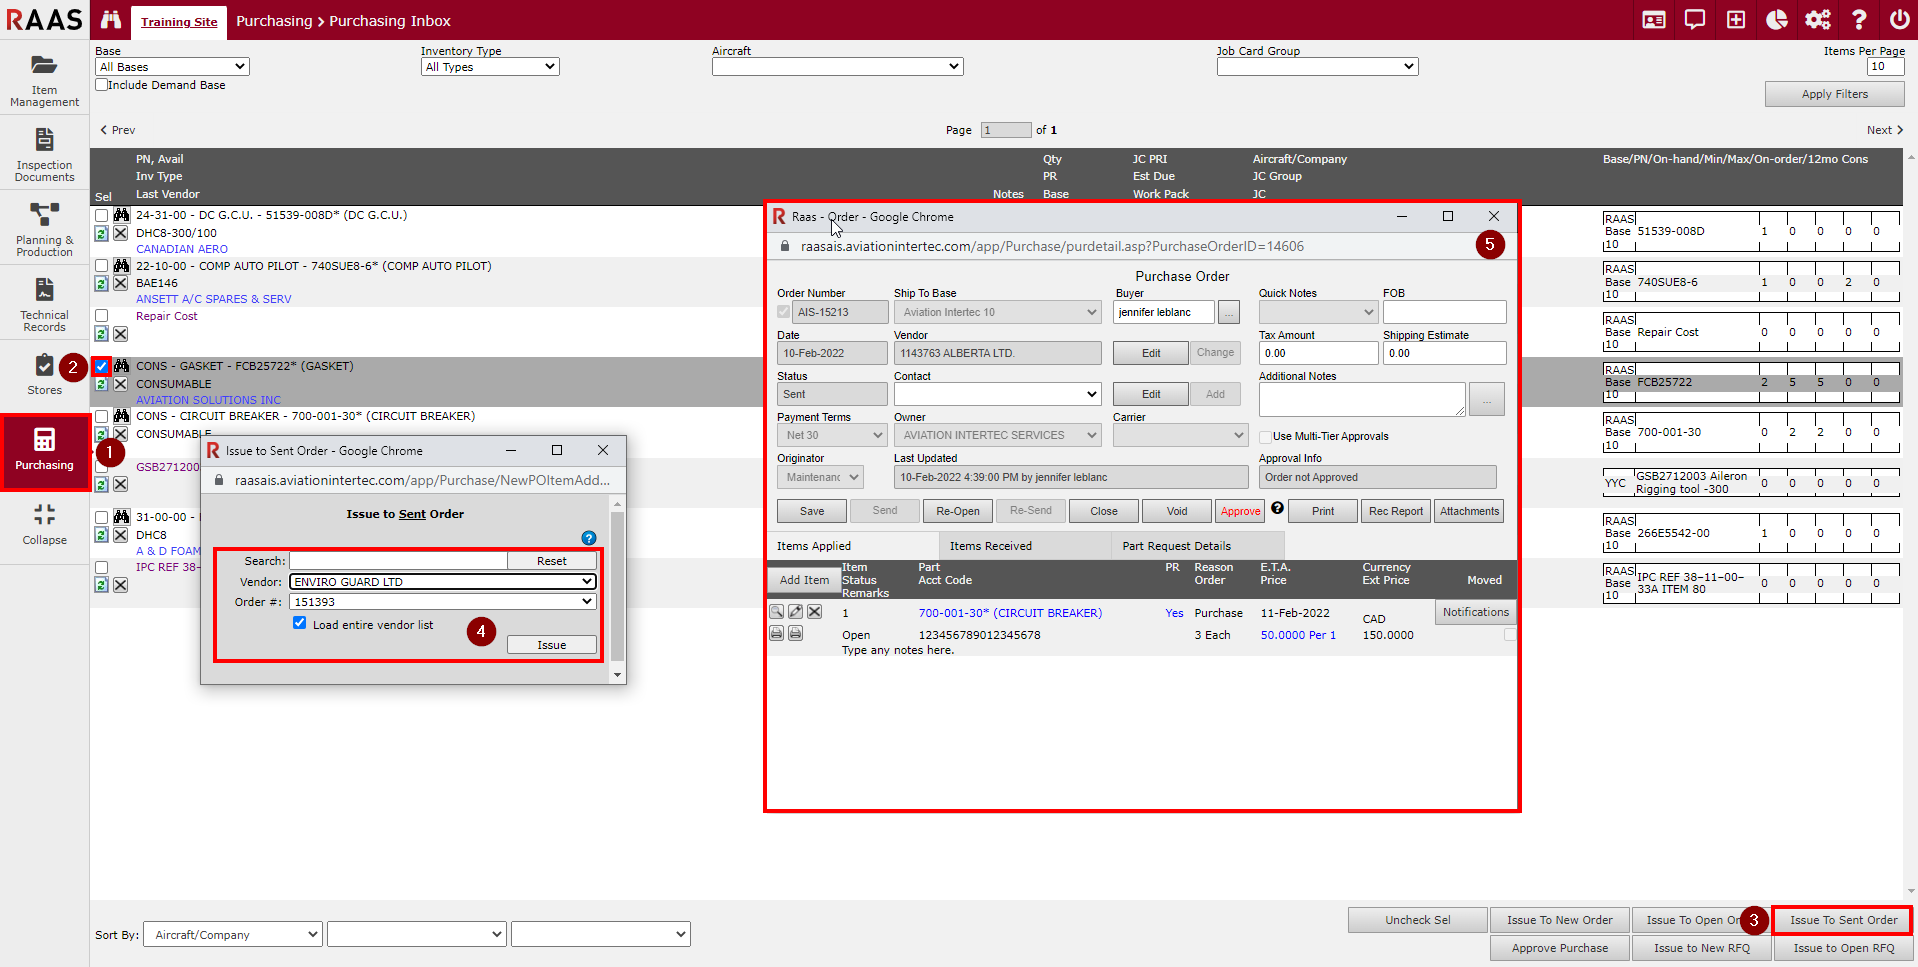
Issue to Sent Order
In order to issue an item to a Sent Order, the item must already exist on the Order and have a sufficient quantity ordered to cover any additional requests for the item in question. Otherwise, the operation will be cancelled and the item will remain in the Purchasing Inbox. Non-Tracked items cannot be associated with Sent Orders.
-
Click on Purchasing and select Purchasing Inbox.
-
Locate the applicable item and select the checkbox at the beginning of the row. This will highlight the row.
-
Click the Issue to Sent Order button, located at the bottom right of the window.
-
Select the desired Vendor, select the applicable Order # and then click the Issue button. Click OK to continue issuing the item to the selected Sent Order.
-
After RAAS has added the item to the selected Sent Order, the Purchase Order window appears and the item is removed from the Purchasing Inbox listing. Once the purchaser verifies that the item has been added to the Purchase Order, they can close the window.