
Pick Lists are non-work orders that can be created in RAAS to help Stores personnel pick parts from inventory to fill Part Requests. They can be created from the Part Requests Listing (or Part Request Detail window) in the Stores module or via processing items in the Part List of a Job Card and they are created for a specific base.
Creating a Pick List
-
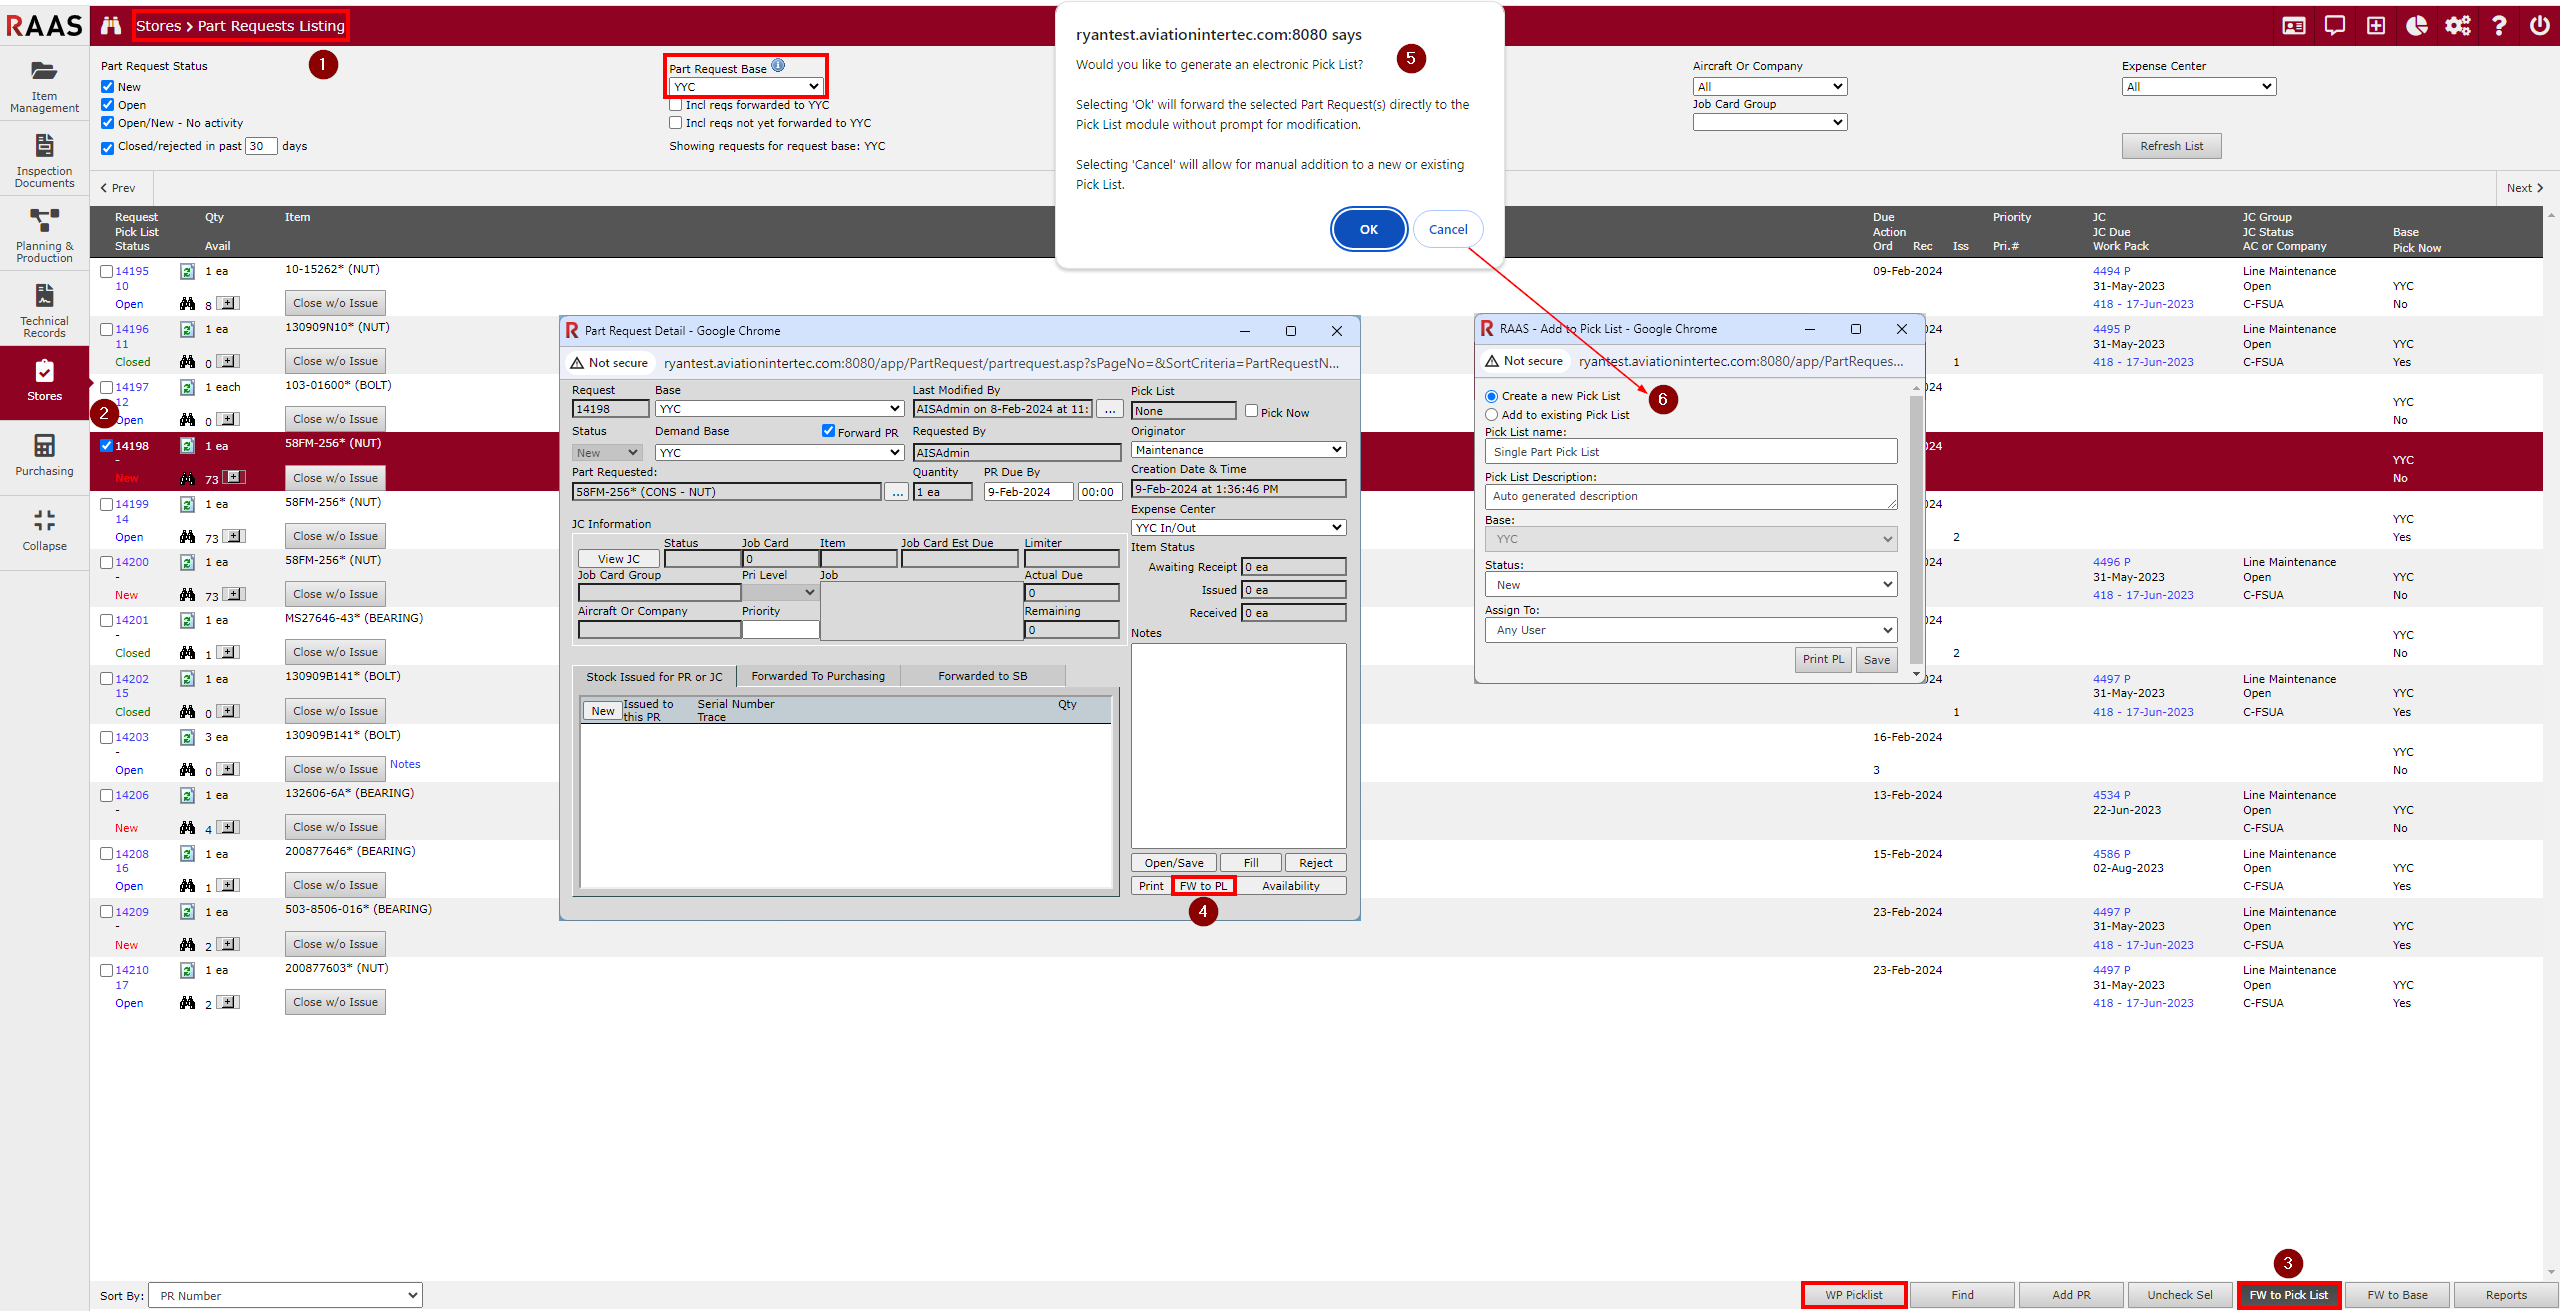
Click Stores and select Part Request Listing.
-
Select the appropriate Base.
-
-
Select the Part Request(s) you would like to forward to a Pick List by clicking the checkbox(es).
-
Alternatively, you can click on an individual Part Request number to open its Part Request Detail window.
-
If the Part Request(s) you are looking for aren’t listed, double-check the filter settings at the top of the page.
-
-
If forwarding from the Part Requests Listing, click on the FW to Pick List button after selecting the Part Request(s) that you want to forward.
Note: Pick Lists can also be created for Work Packs by selecting WP Picklist and selecting the specific WP from the drop-down. -
If forwarding from the Part Request Detail window, click the FW to PL button.
-
Steps 3 and 4 will bring up the same pop-up window when clicking the respective button.
-
Clicking OK will automatically create the Pick List without any customization options from the user.
-
Clicking Cancel will allow the user to customize the Pick List settings before creating it.
-
-
Within the Add to Pick List window (after clicking Cancel in Step 5), the user can choose to create a new Pick List or add to an existing Pick List*. When creating a new Pick List, the following options can be edited:
-
Pick List Name
-
Pick List Description
-
Status (New or Open)
-
Assign to a user
-
-
When satisfied with the settings, click Save to create the Pick List or Print PL to print the Pick List.
-
After creating the Pick List, a window will pop up with the Part Request and Pick List number(s) and the user can choose to view the Pick List from there or navigate to the Pick List sub-module to view it.
To create a Pick List via a Job Card** please follow the instructions outlined here.
*Note: A Part request can only be added to an existing Pick List if there is a New Pick List (rather than Open) in the associated Base. If there isn’t a new Pick List in the Base, the only option will be to create a new Pick List.
**Note that a Pick List created via a Job Card doesn’t allow for any customization options to be set and the parts cannot be added to an existing Pick List this way (a new one will be created automatically in this case).
***Note that a newly created Pick List has no default assignee.
****Note that the status of a Part Request forwarded to a Pick List is automatically set to Open.
*****Note that the status of a Pick List is automatically set to Open on creation, except in cases the user deliberately chooses customizations.
Viewing, Filtering, Sorting, and Deleting Pick Lists
-
Navigate to Stores -> Pick Lists.
-
The Auto-Refresh button allows users to toggle the auto-refresh function of the Pick Lists listing on (circled checkmark) or off (circled x symbol).
-
When turning it on, a chime will play. This chime will also play whenever a new Pick List is added to the listing while the page is active. Additionally, the page will auto-refresh every minute with this setting turned on.
-
When off, the page will not auto-refresh every minute and there will be no chime sound when new Pick Lists are added.
-
-
The following filter options can be set when clicking Filter (click again to hide):
-
Base
-
Assignee
Note that that an Assignee option of Unassigned should be used to display unactioned Pick Lists.
-
Created By
-
Status (New, Open, Closed)
Note that all Pick Lists are displayed when no Status filter options are selected (taking into account the other filter settings).
-
-
When satisfied with the filter settings, click Apply to save them and regenerate the listing.
-
Pick Lists can be sorted via the following options when clicking Sort (click again to hide; click Apply to save the sort order and regenerate the listing):
-
Created (Descending)
-
Created (Ascending)
-
Assignee
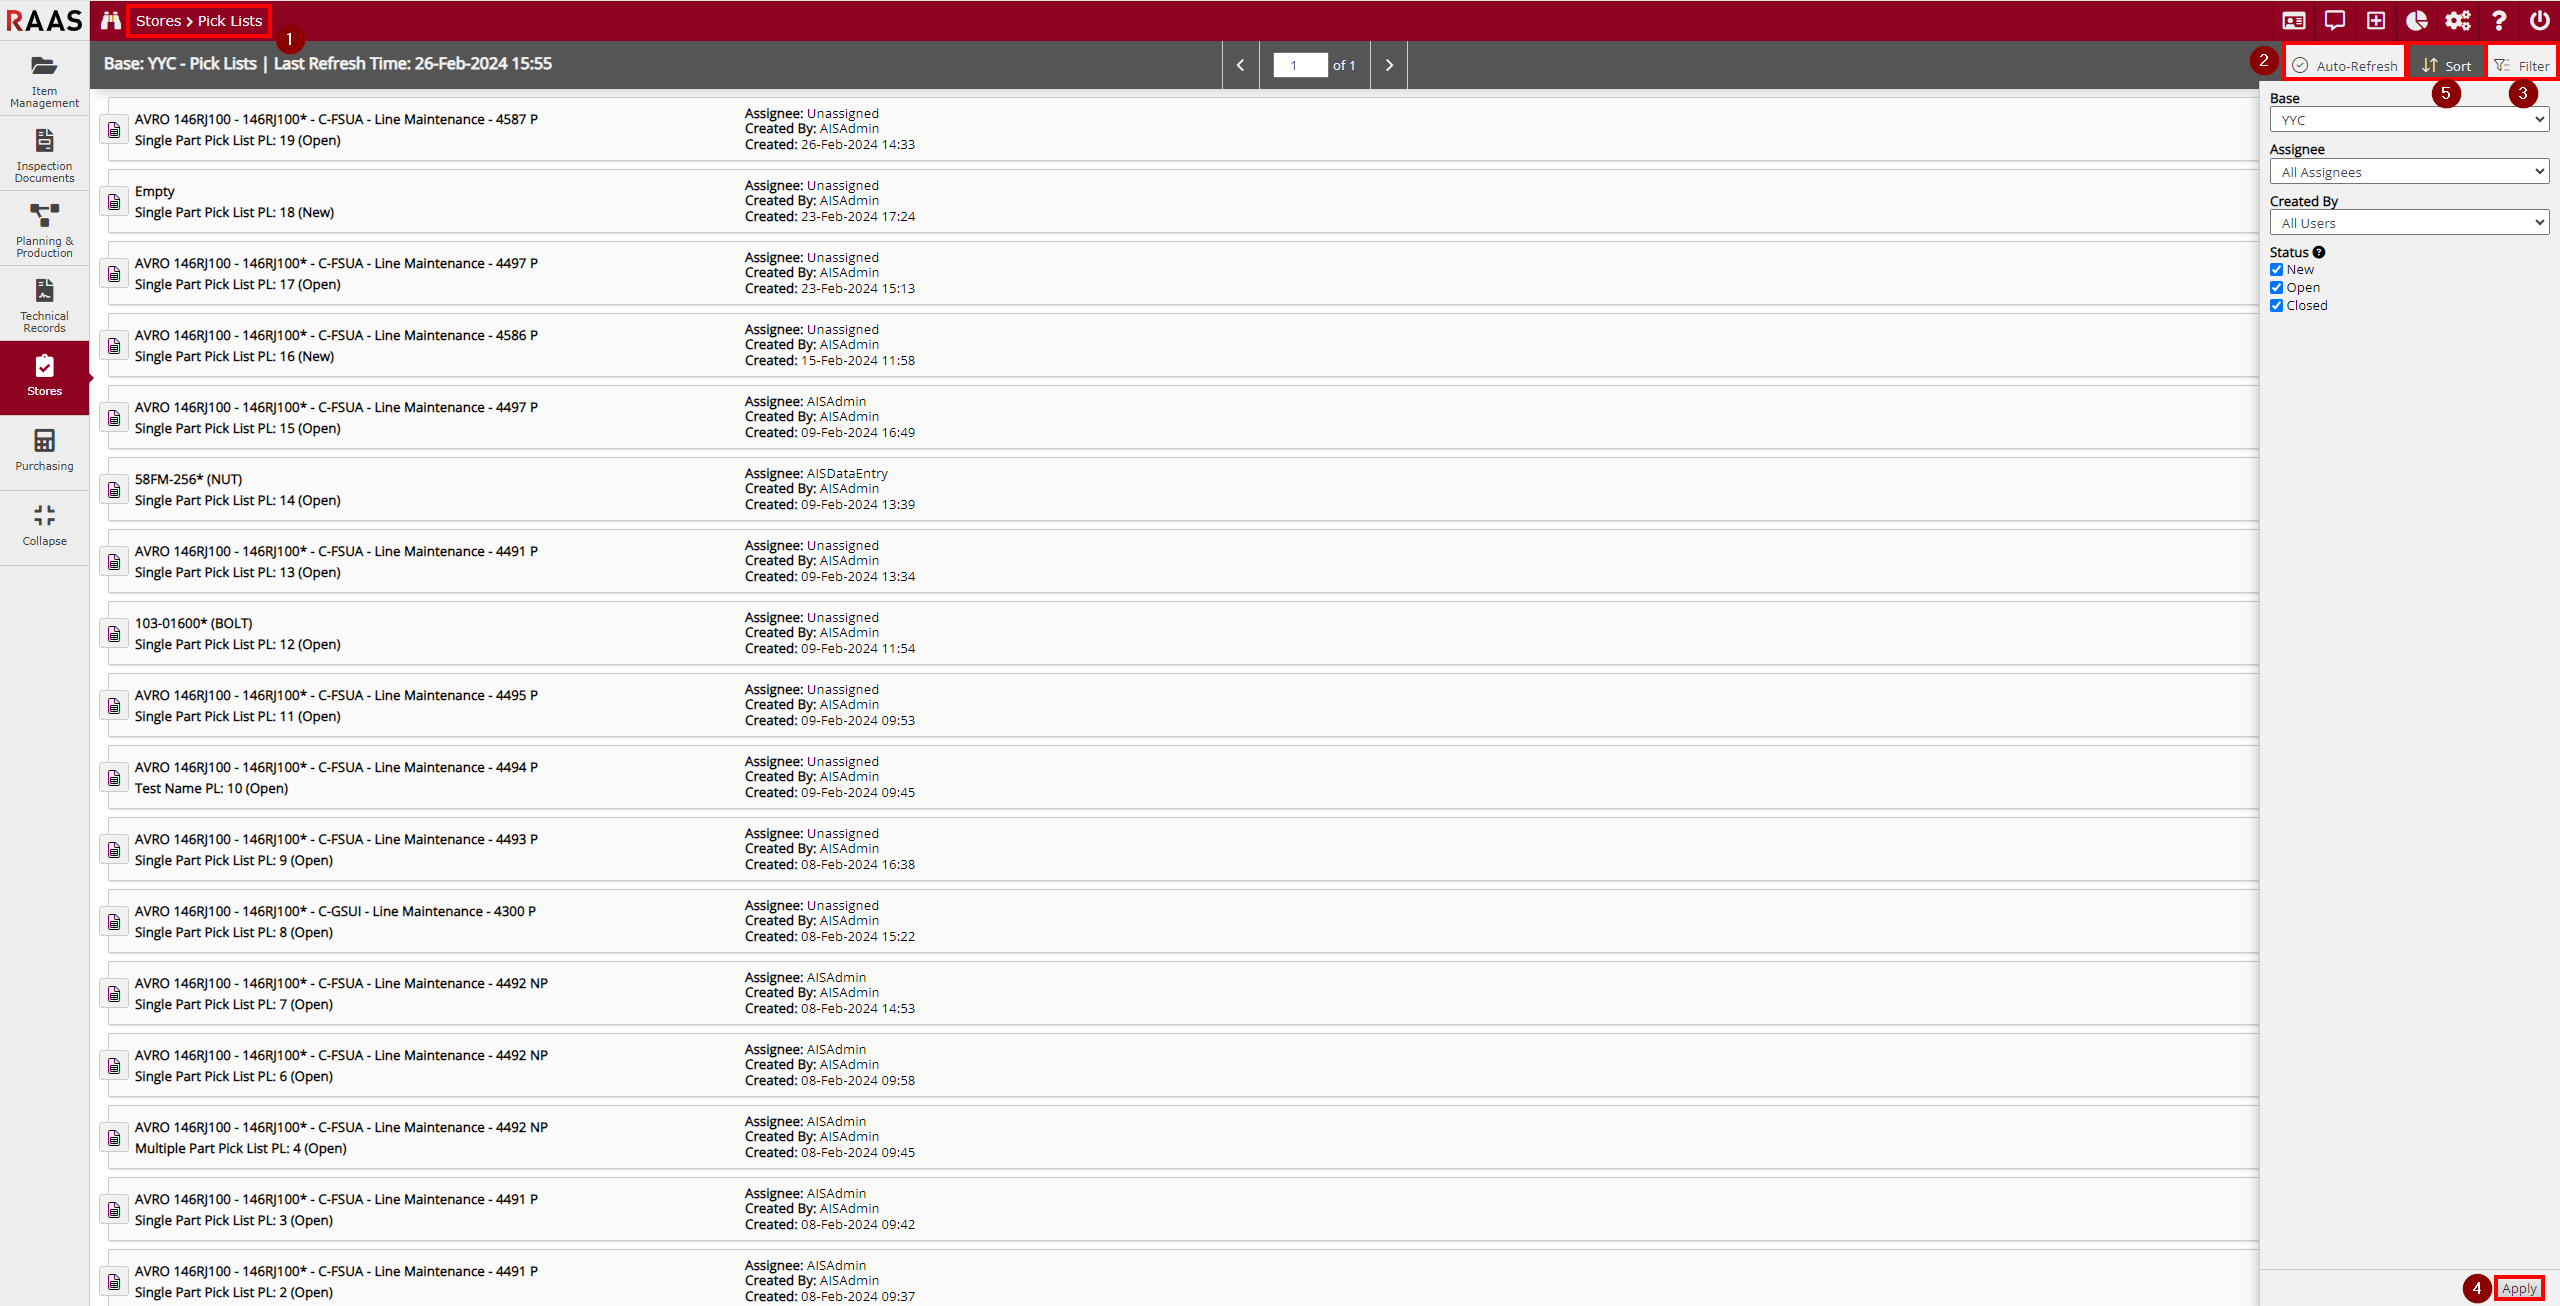
Figure 2: Viewing, Filtering, and Sorting Pick Lists
-
-
Clicking the vertical ellipsis brings up a Delete button for users to be able to delete a Pick List.
Note that hovering off of the Delete button will cause it to disappear until clicking the vertical ellipsis again. -
Click the Delete button to delete the Pick List.
Note that a Pick List cannot be deleted if it contains any Part Requests.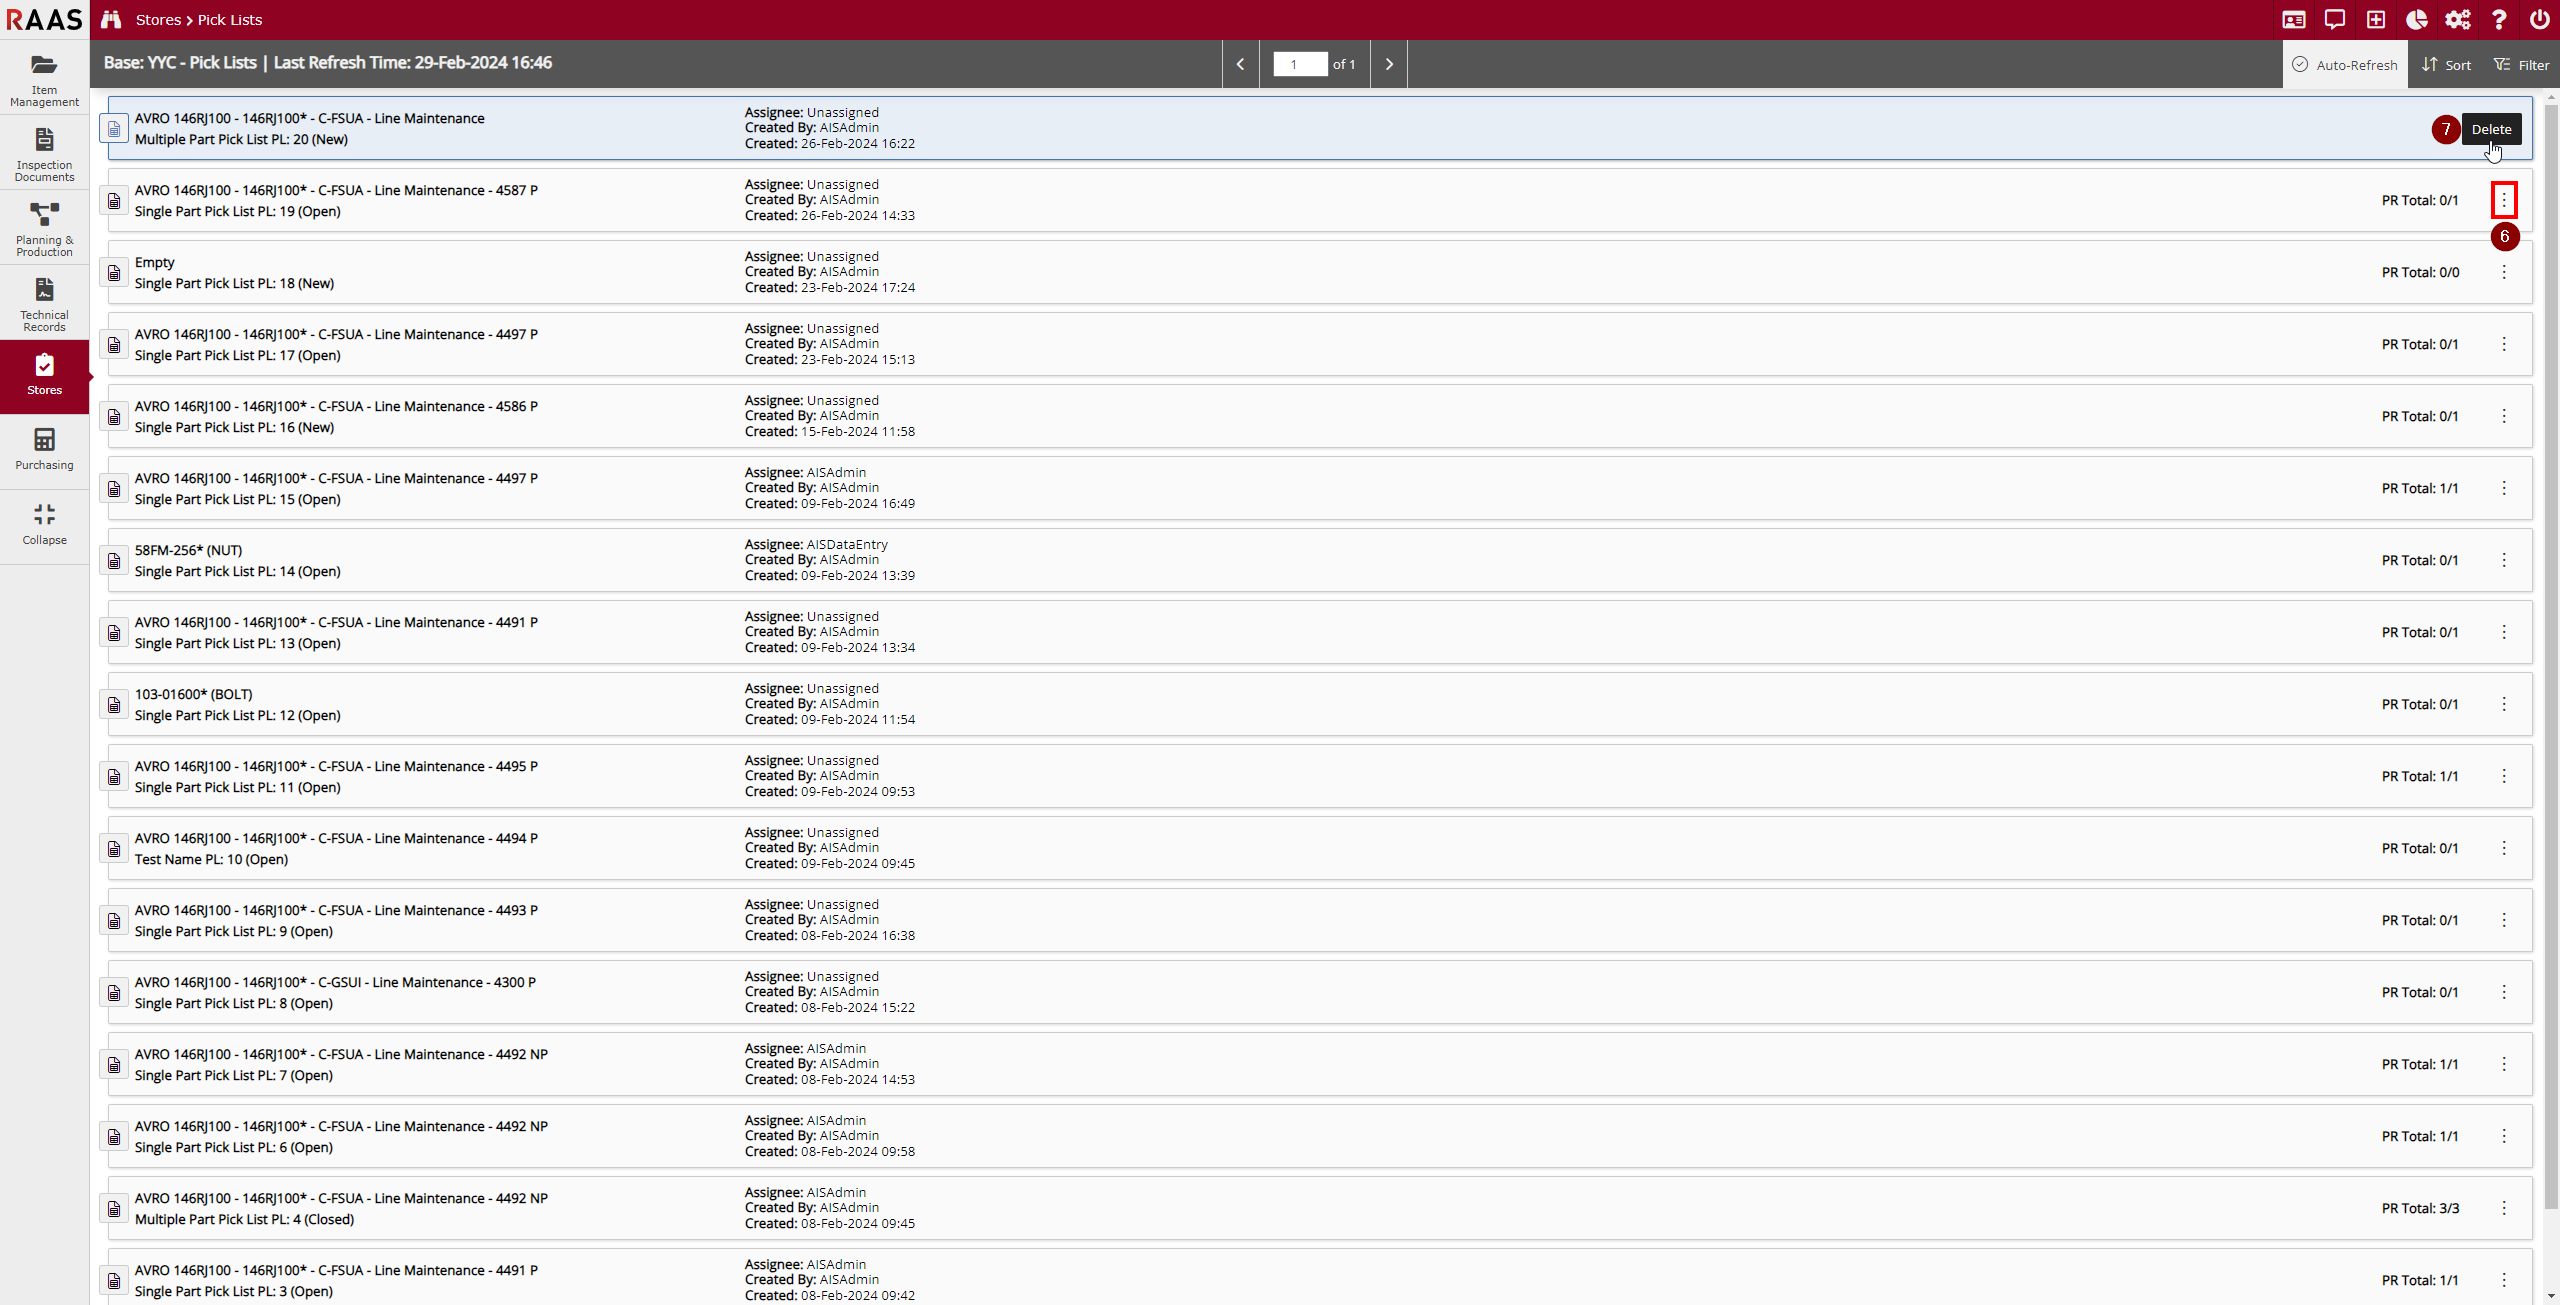
Figure 3: Deleting a Pick List
Viewing, Printing, Issuing Items, and Changing Settings Within a Pick List
-
Navigate to Stores -> Pick Lists and click on the Pick List you would like to view. This will open up the Pick List Detail window which shows the information listed below.
-
The name and number of the Pick List.
-
The Job Card associated to the Part Request for each part in the Pick List.
-
The Part Number, Part Description (in brackets), quantity required, quantity issued, and the unit of issue (Shelf Units).
-
Clicking the Print button allows users to print out the currently selected Pick List. This will open a PDF in a new window and will show various info about each item. If more than one Trace of an item is available, the printout will show each unique Trace. There is also a barcode for each trace and Part Request for scanner use. To print the sheet(s), click the printer icon in this new window.
-
Use the dropdown menu to select the Trace to issue for the Part Request. This will list all available Traces for the part.
-
Click on the magnifying glass icon to view the details of the selected Trace.
-
As an alternative to using the dropdown menu to select the Trace for issuing, the user can click on the scanner icon to scan a Trace barcode to fill in the Trace for the part to be issued instead.
-
Enter the quantity to issue for the Part Request by either typing in the number or using the Up/Down arrows that appear when highlighting the box.
-
Click on Issue when the trace and quantity are selected/entered to issue the part(s) to the Part Request(s).
-
RAAS will ask the user if they want to close the Part Request when all items are issued to it.
-
The Pick List will be automatically assigned to the clicking user.
-
-
Clicking the vertical ellipsis brings up a Delete button that users can click to remove a part from the Pick List. This will update the Part Request to not be part of the Pick List in the Part Requests Listing.
Note that hovering off of the Delete button will cause it to disappear until clicking the vertical ellipsis again. -
Click on the x button to leave the Pick List Detail window and return to the Pick List listing.
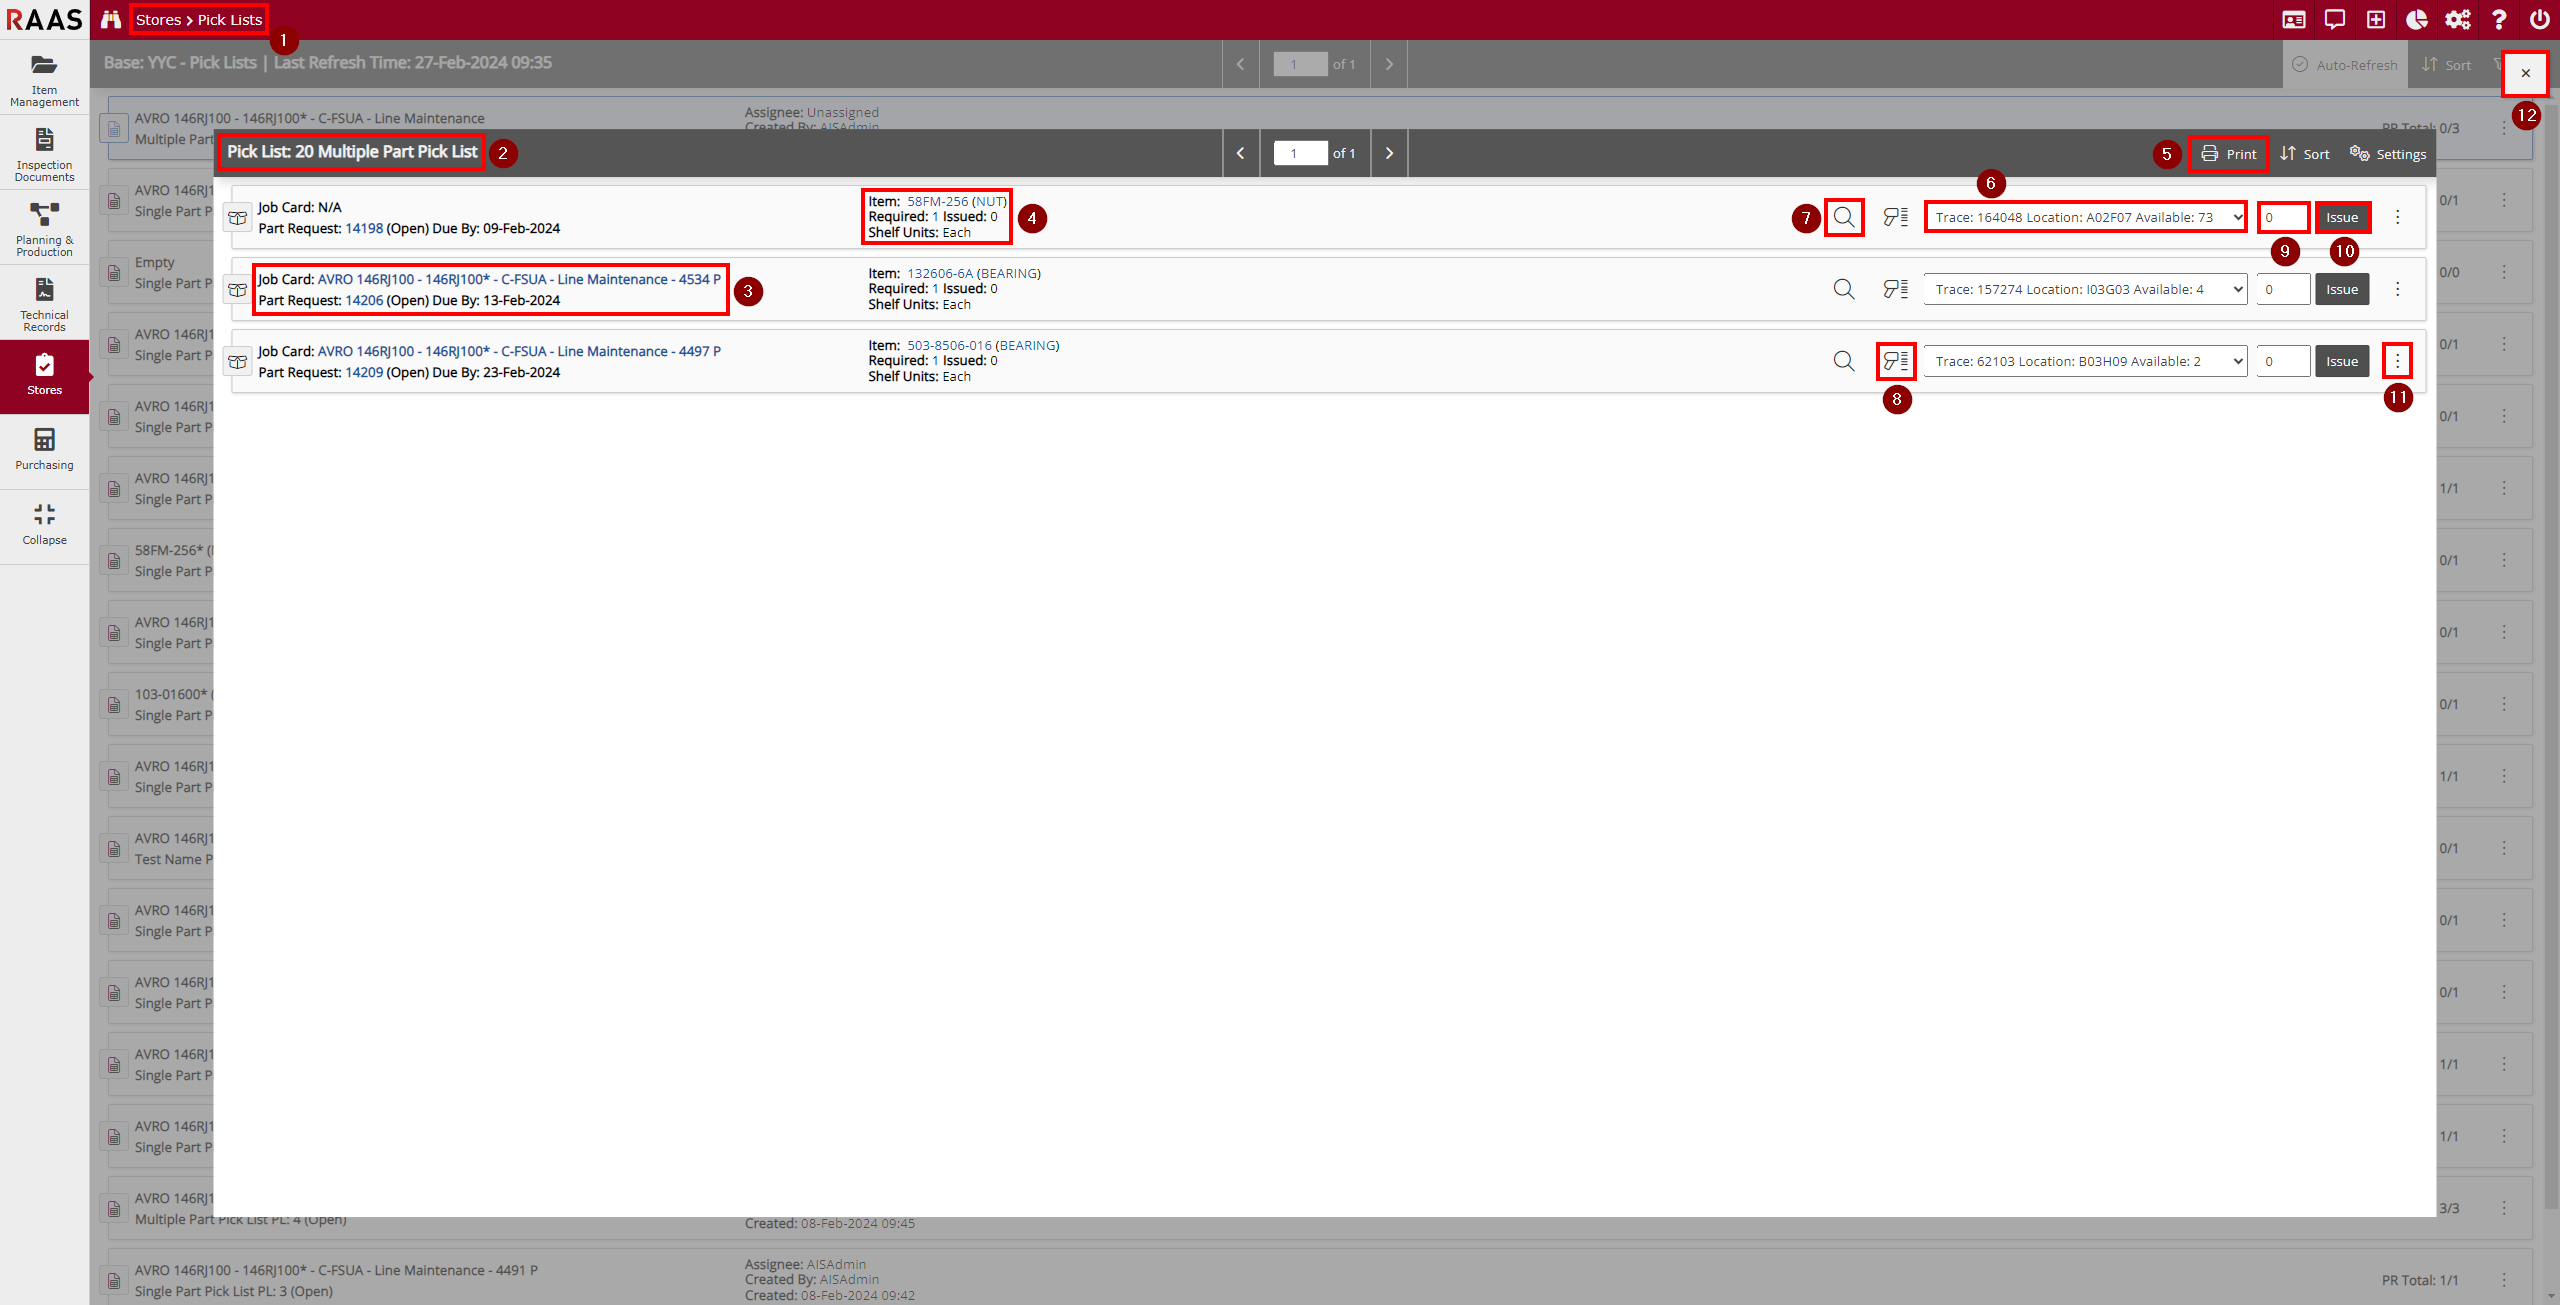
Figure 4: Pick List Detail Window -
Click on Settings to view and edit the Pick List Settings (click again to hide).
-
The following settings can be changed:
-
Pick List Name
-
Assignee
Note that only users with the Stores: View Pick Lists permission may be assignees. -
Status (New, Open, Closed)
Note that the Pick List has to manually be set to Closed when appropriate. -
Notes
-
Part Request Status
-
Include Closed or Rejected Part Requests (flag on/off)
-
-
Min Max
-
Automatically create Part Requests when Min Max thresholds are reached (flag on/off)
Note that unselecting this option allows manual adjustment of Min Max reorder requests.
-
-
The created date of the Pick List is also displayed (not editable).
-
-
Click Save to save any changes and regenerate the Pick List Detail window. A window will pop up letting the user know that the settings were successfully saved.
-
The items within the Pick List can be sorted by clicking Sort (click again to hide), which has the following sorting options:
-
PR Number, Trace receipt date
-
Part Number, PR Number, Trace receipt date
-
PR Due By, PR Number, Trace receipt date
-
Click Apply to re-sort the items.
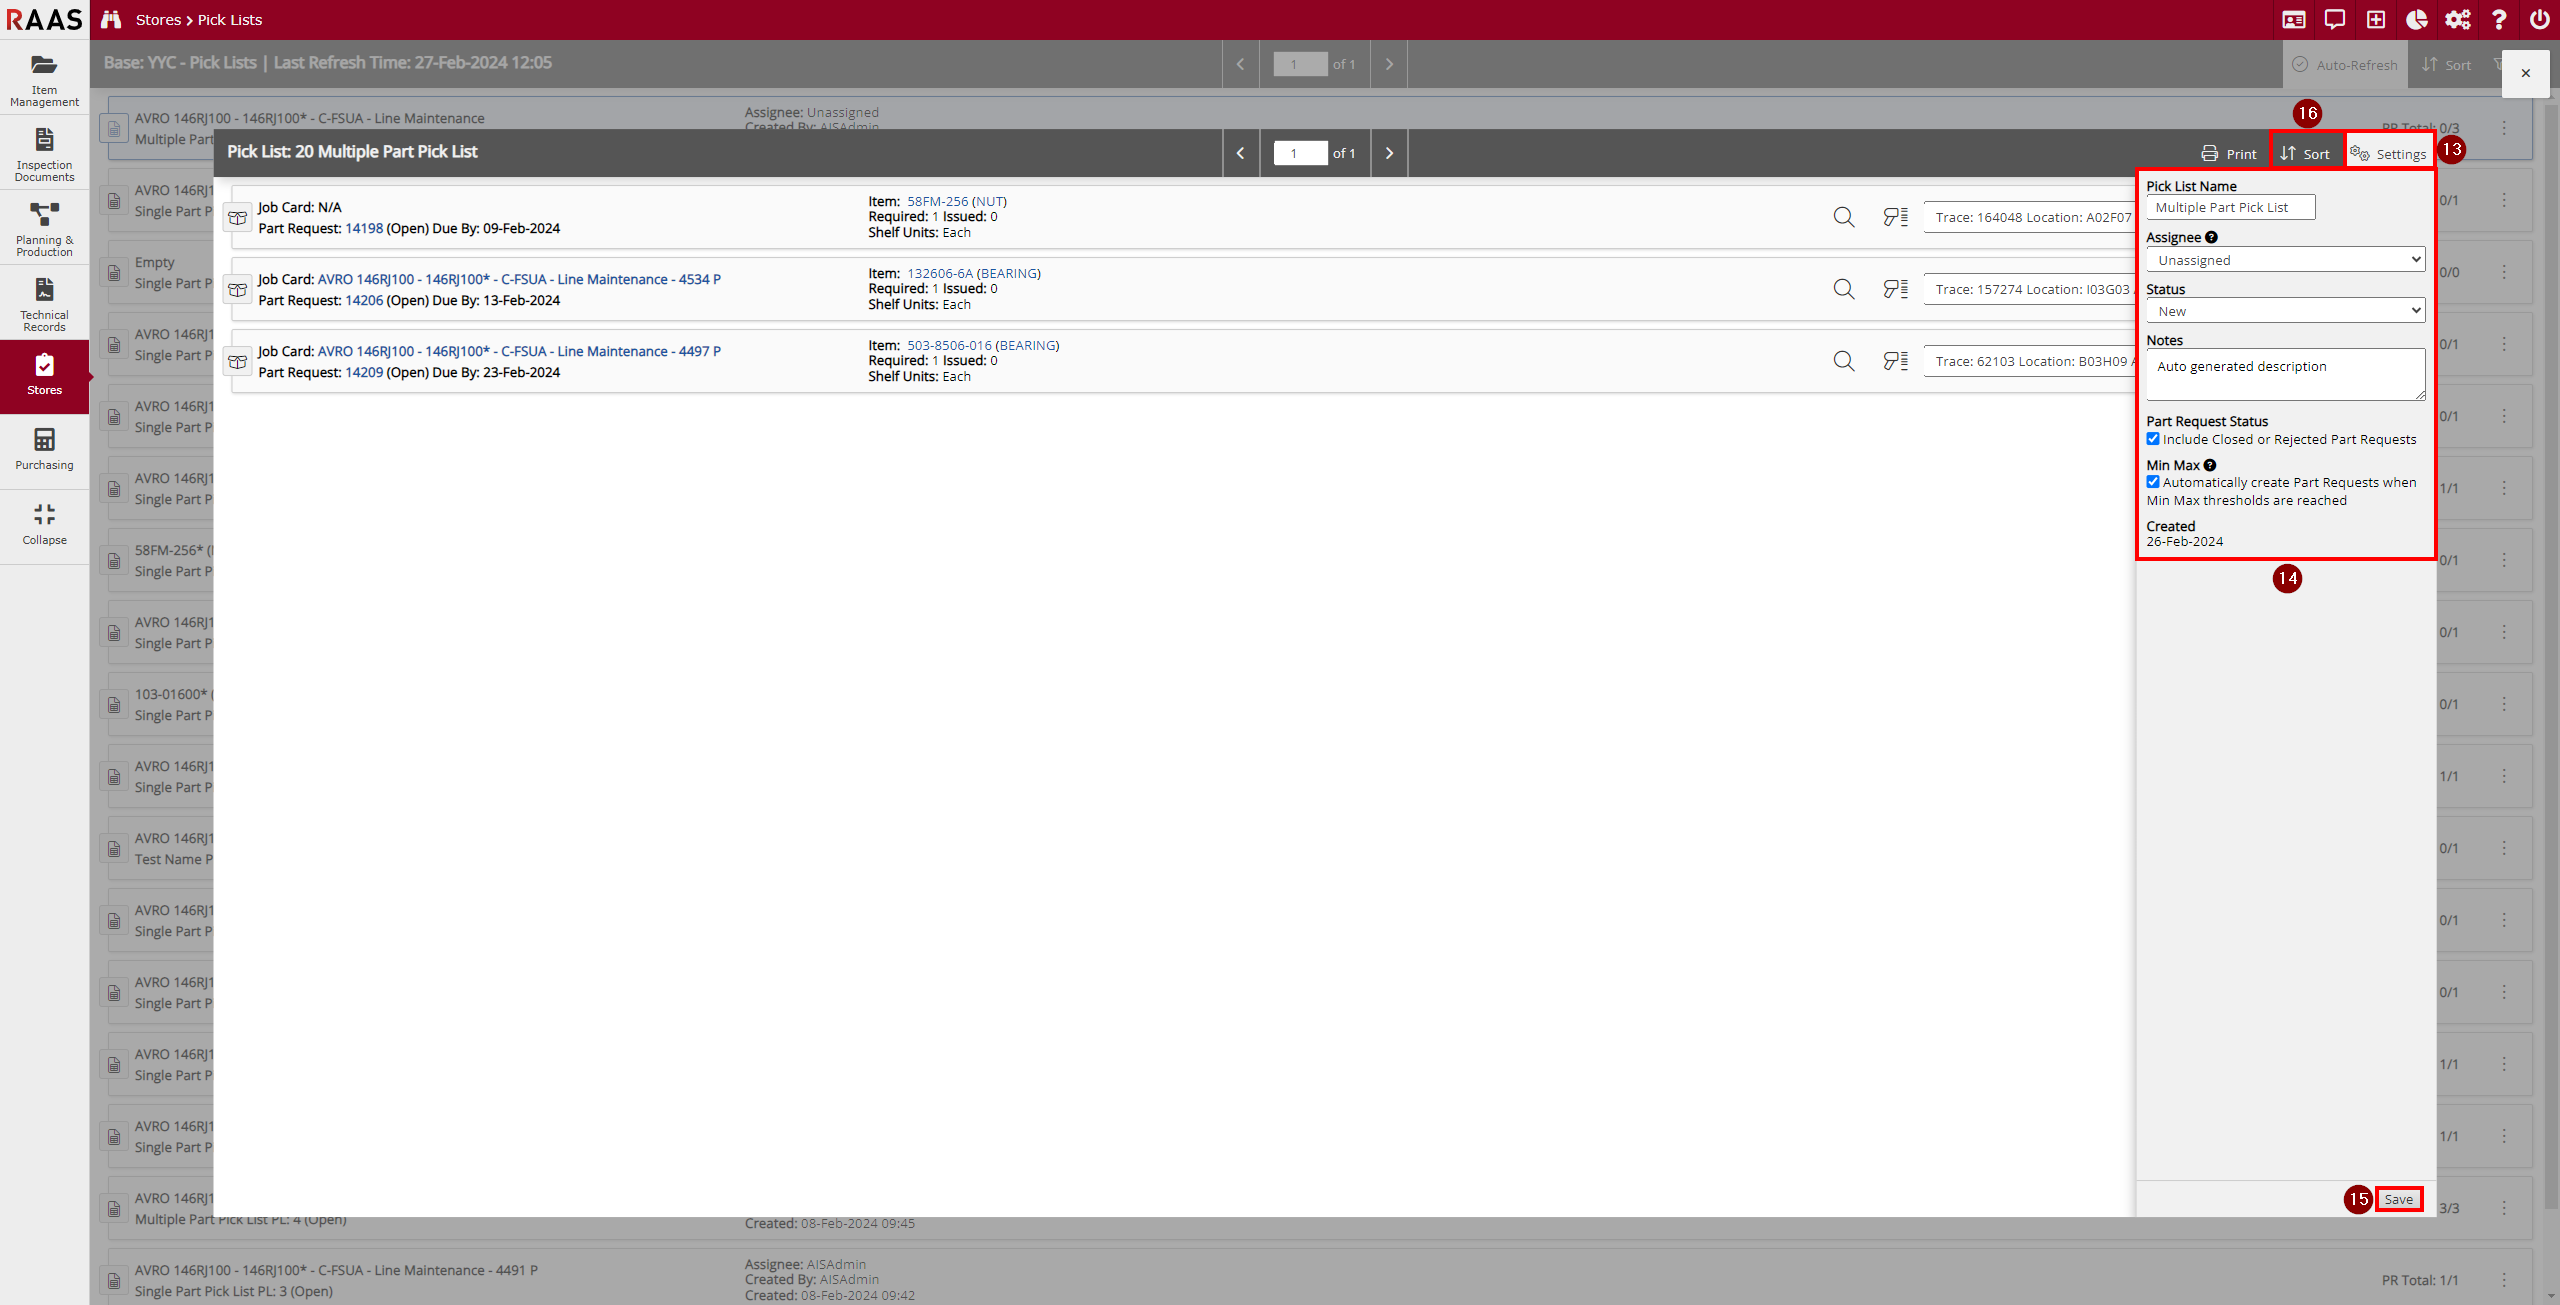
Figure 5: Pick List Detail Settings
-