In order to fill a part request, a request for that part must have been made, either automatically by opening a job card - See Modifying Job Cards - Opening Job Cards, or by creating a request from within the Part Requests Listing sub-module - See Creating Part Requests. To fill a part request, parts may come from Inventory (Stock Issued for PR or JC), acquired from another base (Forwarded to SB) or purchased (Forwarded to Purchasing).
Navigation
-
Click Stores and select Part Requests Listing.
Find a Part Request
-
Click the Find button located at the footer.
-
Choose a search type, enter the search criteria, and click Find.
-
Click on the desired result and click Go.
Processing Part Requests - Issuing
The Part Requests Listing Qty Avail field tells the user at a glance whether or not there is sufficient stock to satisfy a part request. If the Avail field indicates a quantity available, ensure the stock is at the base from which the part request originated, then follow these steps to issue stock:
-
Follow the navigation instructions above.
-
From the Part Requests Listing, click the plus button beside the Avail quantity of the request to be filled.
-
If the part being issued is a Consumable, select the Trace to issue from in the Traces drop-down.
-
Click the Issue button on the right side of the Serial Number to be issued.
-
The Issue Parts window appears with a list of Traces available to be issued. Select the Trace to be issued, indicate the issue quantity, enter the Date and Time of Issue, enter a Reason if desired or required, and click Issue.
-
If the quantity issued satisfies the part request, click OK when prompted to close the Part Request. This will change the Part Request status from Open to Filled/Closed and the issued part will appear on the Stock Issued for PR or JC tab.
Note: the same steps can be carried out by clicking a part request number and clicking New on the Stock Issued for PR or JC tab of the part request detail window.
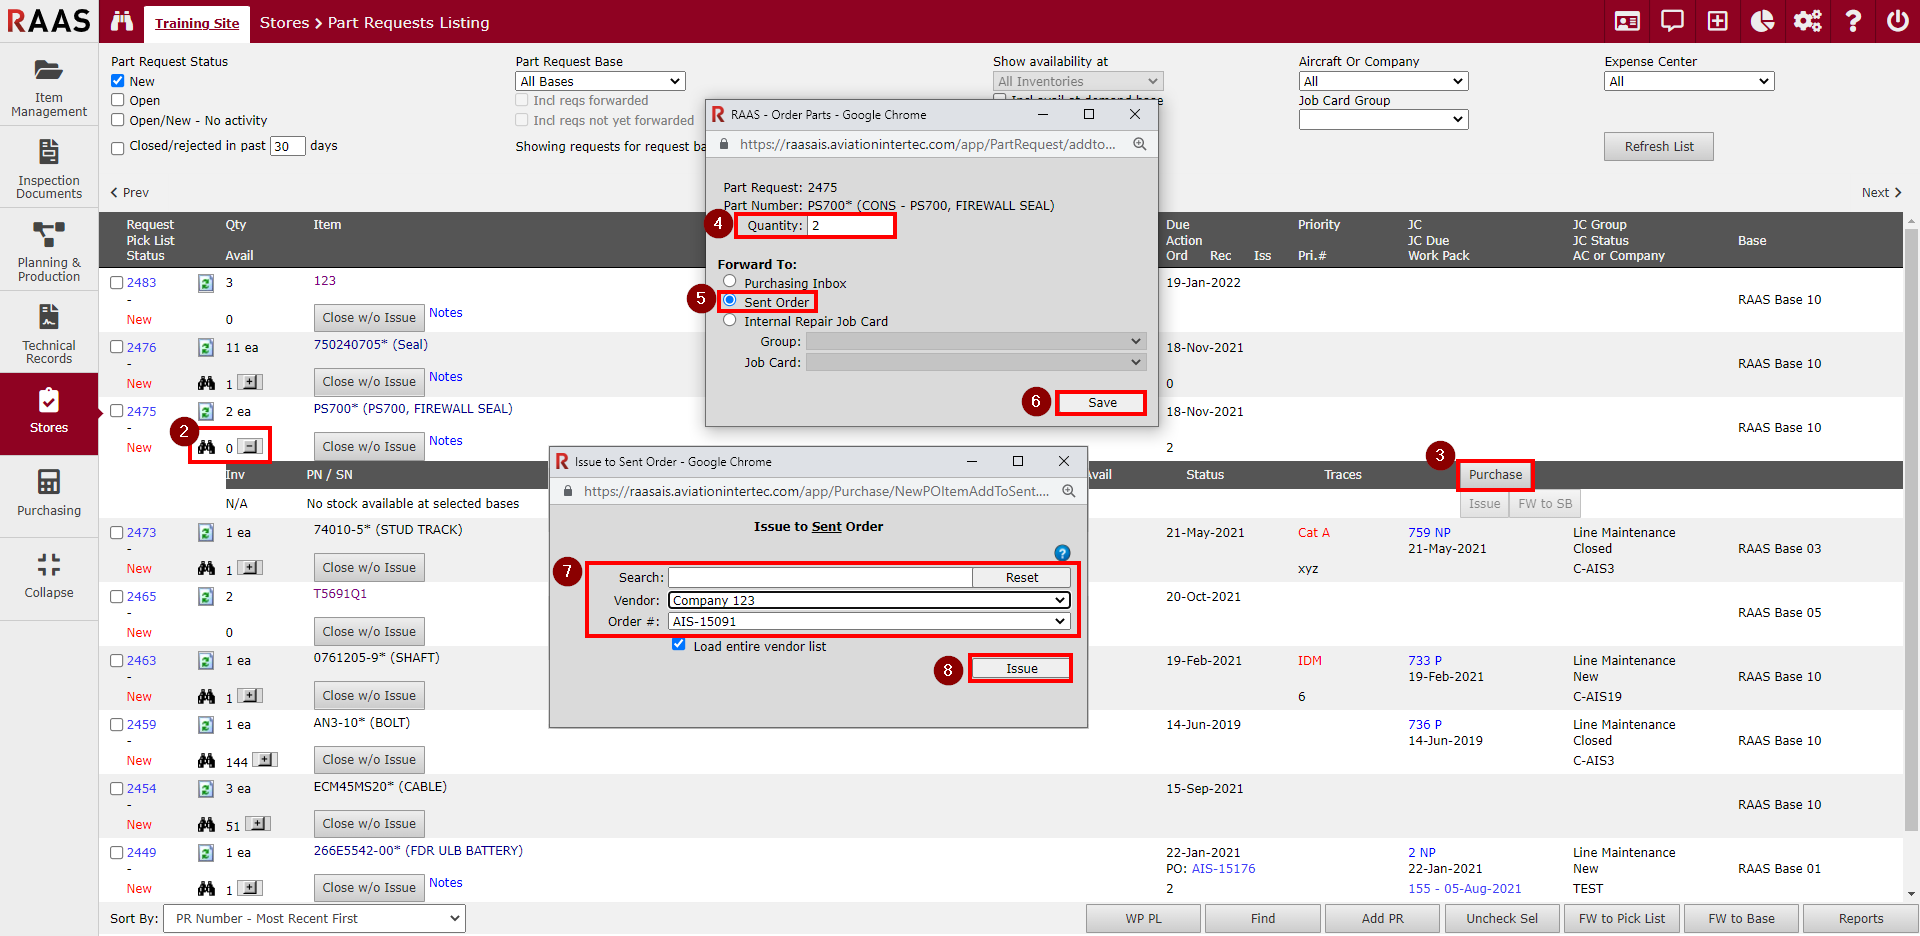
Processing Part Requests - Forwarded to Purchasing
If the Qty Avail field indicates insufficient quantity available, then follow these steps to forward the part request to Purchasing:
-
Follow the navigation instructions above.
-
From the Part Requests Listing, click on the plus button beside the Avail quantity of the request to be forwarded to Purchasing.
-
Click the Purchase button on the right side of the Serial Number list.
-
Enter the Quantity for the part number indicated.
-
Select Sent Order from the list. The part request can only be applied to the Sent Order if there is a sufficient quantity of the part number being ordered. If not, the quantity ordered can be adjusted from the purchase order detail window after confirming the quantity increase with the vendor.
-
Click Save.
-
Select a vendor and PO to issue this part to the selected Sent Order.
-
Click Issue.
Note: the same steps can be carried out by clicking a part request number and clicking Add on the Forwarded to Purchasing tab of the part request detail window.
Processing Part Requests - Forwarded to SB (Shipping Bill)
If a part request from one base is to be filled with stock from another base (a Demand Base), the stock must be shipped to the part request base before issuing. Follow the steps below to create a new Shipping Bill. If an existing Shipping Bill is to be used, follow the instructions on the Stores - Shipping Bills Help page.
-
Follow the navigation instructions above.
-
From the Part Requests Listing click the part request number to display the part request detail window to make sure the part request has been forwarded to the base from which the stock will be shipped (the Demand Base).
-
Click the plus button beside the Avail quantity of the request for which stock is being shipped.
-
Click the FW to SB button on the right side of the Serial Number to be shipped. A Shipping Bill window will be presented.
-
Complete the Shipping Bill header details, including Carrier Waybill, Carrier, Weight, No. of Boxes, Handling Instructions, and Notes.
-
Click Save.
-
Click the Add Tracked button.
-
Search for the stock to be shipped by Part Number, Serial Number, Trace, or Barcode.
-
Select the Serial Number to be shipped or the Trace from which to ship from the search results, enter the qty, and click Select Item.
-
If the stock being shipped is non-Consumable, destination details can be optionally entered, including pre-assigning a Trace in order to print a label, the destination Inventory Position, Harmonization code, box shipped in, and Transfer Reason.
-
If the stock being shipped is Consumable, in addition to the destination details in step 9, optionally select the Destination Bin.
-
Click Add Item.
-
If additional stock is to be shipped on the same shipping bill, repeat steps 6 thru 11 for each item.
-
When all items have been added to the Shipping Bill, send the Shipping Bill by clicking the Send button in the Shipping Bill header.
-
Once the shipment arrives at the destination base items can be received and issued.
Note: the same steps can be carried out by clicking a part request number and clicking New on the Forwarded to SB tab of the part request detail window.
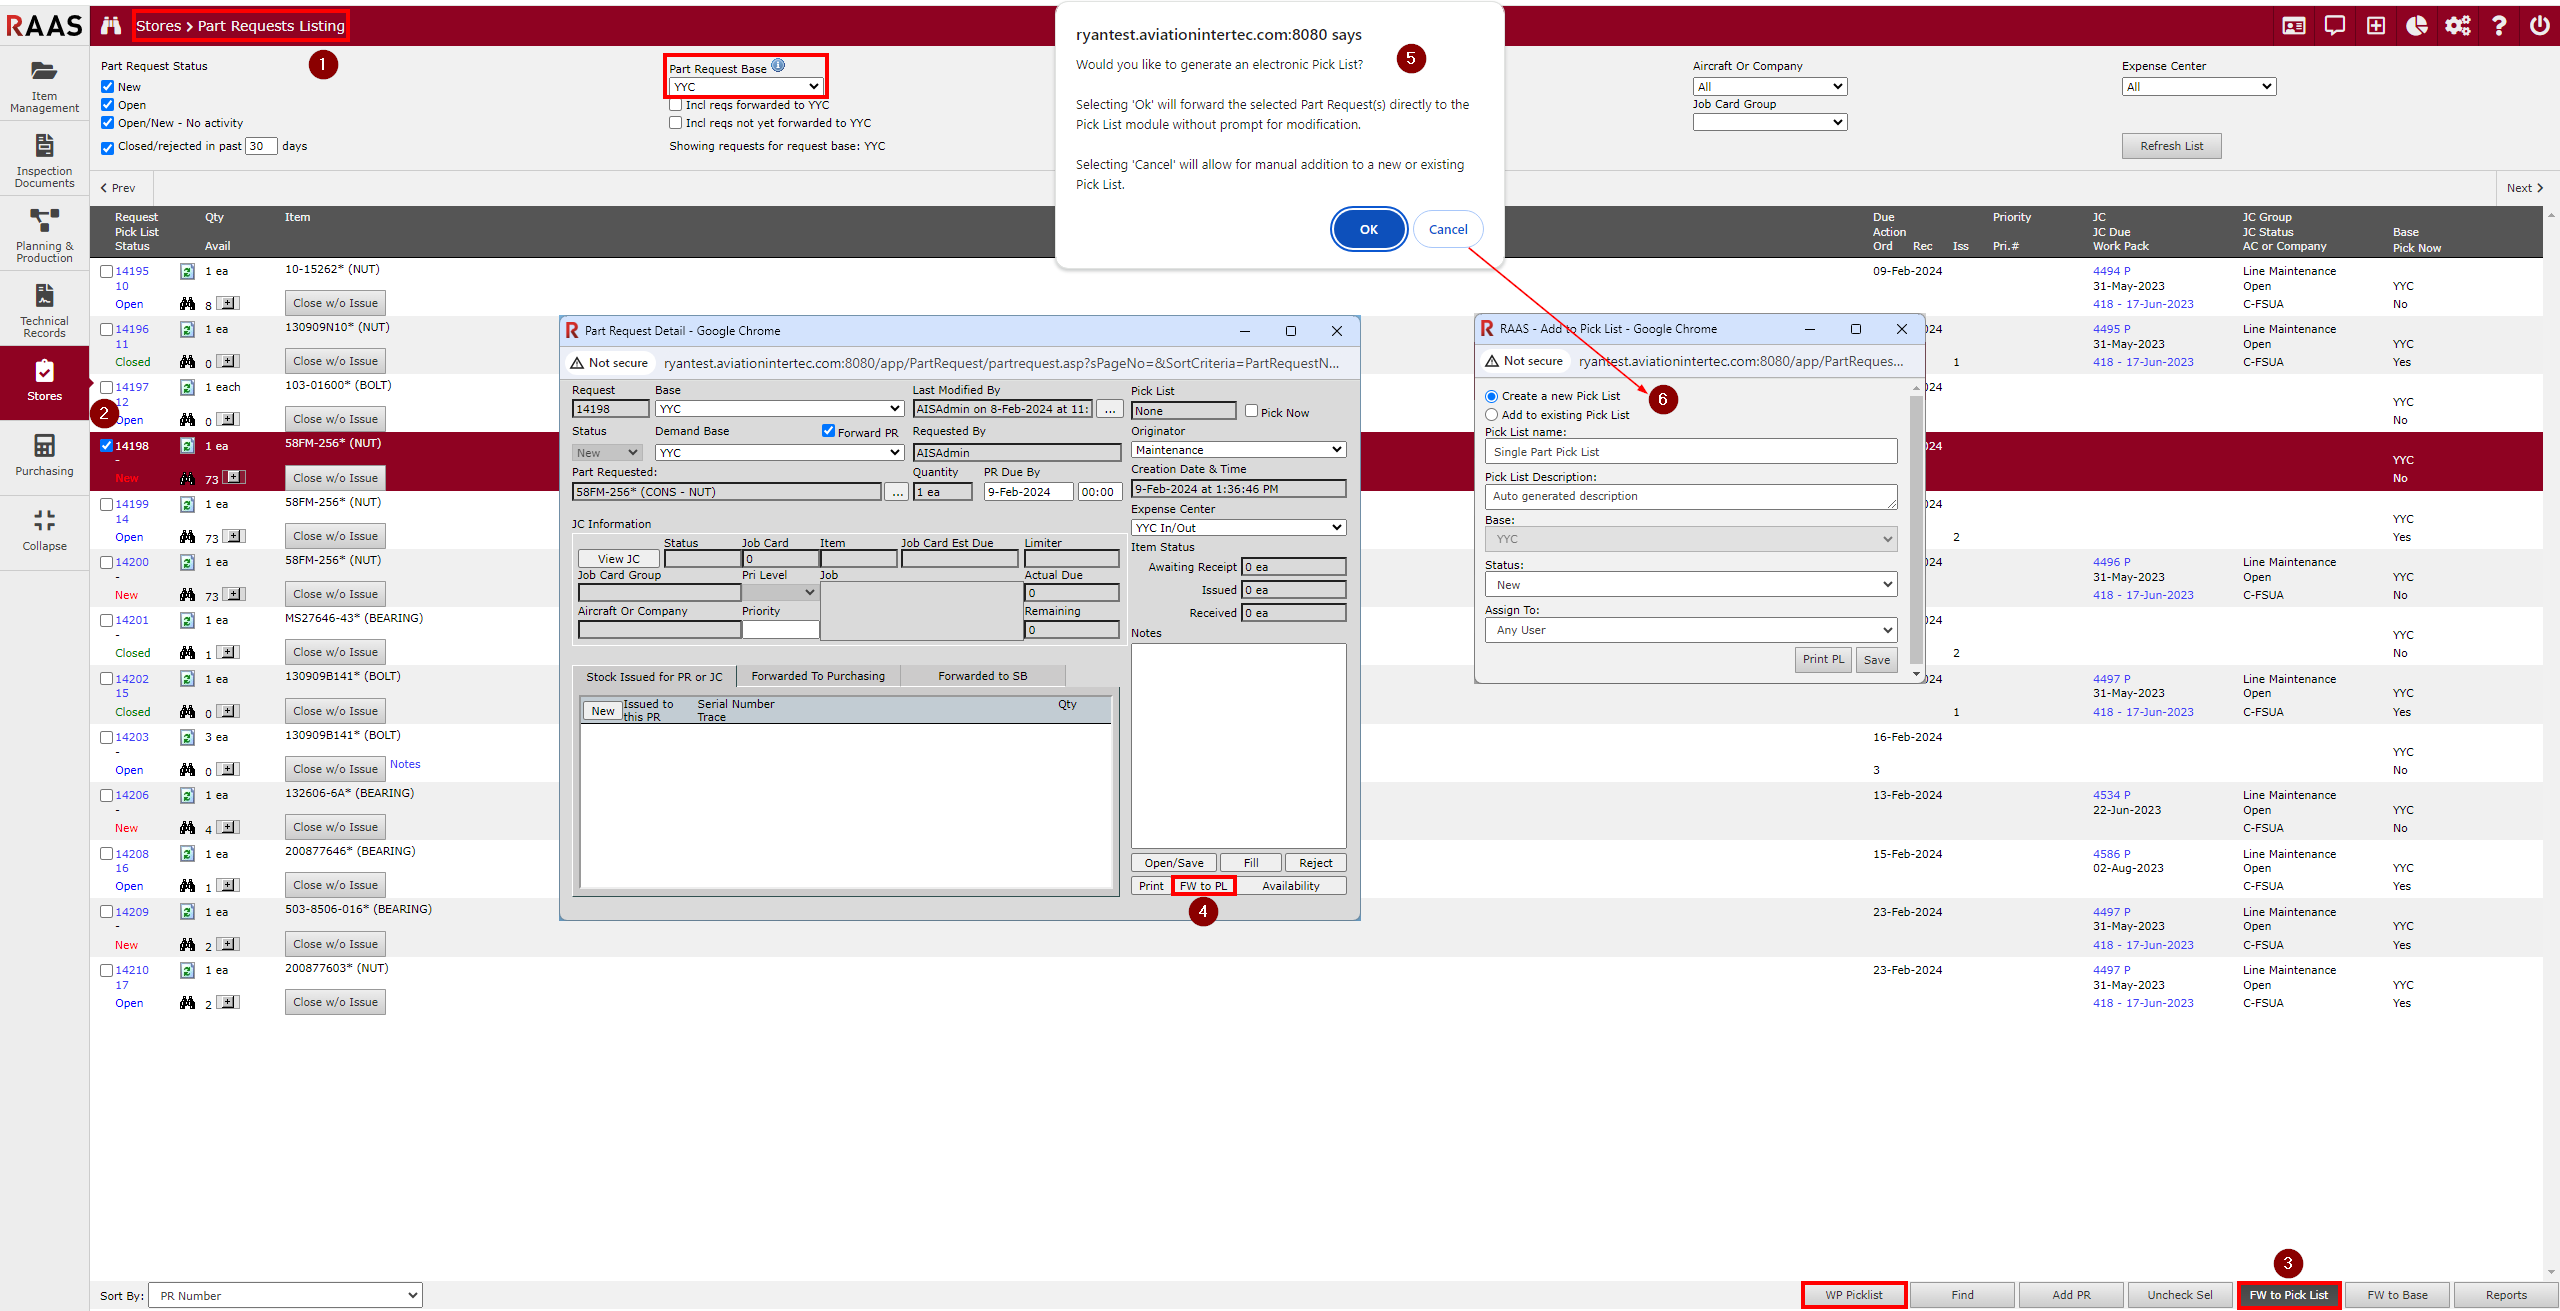
Processing Part Requests - Forwarded to Pick List
There are two options for forwarding Part Requests to Pick Lists: from the Part Requests Listing sub-module or from the Part Request Detail window.
-
Follow the navigation instructions above.
-
Select the Part Request(s) you would like to forward to a Pick List by clicking the checkbox(es).
-
Alternatively, you can click on an individual Part Request number to open its Part Request Detail window.
-
If the Part Request(s) you are looking for aren’t listed, double-check the filter settings at the top of the page.
-
-
If forwarding from the Part Requests Listing, click on the FW to Pick List button after selecting the Part Request(s) that you want to forward.
Note: Pick Lists can also be created for Work Packs by clicking WP Picklist and selecting the specific WP from the drop-down. -
If forwarding from the Part Request Detail window, click the FW to PL button.
-
Steps 3 and 4 will bring up the same pop-up window when clicking the respective buttons.
-
Clicking OK will automatically create the Pick List without any customization options from the user.
-
Clicking Cancel will allow the user to customize the Pick List settings before creating it.
-
-
Within the Add to Pick List window (after clicking Cancel in Step 5), the user can choose to create a new Pick List or add to an existing Pick List*. When creating a new Pick List, the following options can be edited:
-
Pick List Name
-
Pick List Description
-
Status (New or Open)
-
Assign to a user
-
-
When satisfied with the settings, click Save to create the Pick List or Print PL to print the Pick List.
-
After creating the Pick List, a window will pop up with the Part Request and Pick List number(s) and the user can choose to view the Pick List from there or navigate to the Pick List sub-module to view it.
*Note: A Part request can only be added to an existing Pick List if there is a New Pick List (rather than Open) in the associated Base. If there isn’t a new Pick List in the Base, the only option will be to create a new Pick List.