A Job Card or Task Card is a printed document that contains a large amount of information pertaining to the maintenance job. Some of the more important information is the accomplishment instructions, trade and man-hours requirements, access panel list, graphic attachments, reference material and parts/materials list.
The processes of creating, editing, printing and even viewing a Job Card require the user to have the appropriate security levels.
Navigation
-
Click on Planning and Production or Stores and select Job Card Listing.
-
Select the applicable Aircraft or Company and Job Card Group.
-
Click the Generate button.
Note: If the Job Card you want is not in the list, click the Filter button to adjust the filter settings and click Save. Click the Generate button.
Find a Job Card
-
Follow steps 1 and 2 of the Navigation instructions.
-
Click the Find button.
-
Enter the search criteria and select the appropriate fields and status criteria to be searched and click Find.
-
Select the check box for the desired result and click View. Close the Job Card Find window once you have the desired Job Card.
Opening Job Cards
When a Job Card status is changed from New to Open, any part requests added to the Part List are automatically issued to Stores. When opening an Internal Repair Job Card, if a non-consumable affected part has a current installation other than Inventory, you will be notified that the part can't be moved. Otherwise, you will be notified that it is being moved to Internal Repairs.
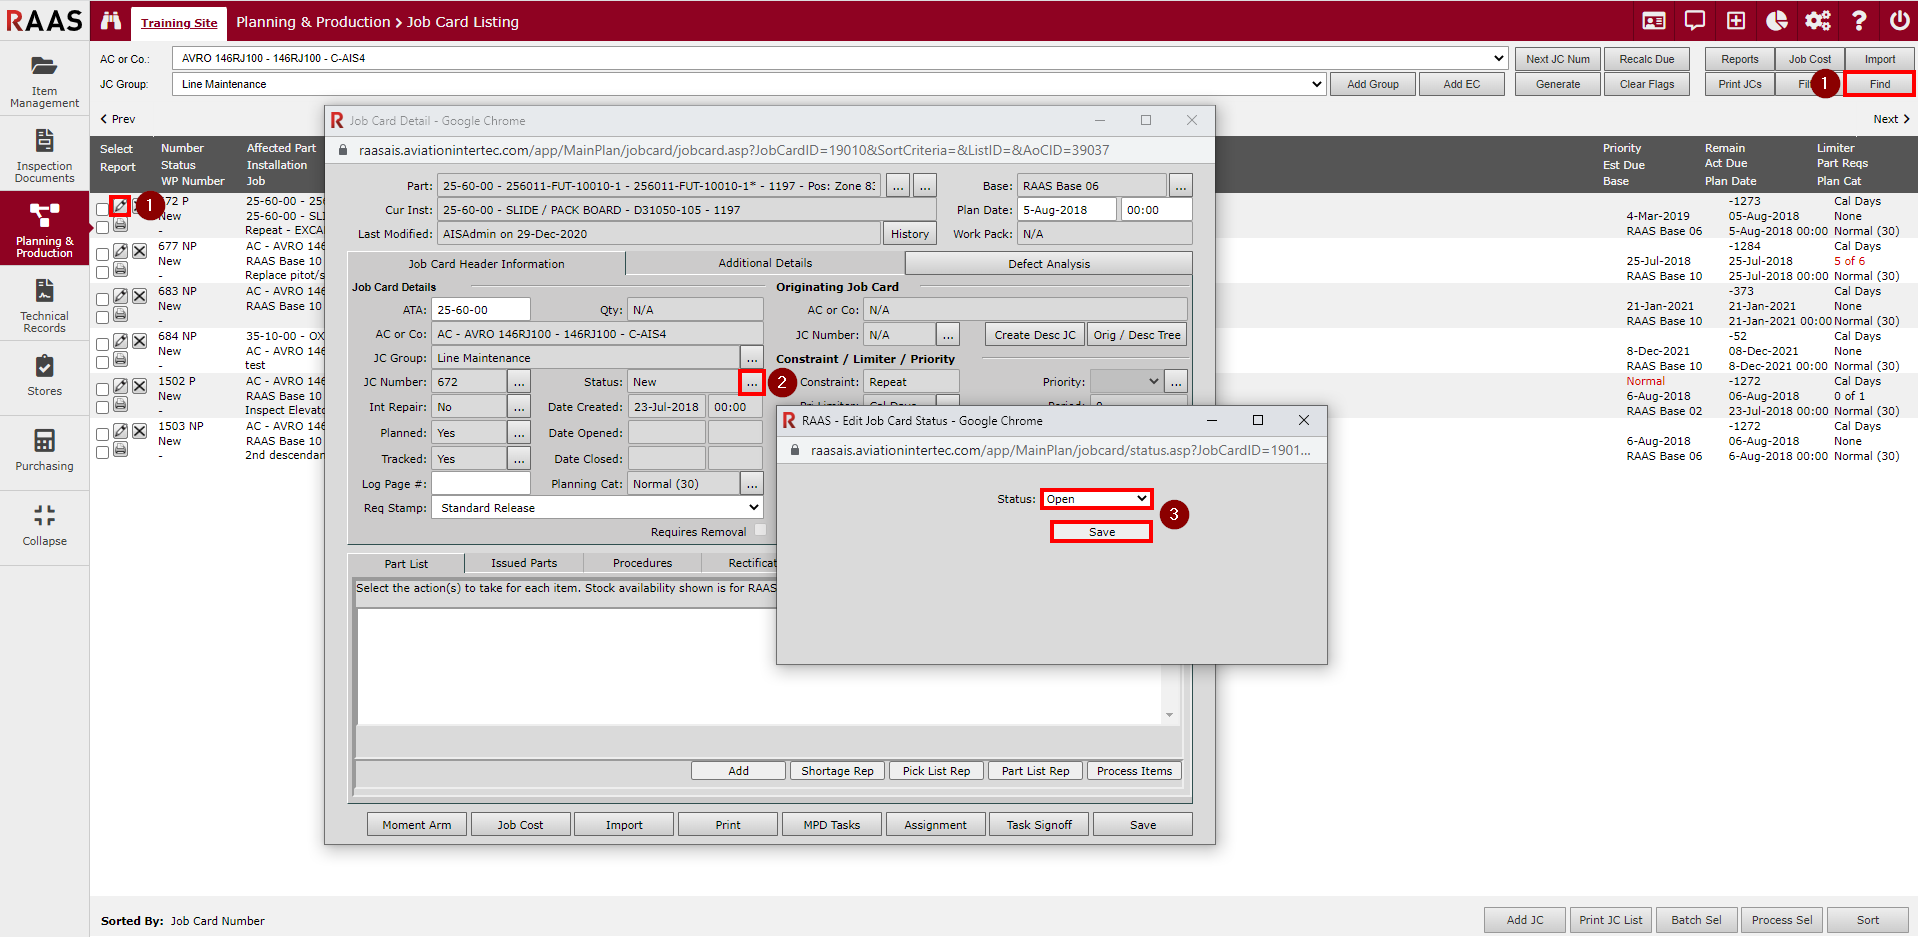
Single Job Card
-
Use the Navigation instructions and click on the notepad icon to view the specific Job Card details.
OR
Use the Find a Job Card method to locate and view the specific Job Card.
-
Click on the ellipse (...) button next to the Status field.
-
Change the Status from New to Open and click Save.
The Job Card will refresh and the status will change from New to Open and the Date Opened will be updated.
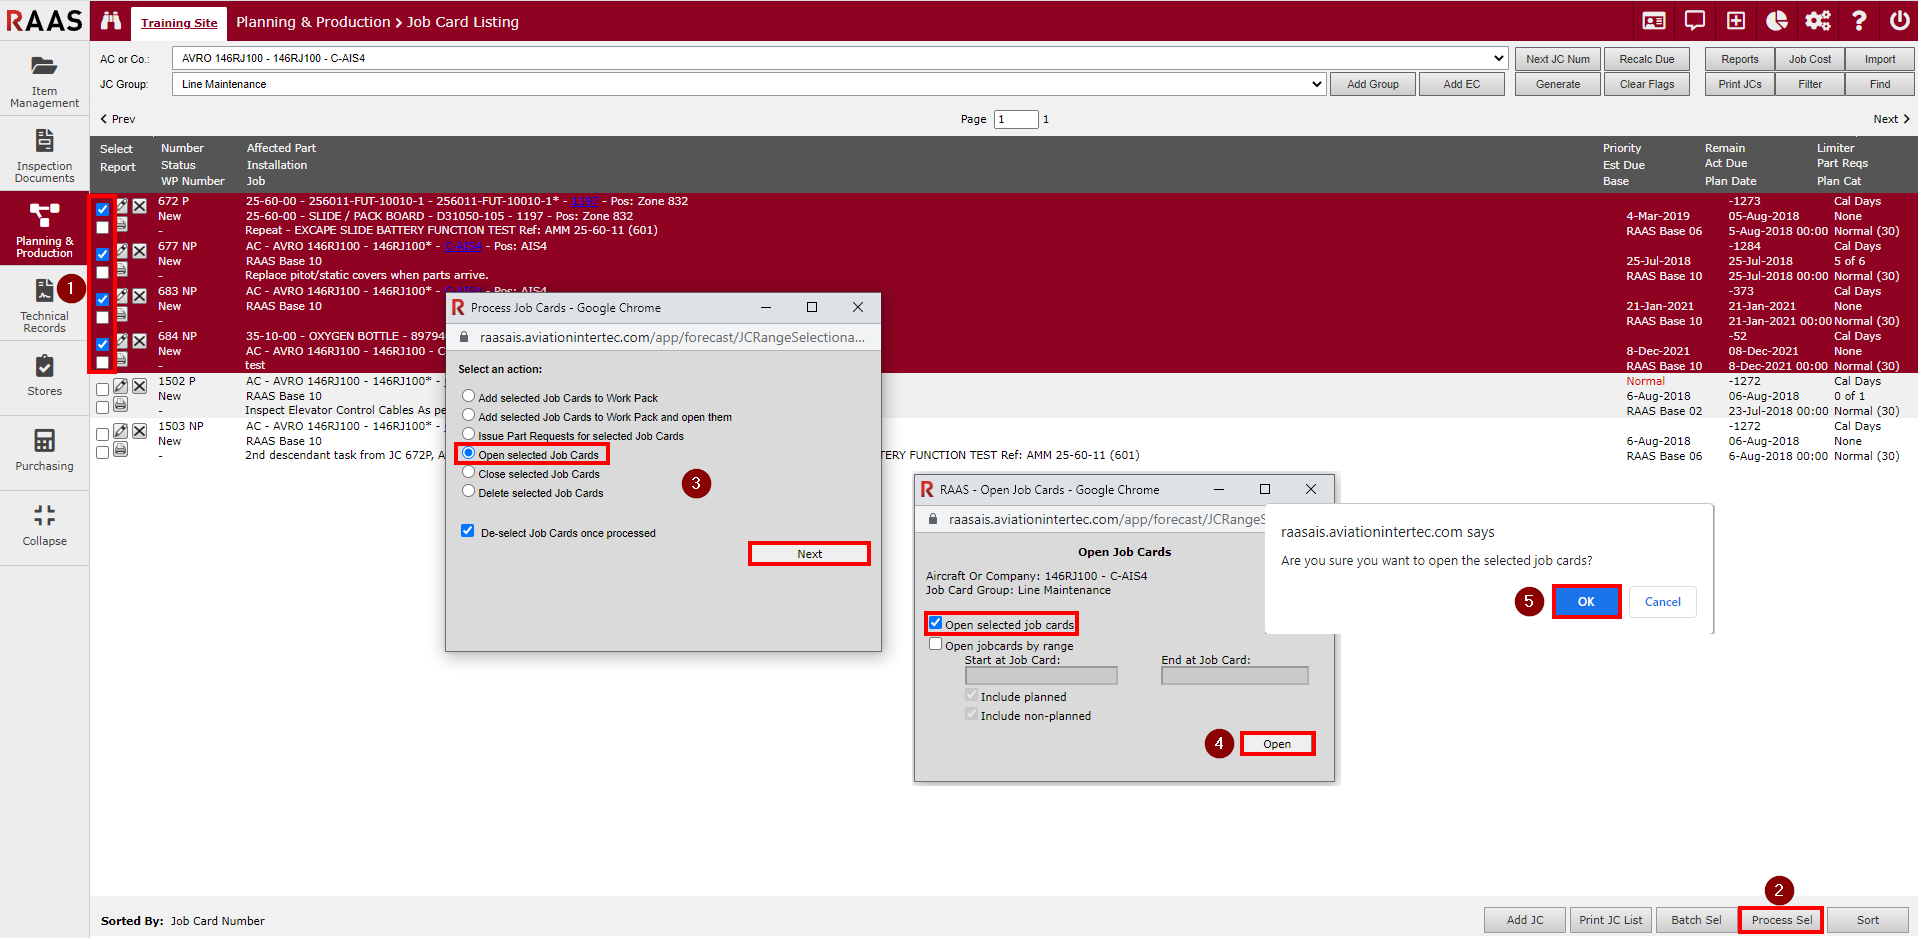
Multiple Job Cards
Use the Navigation instructions and filter on Show New Job Cards only.
-
You can either select specific Job Cards by checking the top check box at the beginning of the Job Card row (the row will highlight red) or specify a Job Card range later in step 4.
-
Click on the Process Sel button located at the bottom of the generated Job Card Listing.
-
Select the Open selected Job Cards action and click Next.
-
If you pre-selected the Job Cards you want to open in step 1, Open selected Job Cards will be checked. Click Open and continue to step 5.
If you elected to specify a range, enter the Job Card number range and indicate if you want to include planned and/or non-planned Job Cards. Click Open.
-
Click OK to continue with opening the selected Job Cards.
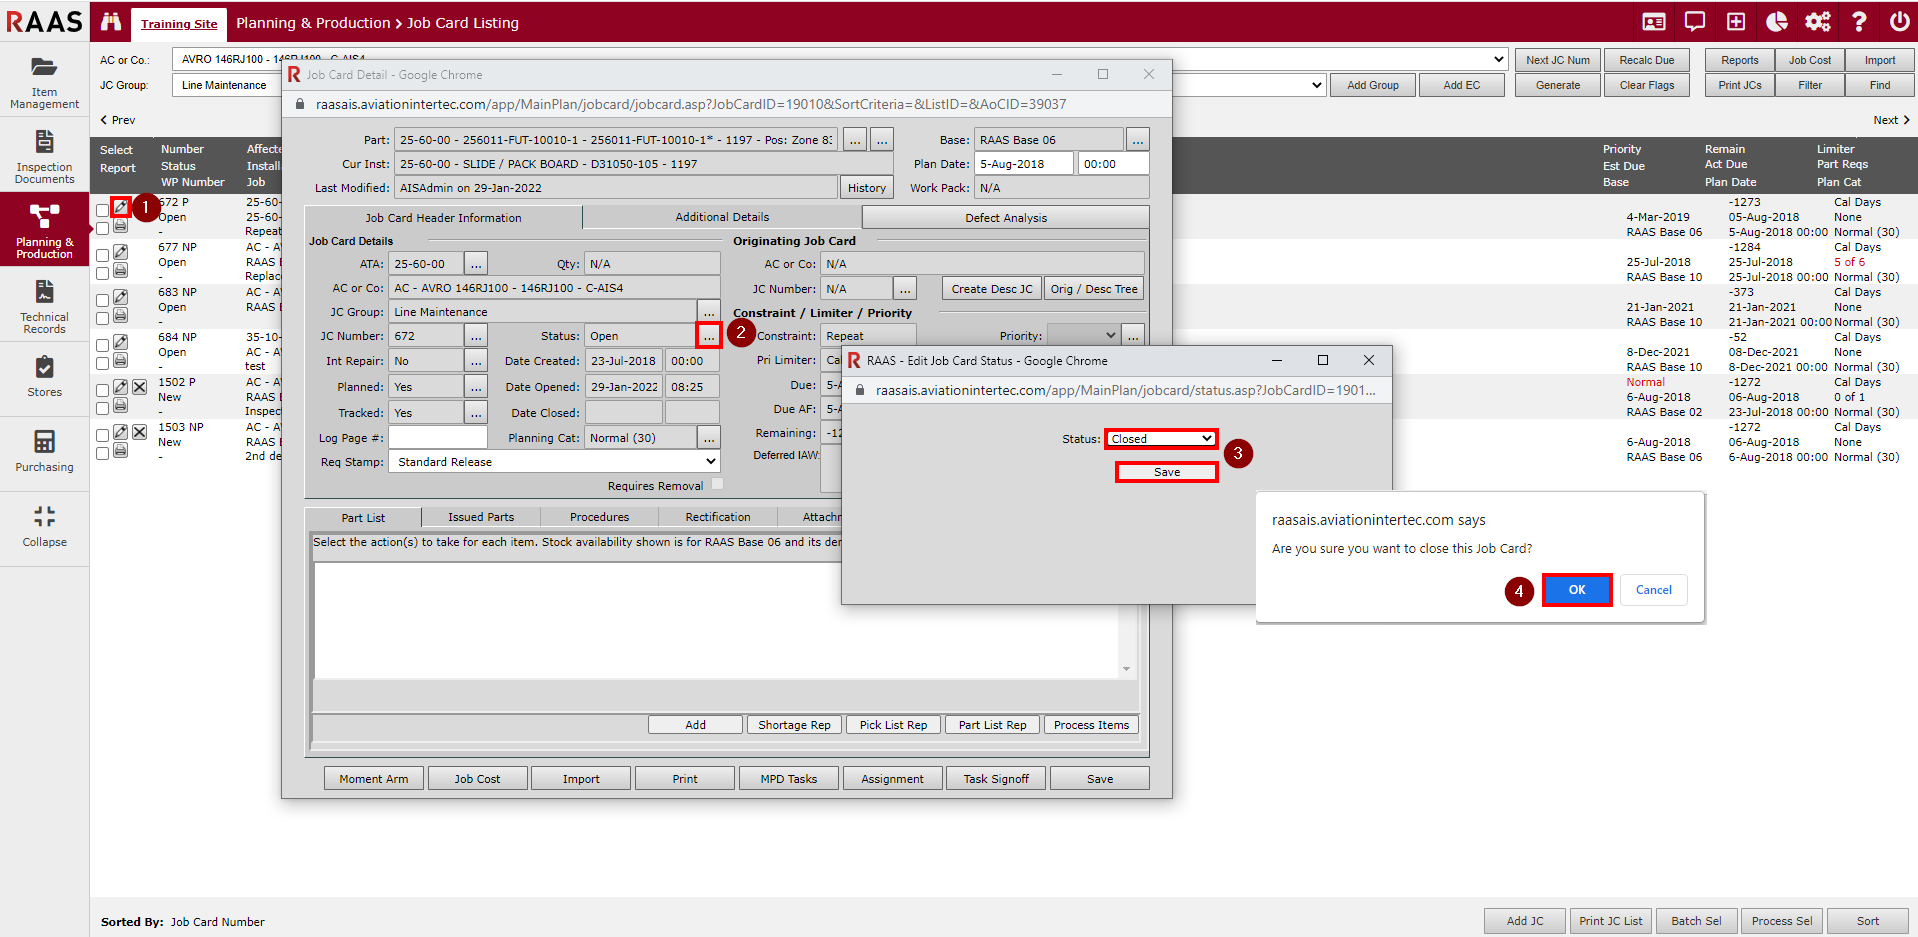
Closing a Job Card Manually
Closing a Job Card means that the maintenance job has been completed. Job Cards are closed one at a time, not in a batch.
-
Use the Navigation instructions and filter for Show Open Job Cards only. Click on the notepad icon to view the specific Job Card details
OR
Use the Find a Job Card method to locate and view the specific Job Card.
-
Click on the ellipse (...) button next to the Status field.
-
Change the Status from Open to Closed and click Save.
-
Click OK to close the Job Card.
The Job Card will refresh and the status will change from Open to Closed and the Date Closed will be updated.
Rectifications
Often referred to as Manual or Line Level Rectifications (LLR), Rectifications are used when maintenance details are being entered directly on the electronic Job Card in RAAS to indicate completion of required tasks. They may be used to supplement or replace a paper process of writing out and signing accomplished work.
Adding a Rectification
-
Use the Navigation instructions and click on the notepad icon to view the specific Job Card details.
OR
Use the Find a Job Card method to locate and view the specific Job Card.
-
Click on the Rectification tab.
-
Any existing/pending rectifications for this Job Card will be listed here.
-
-
Click Add to open the Rectification Wizard.
-
In the Item Related Data section:
-
The user can check the Close Job Card checkbox if wanting to close the Job Card after adding the rectification.
-
If wanting to add multiple non-closure rectifications to a Job Card, keep this box unchecked, but be aware that each entry has to be fully signed before a user can add an additional rectification to the same Job Card.
-
-
The Planned and Tracked checkboxes are not editable here as they are pulled from the Job Card details.
-
Edit Date of Maintenance, AF Hrs, and AF Ldg to current if needed.
-
Maintenance can be completed prior to Tech Records updating the Airframe time or if entering in the information late, for example.
-
-
-
In the Affected Part of the Entry and/or Jobcard section:
-
The Include In Defect Reliability Analysis checkbox will be unselected by default for Planned Job Cards and selected by default for Non-Planned Job Cards.
-
Users can check or uncheck this box manually.
-
-
The rest of the information in this section is populated from the Job Card details.
-
-
In the Work Completed By section:
-
The Required checkbox will be selected by default if the “Auto-select Work Completed By Required checkbox on Rectification creation” option is enabled in the Job Card Information section of Company Settings. The checkbox can be de-selected if necessary.
-
Selecting a Base will filter the Employee dropdown for employees at that base; if left blank all employees will be listed.
-
Search for the Employee by typing a name or leave blank to list all applicable employees.
Note: Employees must have the Maintenance Personnel flag turned on and/or a Base selected (if filtering by Base) in the Employee Information screen of the Options module.
-
Click on an employee’s name to select them.
-
Multiple employees can be added, a password signature for each employee will be required at the end of the rectification entry.
-
-
-
Click Next when finished.
-
Before final sign-off, any of the fields can still be edited if needed by someone with the appropriate Security Roles.
-
If the Close Job Card checkbox is unchecked, a warning will pop up to confirm that the user does not want to close the associated Job Card before proceeding
-
Clicking OK in this window will bring the user back to the Rectification Wizard page to be able to select the checkbox to close the Job Card.
-
Clicking Cancel will proceed to the next page without closing the Job Card.
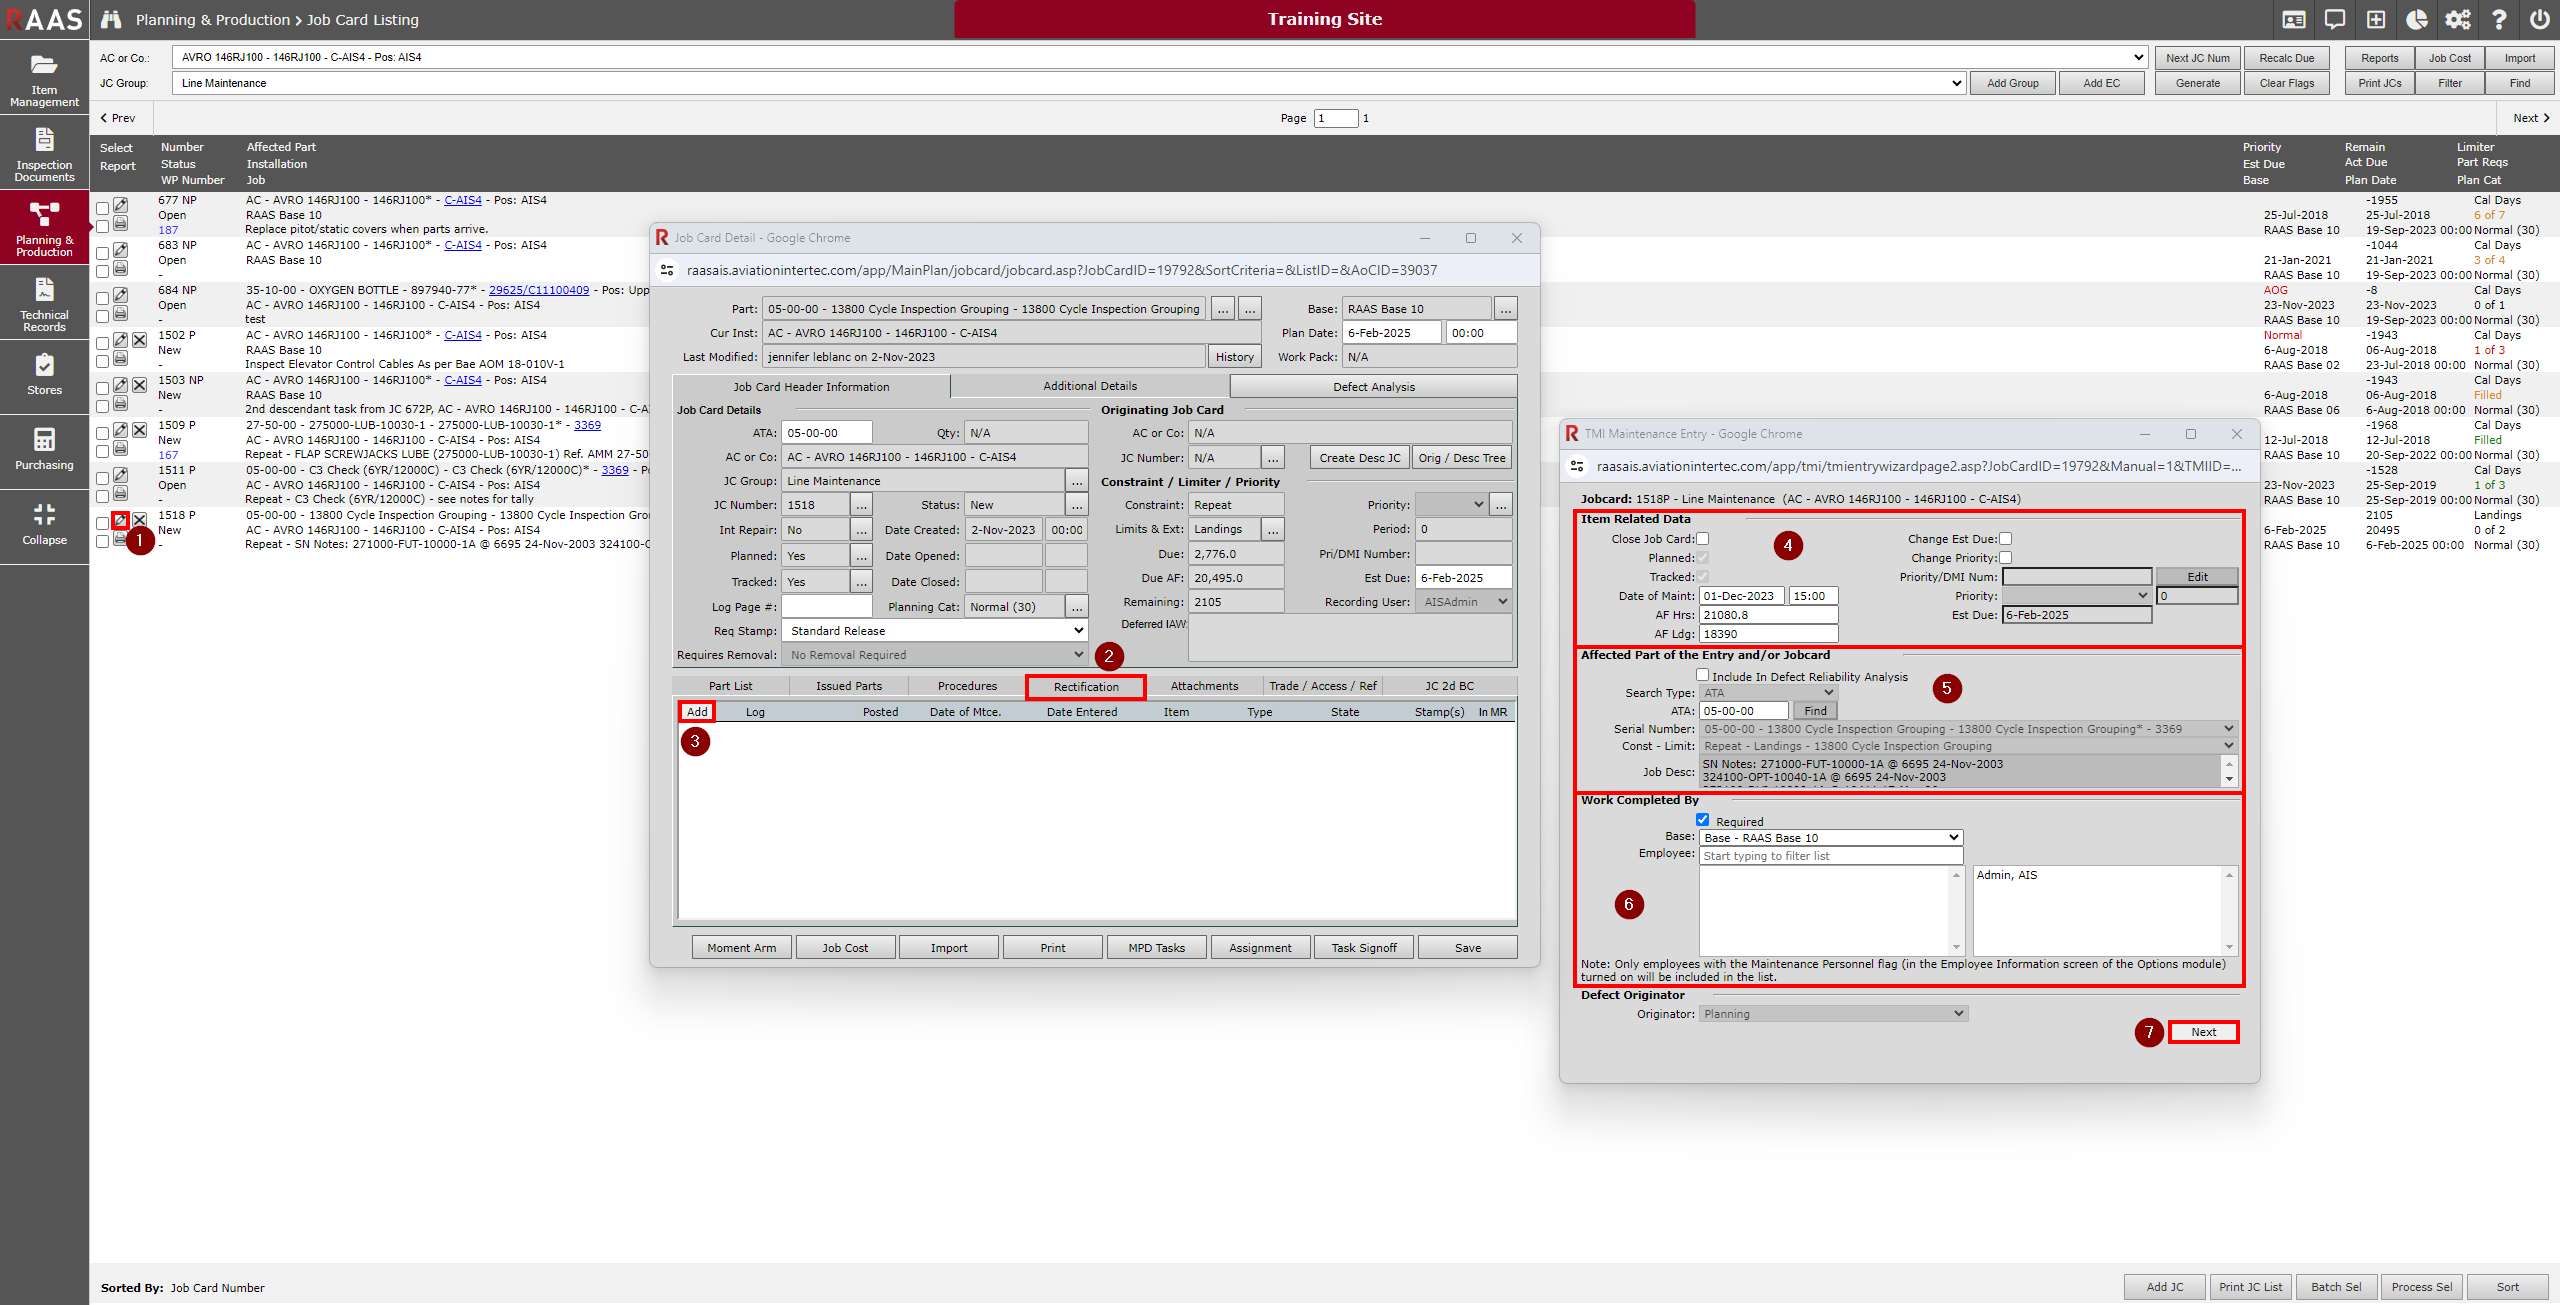
Figure 4: Adding a Rectification
-
-
Stamp Selection
-
The Stamp will be pre-selected based on the Req Stamp selected on the Job Card.
-
The number in brackets next to the stamp name shows how many signatures will be required for this rectification.
-
-
After selecting the appropriate stamp(s), click Next.
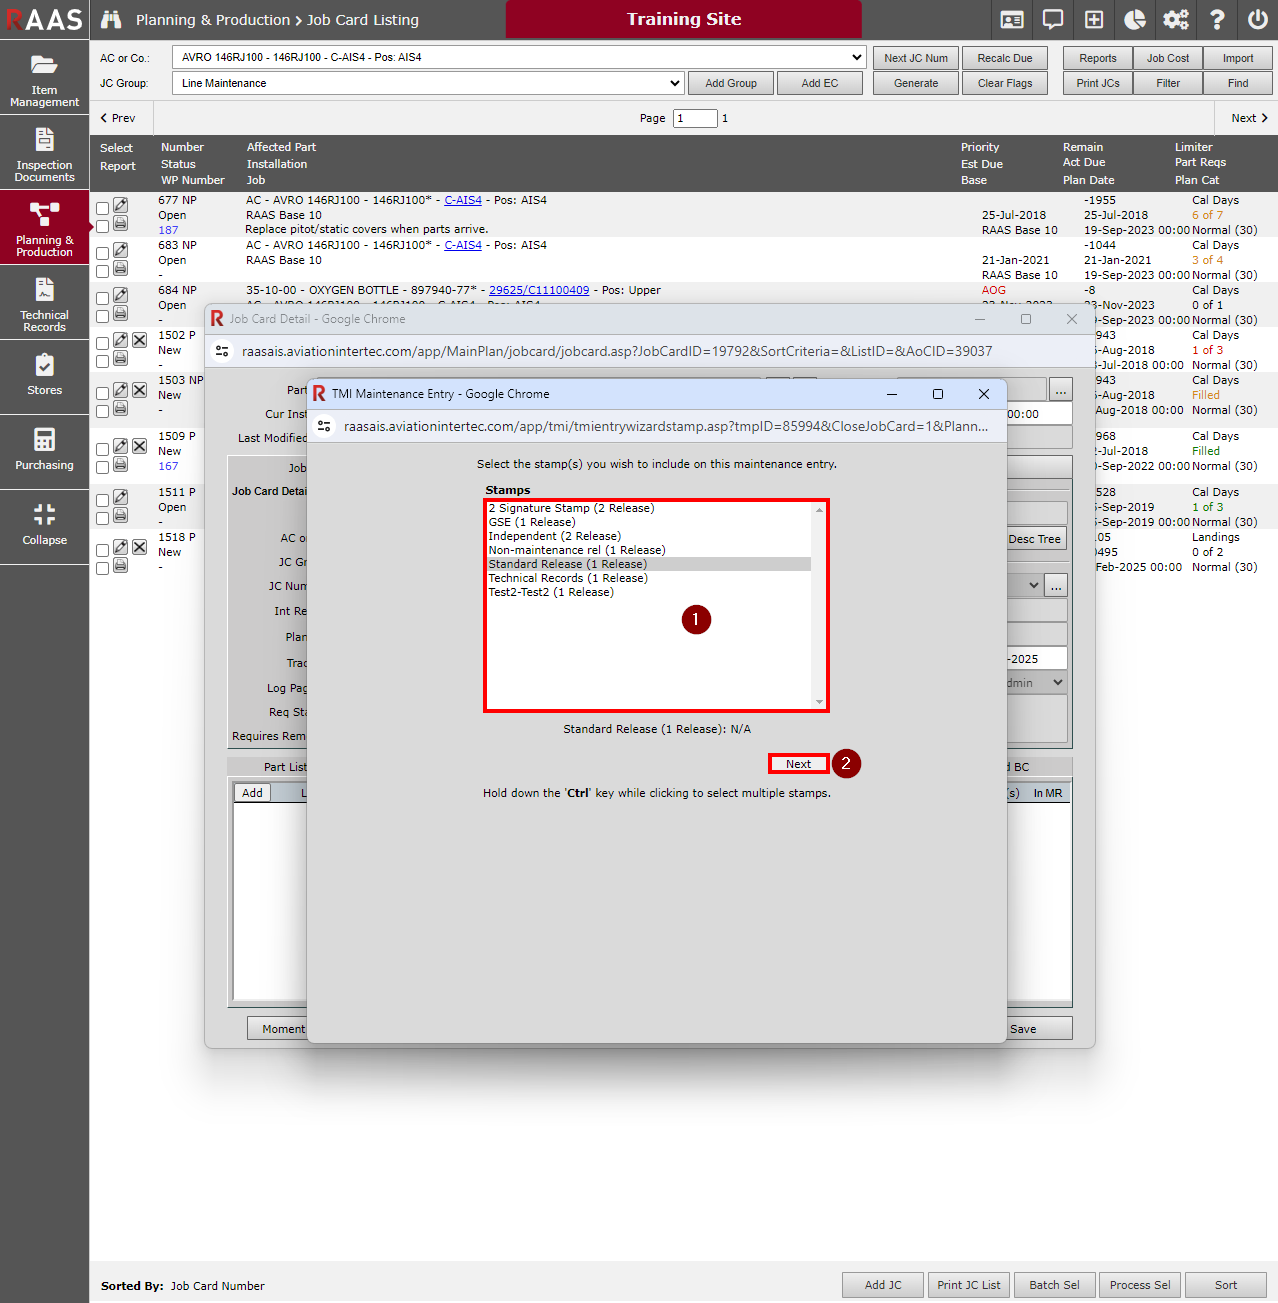
Figure 5: Stamp Selection
Signature Selection
-
Select the signature(s) to use for the stamp(s) being used for this rectification entry.
Note: Employees must have the Signature Authority flag enabled on their Employee Information record to populate the Signature dropdown. -
Click Next.
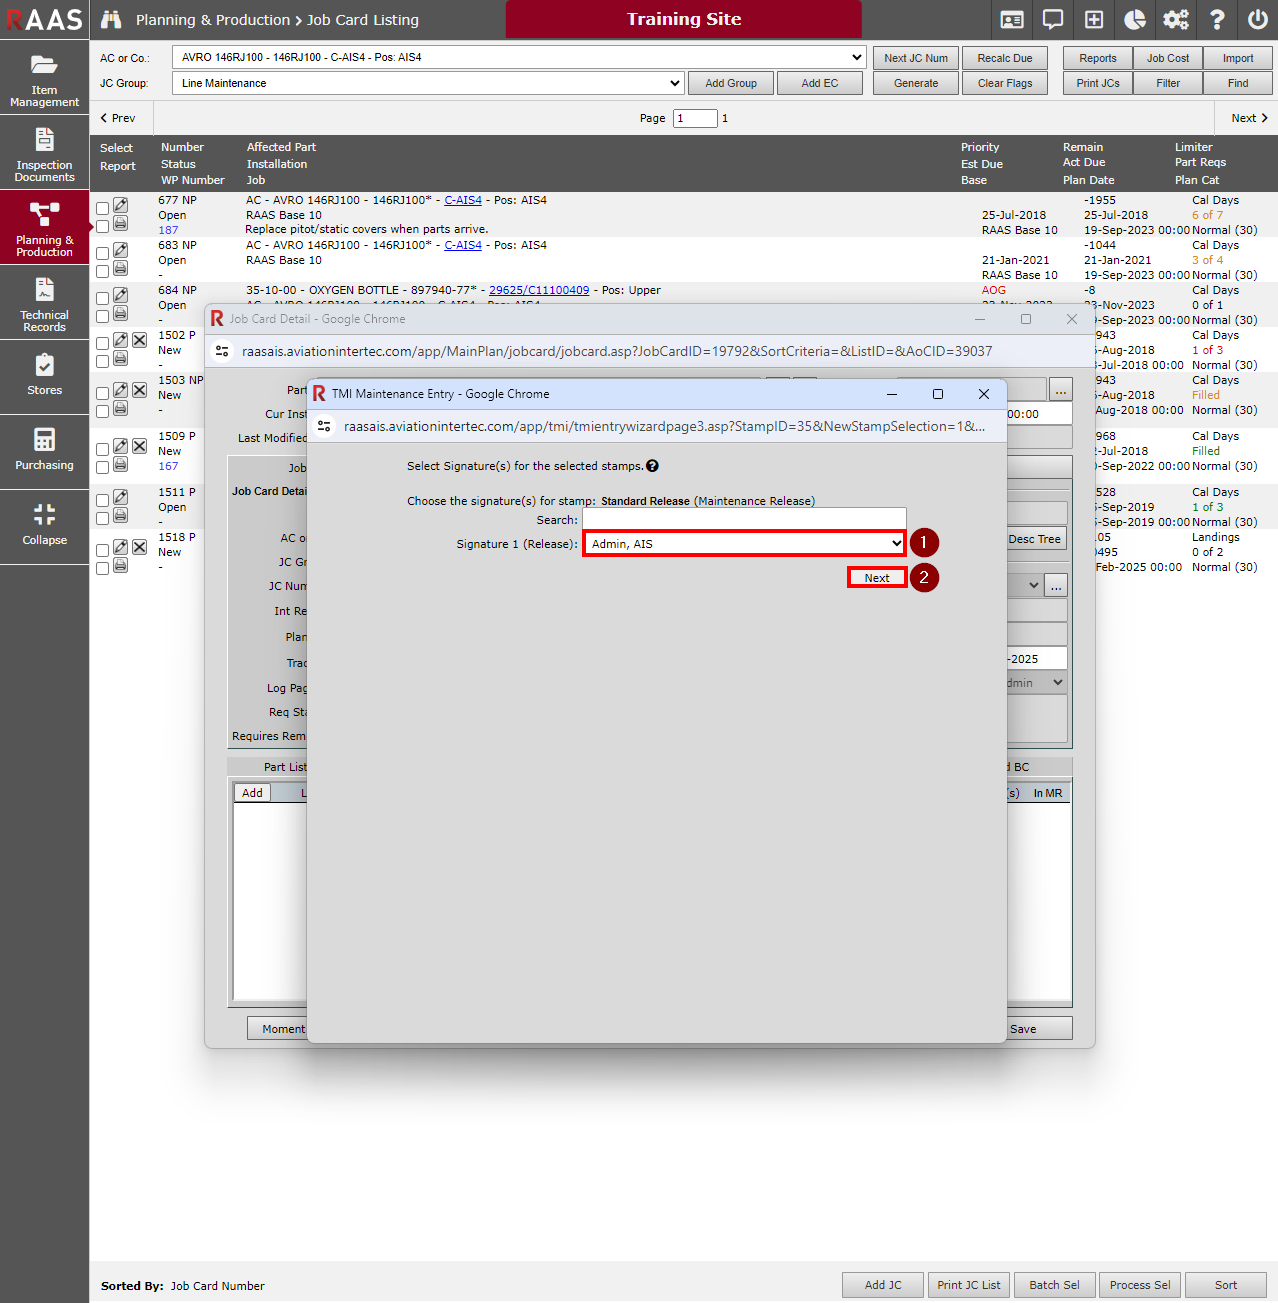
Figure 6: Signature Selection
Technical/Modification Log Entries
The appropriate Technical and Modification Logs will be preselected based on the current installation of the affected part of the Job Card. For example, if an inspection is on an engine, both the engine and aircraft Tech Log should be preselected by default, as long as the “Major Assy (Has Tech Log)” flags are selected on the Part Description of the engine and the aircraft.
-
Ensure the appropriate items to receive Tech/Mod Log entries are selected (Airframe Tech Log will be selected by default.)
-
Click Next.

Figure 7: Technical/Modification Log Entries Selection
Adding Removed/Installed Parts to Rectification (if applicable)
-
Click Add to search for and add any appropriate part(s) that were removed as part of this rectification.
-
For the Parts Removed search window, users will only be able to find parts that are currently installed on the aircraft at the time of entry.
-
-
Click Add to search for and add any appropriate part(s) that were installed as part of this rectification.
-
For the Parts Installed search window, users will only be able to find parts that are available to be installed (Issued for Maintenance) at the time of entry.
-
-
Click Next.
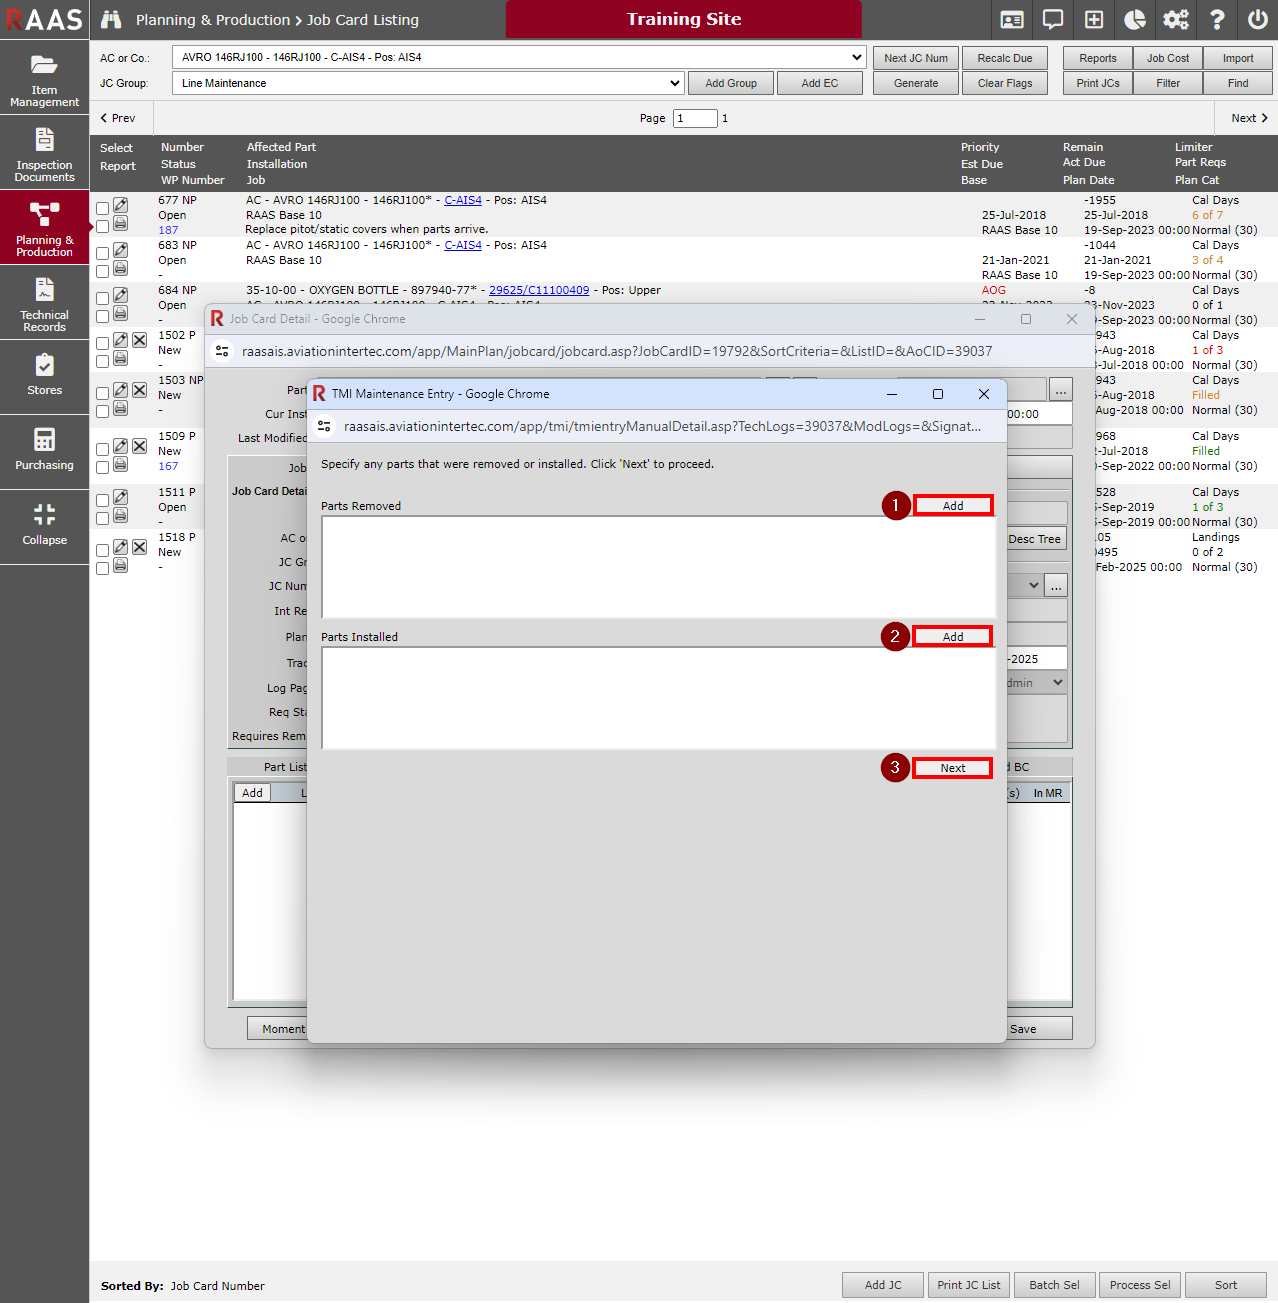
Figure 8: Adding Removed/Installed Parts to Rectification
Rectification Entry
-
Users must enter text into the Rectification box to describe the work that was carried out.
-
Users can upload scanned documents by clicking Upload and selecting the appropriate file(s).
-
Click Finish when done.
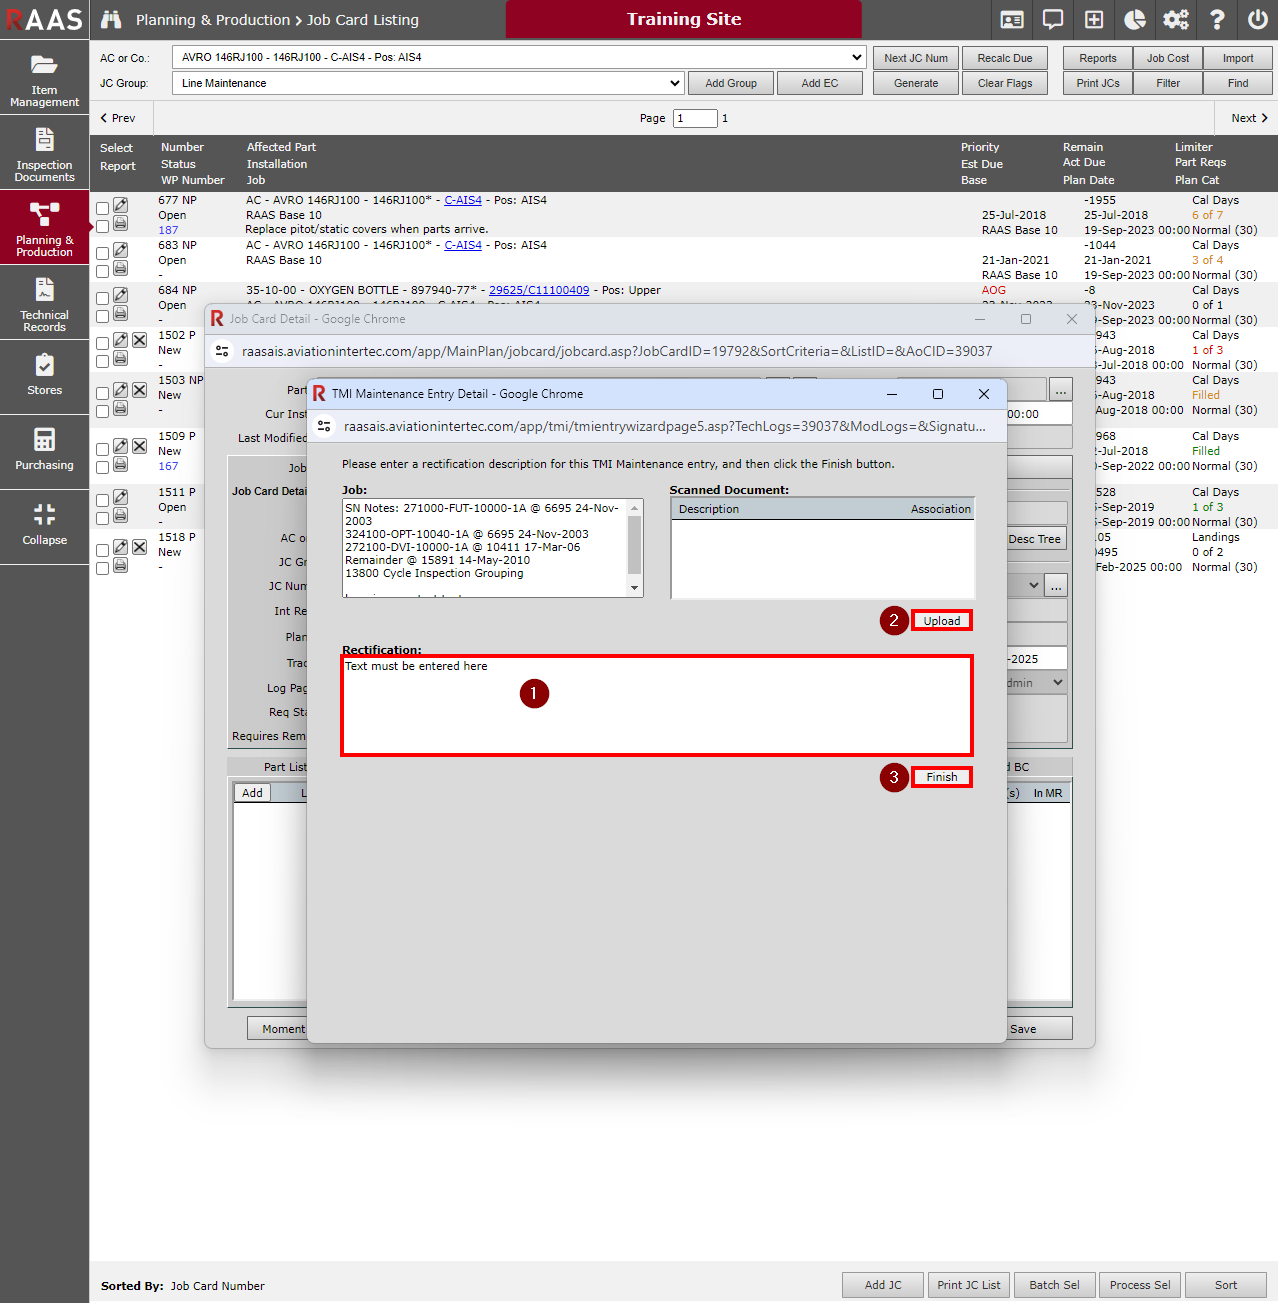
Figure 9: Rectification Entry
Digital Signature Sign-off
-
Users must enter the password for their user account in the Work Completed By section as required.
-
Users can only sign for themselves.
-
Once a signature has been added and signed for, it cannot be removed by modifying the rectification later.
-
-
In the Stamp/Release Digital Signature(s) section, user(s) that were selected in the Signature Selection part of the Rectification Wizard will be listed. They must sign for themselves by entering the password for their account.
-
Once a signature has been added and signed for, it cannot be removed by modifying the rectification later.
-
-
When finished, click Next.
-
If the Stamp/Release is not signed and the rectification entry flagged the Job Card for closure, a warning window will pop up notifying the user that the entry will be placed into a Pending Release state and the Job Card will not be closed until the necessary signatures have been applied if they proceed without a Stamp/Release signature.
-
If all required signatures have been applied and the rectification entry flagged the Job Card for closure, a warning window will pop up notifying the user that the Job Card will become closed if they proceed.
-
The Status of Job Cards that require signatures will be red instead of black in both the Job Card Listing and the Work Pack listing.
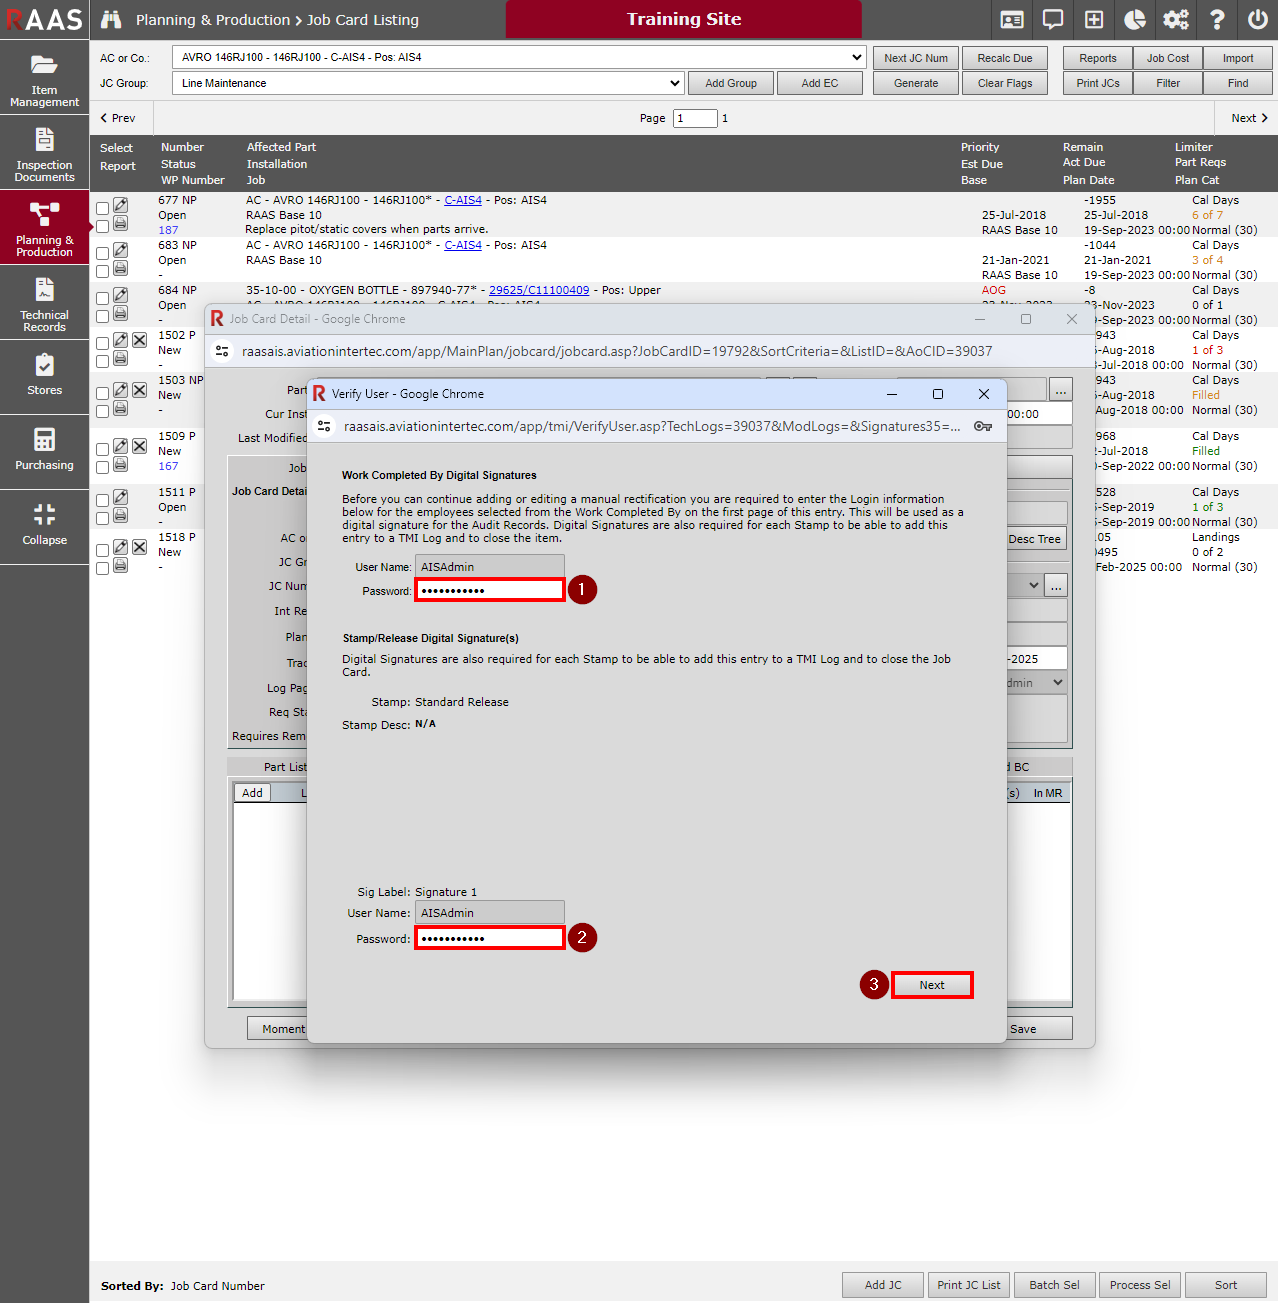
Figure 10: Digital Signature Sign-off
-
Notes/Considerations:
-
Parts will not be removed from or installed on an Aircraft until Tech Records performs a TMI Entry and posts it.
-
When a JC is Closed, items with a constraint will still show up in the Maintenance Forecast with reference to the Closed Job Card as long as the “Include Closed JCs” flag is on for the Forecast.
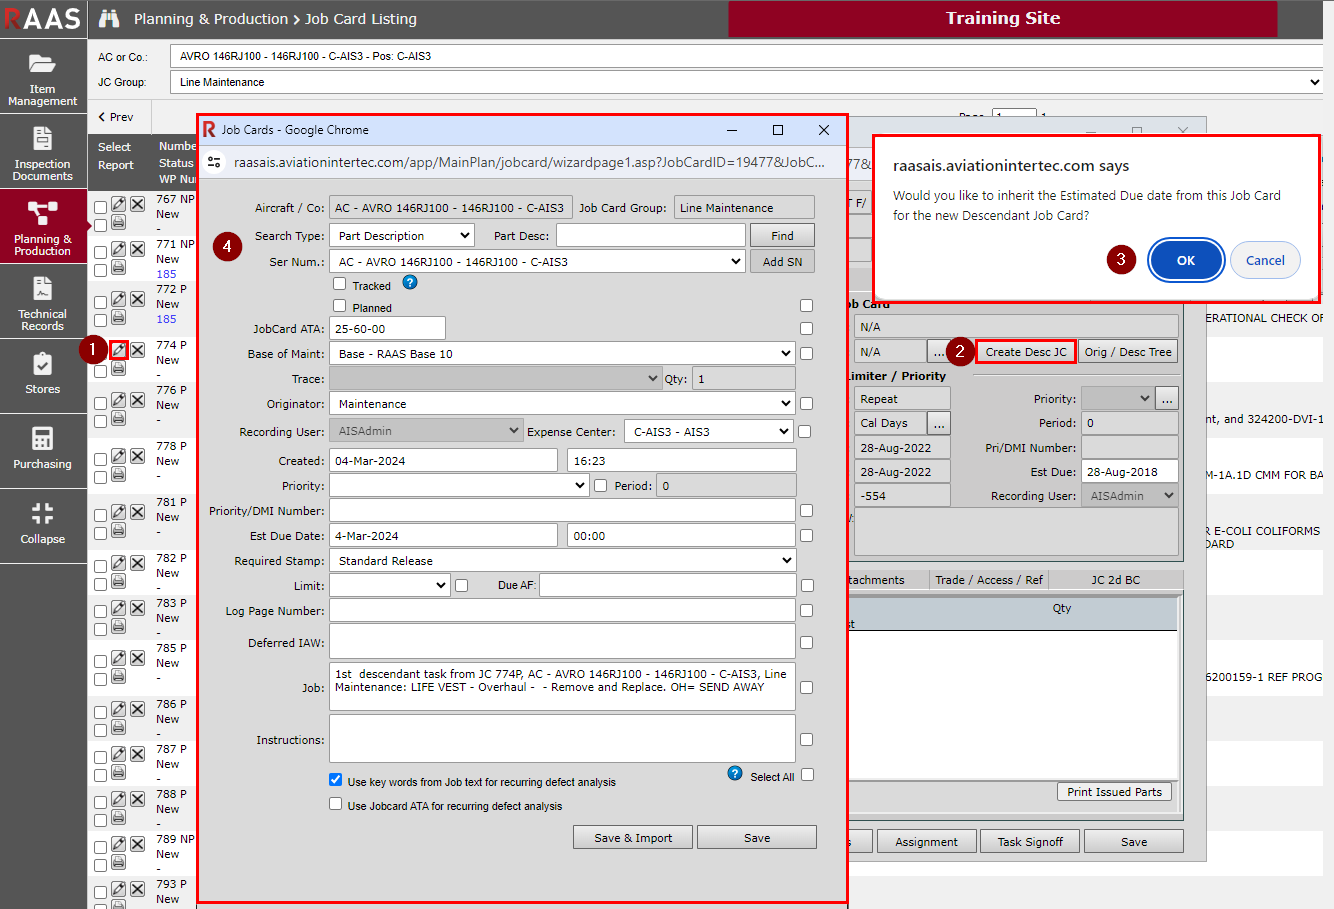
Creating a Descendant Job Card
The purpose of a Descendant Job Card is to maintain the relation with the Non-Planned tasks that were a result of the parent Job Card. This also helps determine the Planned and Non-Planned Labour hours for the task. An example would be in the case of a Heavy Check. The Heavy Check (Inspection) is completed, but there were defects found and now that work needs to be completed.
Creating a Descendant Job Card allows the user to assign different tasks from the same Job Card to different people to work on simultaneously.
-
From the Job Card Listing, Click the Edit icon that corresponds with the required parent Job Card.
-
In the Job Card Detail window, Click on the Create Desc JC button.
-
Clicking the Create Desc JC button prompts a pop-up confirming that you would to inherit the Estimated Due date from the original Job Card for the new Descendant Job Card. Clicking cancel will trigger RAAS to recalculate the Next Due from the date the Job Card was raised. Clicking OK will adopt the parent Job Card due date.
-
Populate the necessary fields with Job data.
Deleting a Job Card
RAAS allows for single or multiple Job Card deletions. However, a Job Card can only be deleted when the Job Card's status is New and there has been no history accumulated against the Job Card.
Deleting Job Cards is not recommended. If a Job Card is created but no longer required, the recommendation is to open the Job Card and then "Recall" it with an explanation.
Single Job Card Deletion
Use the Navigation instructions and filter on Show New Job Cards only.
-
Click on the X at the beginning of the row for the Job Card to be deleted.
-
Click OK to confirm the intention to delete. The Job Card Listing will refresh and the deleted Job Card will no longer appear in the listing.
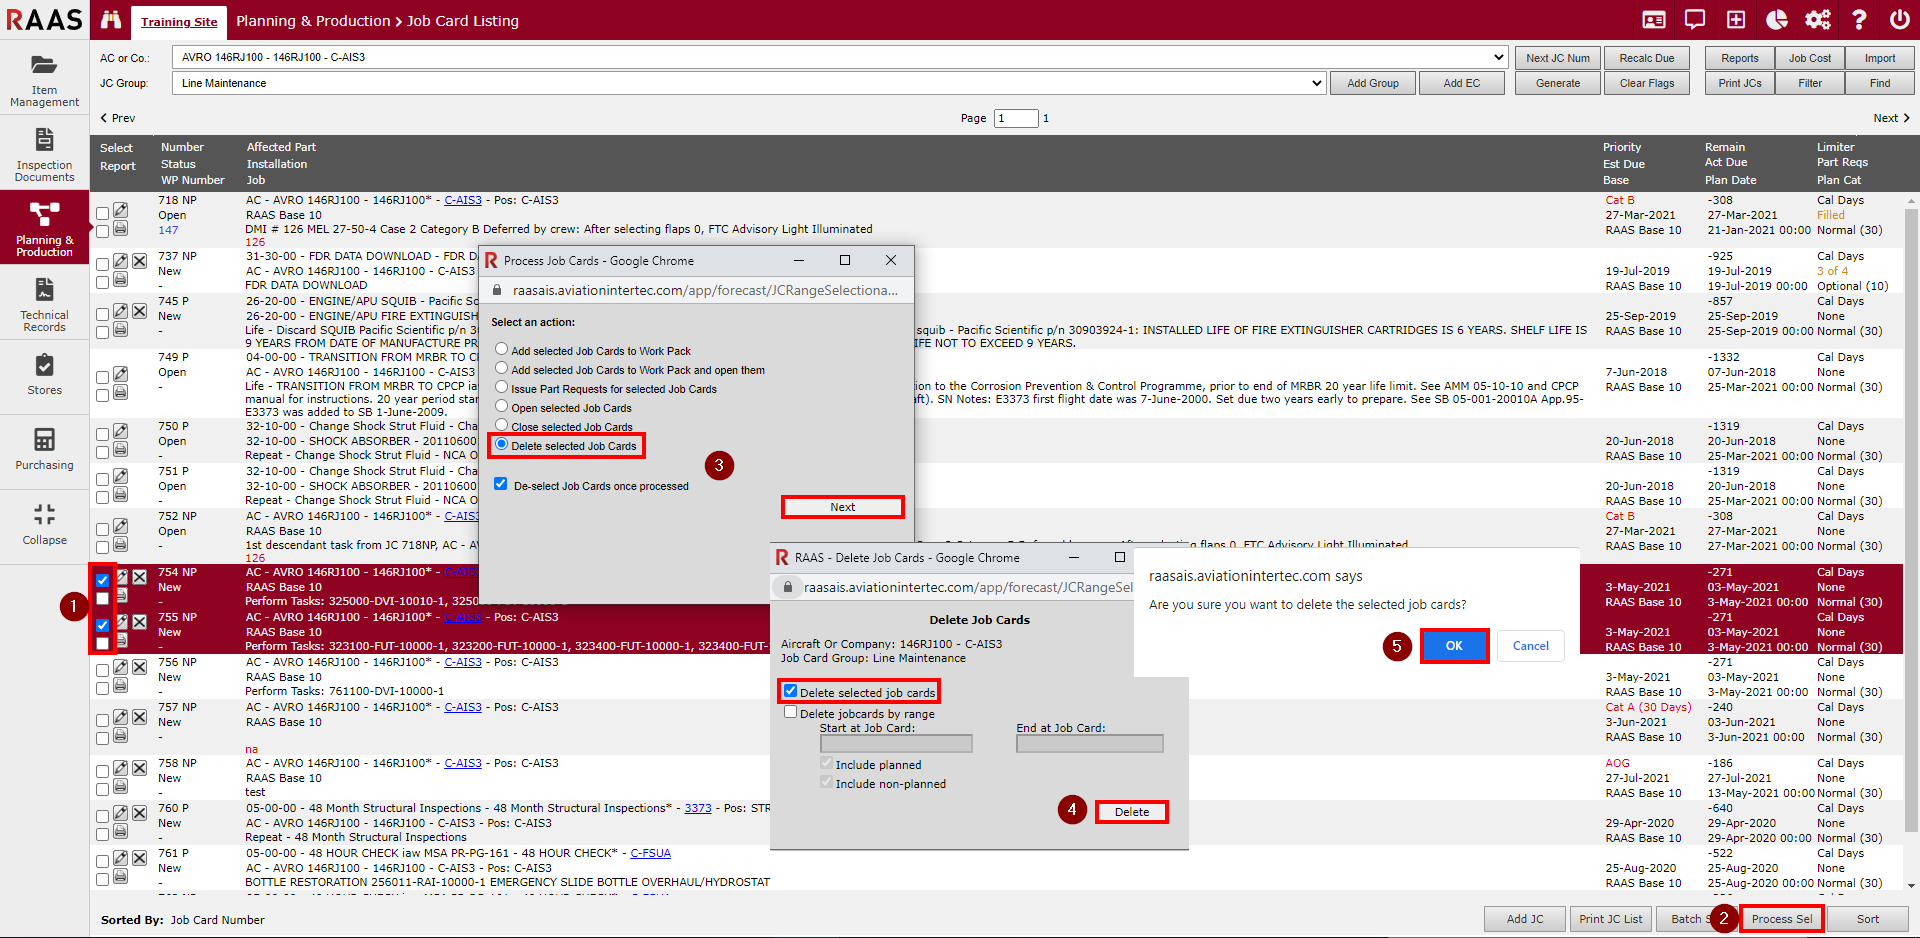
Multiple Job Card Deletion
Use the Navigation instructions, and filter for Show New Job Cards only.
-
You can either select specific Job Cards by checking the top check box at the beginning of the Job Card row (the row will highlight red) or specify a Job Card range later in step 4.
-
Click on the Process Sel button located at the bottom of the generated Job Card Listing.
-
Select the Delete selected Job Cards action and click Next.
-
If you pre-selected the Job Cards you want to delete in step 1, Delete selected Job Cards will be checked. Click Delete and continue to step 5.
If you elected to specify a range, enter the Job Card number range and indicate if you want to include planned and/or non-planned Job Cards. Click Delete.
-
Click OK to confirm the intention to delete the selected Job Cards.