
Parts can be created in the Item Editor or through the Order Receipt Process.
Within the Item Editor all items are defined with the same data structure - everything is treated as a Part and has a Part Description, Part Number, and Serial Number. RAAS defines a part first by its Item Type, which is a RAAS category that a part belongs to. For example, an aircraft is an Aircraft item type. Selection of an item type predetermines the possible properties or characteristics you will be able to track; there will be a different set of enabled check boxes for each item type.
Item Types include: Aircraft, Base, Consumable, Employee, Engine, Ground Equipment, Inspection, Non-Serialized, Propeller, Serialized, Tool, and Training Requirements.
Creating a Part in Item Editor
Create a Part Description
A Part Description is designed to allow grouping of similar interchangeable parts (alternatives) that have dissimilar part numbers.
-
Click on Item Management and select Item Editor.
-
Click the Item Type drop-down and select the appropriate item type for the part you wish to create.
-
Click on the Add New Part Description button to display the Item Editor for the part description level on the right side of the window.
-
Enter the new part's Item Description and ATA; Select the appropriate check boxes to indicate the part's properties.
-
Is Rotable and/or Asset - allows the user to indicate if the part is rotable for reporting purposes. See REPORTS.
-
On Install/Removal Report - indicates which parts' removals and installations to include in the Installation and Removal Log. Because Installation and Removal history is kept for all non-consumable parts, clicking this check box will display removals and installations that took place prior to this time.
-
Separate Time Tracking - indicates that this item tracks time at a different rate than the higher order item in the assembly.
-
Major Assembly (Has Tech Log) - indicates which parts' logs to include in the list generated when making a TMI entry.
See TECHNICAL MAINTENANCE INPUT - CREATING A TMI LOG SHEET RECORD. -
Make Removal/Install Log - indicates which parts' logs to include in the list generated when making a TMI entry.
See TECHNICAL MAINTENANCE INPUT - CREATING A TMI LOG SHEET RECORD. -
Make Modification Log - indicates which parts' logs to include in the list generated when making a TMI entry.
See TECHNICAL MAINTENANCE INPUT - CREATING A TMI LOG SHEET RECORD. -
Capital Expenditure (CapEx) - indicates that this item is a Capital Expenditure. Items with CapEx selected, can be forecasted separately to identify maintenance events with high associated costs (e.g. engine changes).
-
-
Click Save.
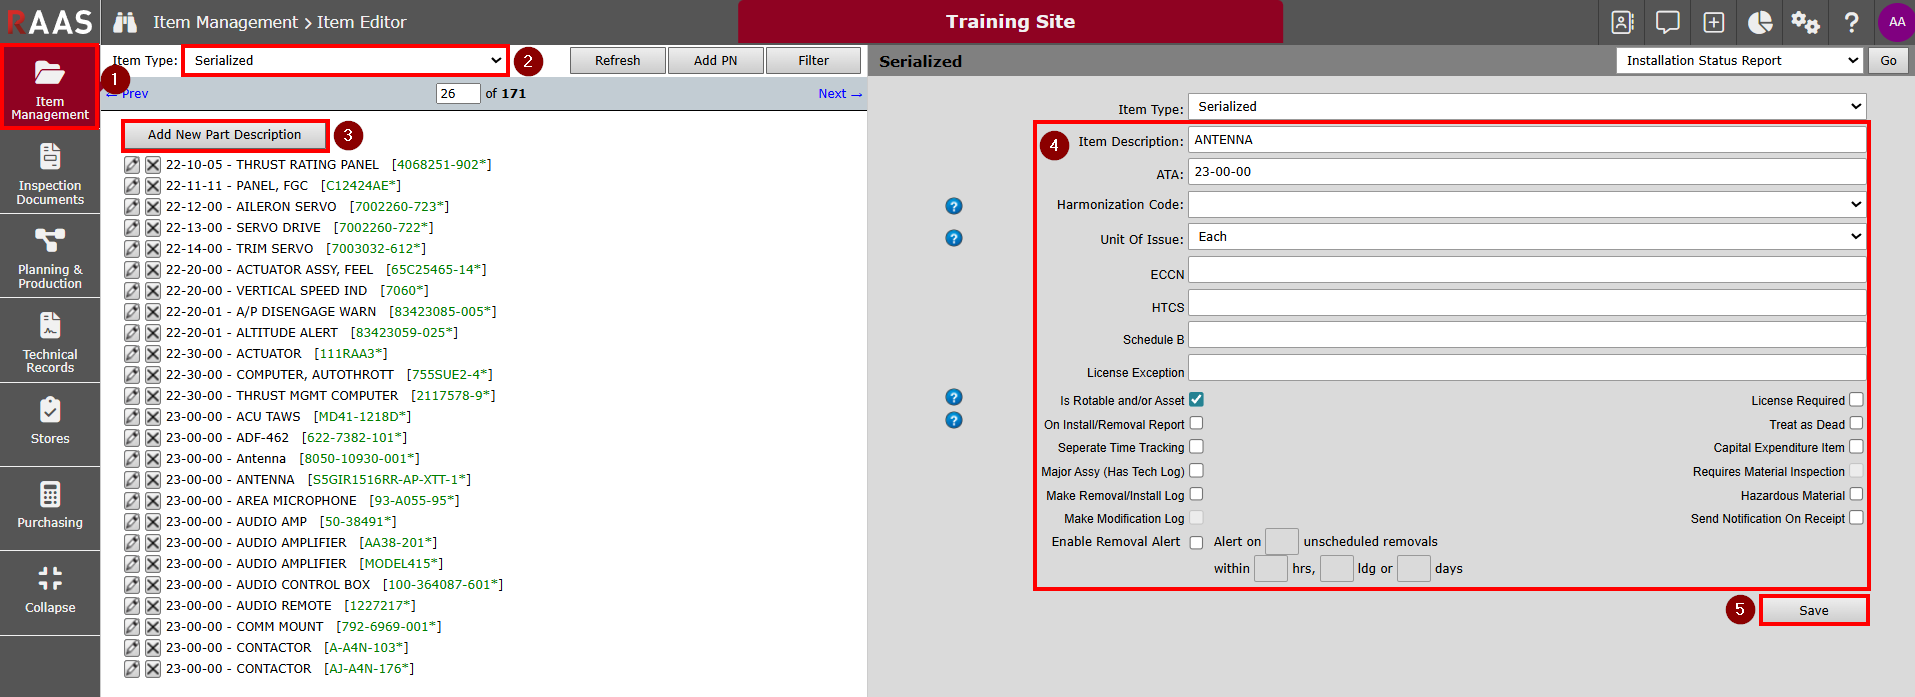
Figure 1: Create a Part Description
Figure 2 shows the newly created part description for 23-00-00 - Antenna appearing in the left window with Add New Part Description button located above. When the right window refreshes, a new button labelled Change Type will appear to the left of the Save button.
For Aircraft item types, there is a section for entering Defects, Monthly Defects/100 Hrs, and the Defect Alert Level.
All other item types have a button labelled Edit Min/Max, which appears at the bottom of the window. When the button is clicked, a window will pop over to allow entry of minimum and maximum inventory amounts and default positions for each inventory location.
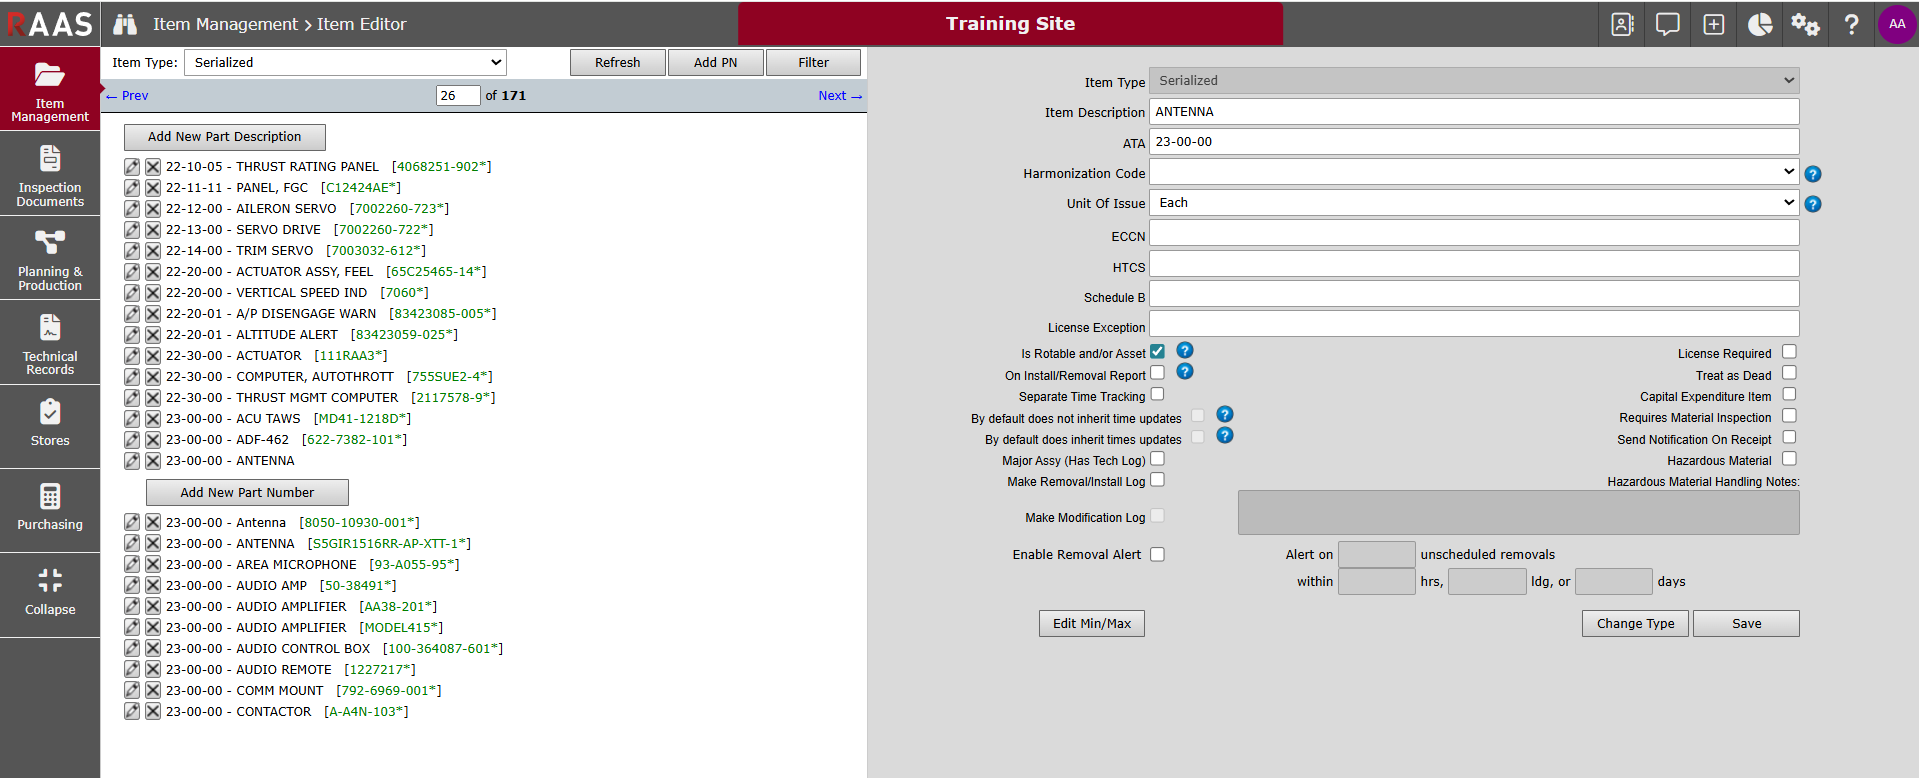
Add New Part Number
A Part Number further defines a part description and typically groups identical parts from a given manufacturer.
-
Click on Add New Part Number to display the Item Editor for the part number level on the right side of the window.
-
Enter the new Part Number.
-
Select the appropriate Inventory Type and Item Class.
-
Select the appropriate Track limiters. The Landings limiter is dynamic and can be set to Cycles, Starts, RINs, or Landings. By selecting Track Hours, Track Landings/Cycles/Starts/RINs, or Track Calendar, the corresponding limiter checkbox is enabled on Life, Initial and Repeat Constraints tabs. Depending on the Item Type selected, Track Hours and Track Landings are auto-selected and disabled.
-
For applicable Life, Initial, and/or Repeat constraint tabs, enter the limiter data for each selected limiter. Once a limiter is turned on, the constraint is considered set up. All serial numbers created under this part number will inherit these setup constraints.
-
Data entry applies only to the constraint whose tab is selected.
-
If an item has been set up with both initial and repeat constraints, RAAS will automatically create a trigger to reset the repeat constraint upon compliance of the initial.
-
Whichever is Later (WIL): This function allows a constraint that is multi-limited to only come due when all of the constraint limits are due, instead of the default, which is when any one of the constraint limits is due. See MAINTENANCE FORECAST - WIL.
-
High Freq Item: Allows users to create multiple Job Cards for the same tracking inspection or component, even when an existing Job Card is in New or Open status. When this option is disabled, and an additional Job Card is created for the same tracking inspection or component, RAAS will prevent users from performing a Comply/Reset action until the original Job Card is either Closed or Recalled.
-
Planning Cat.: applies a value to the Item used for filtering Job Cards throughout RAAS modules. See PLANNING CATEGORIES.
-
-
Click Save.
-
Ordering Rules: Specifies defaults for how a part is handled in purchasing. The user can define automatic account codes to be used on specific order types.
-
Applic Inst (Applicable Installation): Applicable installations are used for Job Card Templates. See APPLICABLE INSTALLATIONS.
-
Triggers & Notes: Items triggered by the installation, removal, compliance or reset of a constraint indicated in the upper portion of this pane. This provides an association between items. An example of one item triggering an associated item is the installation of a propellor triggering the reset of the corrosion inspection. See DEFINING TRIGGERS.
-
Scan Doc (Scanned Documents): Used for uploading documents and files related to this Part Number.
-
Vendors: A list of qualified vendors associated to this part number. The information entered here is used for generating Requests For Quotation (RFQs), and for listing default warranty terms.
-
Cross Ref (Cross Reference): Used to add a Cross-Reference to a Part Number. For example, a Service Bulletin is often added as a cross-reference on an Airworthiness Directive.
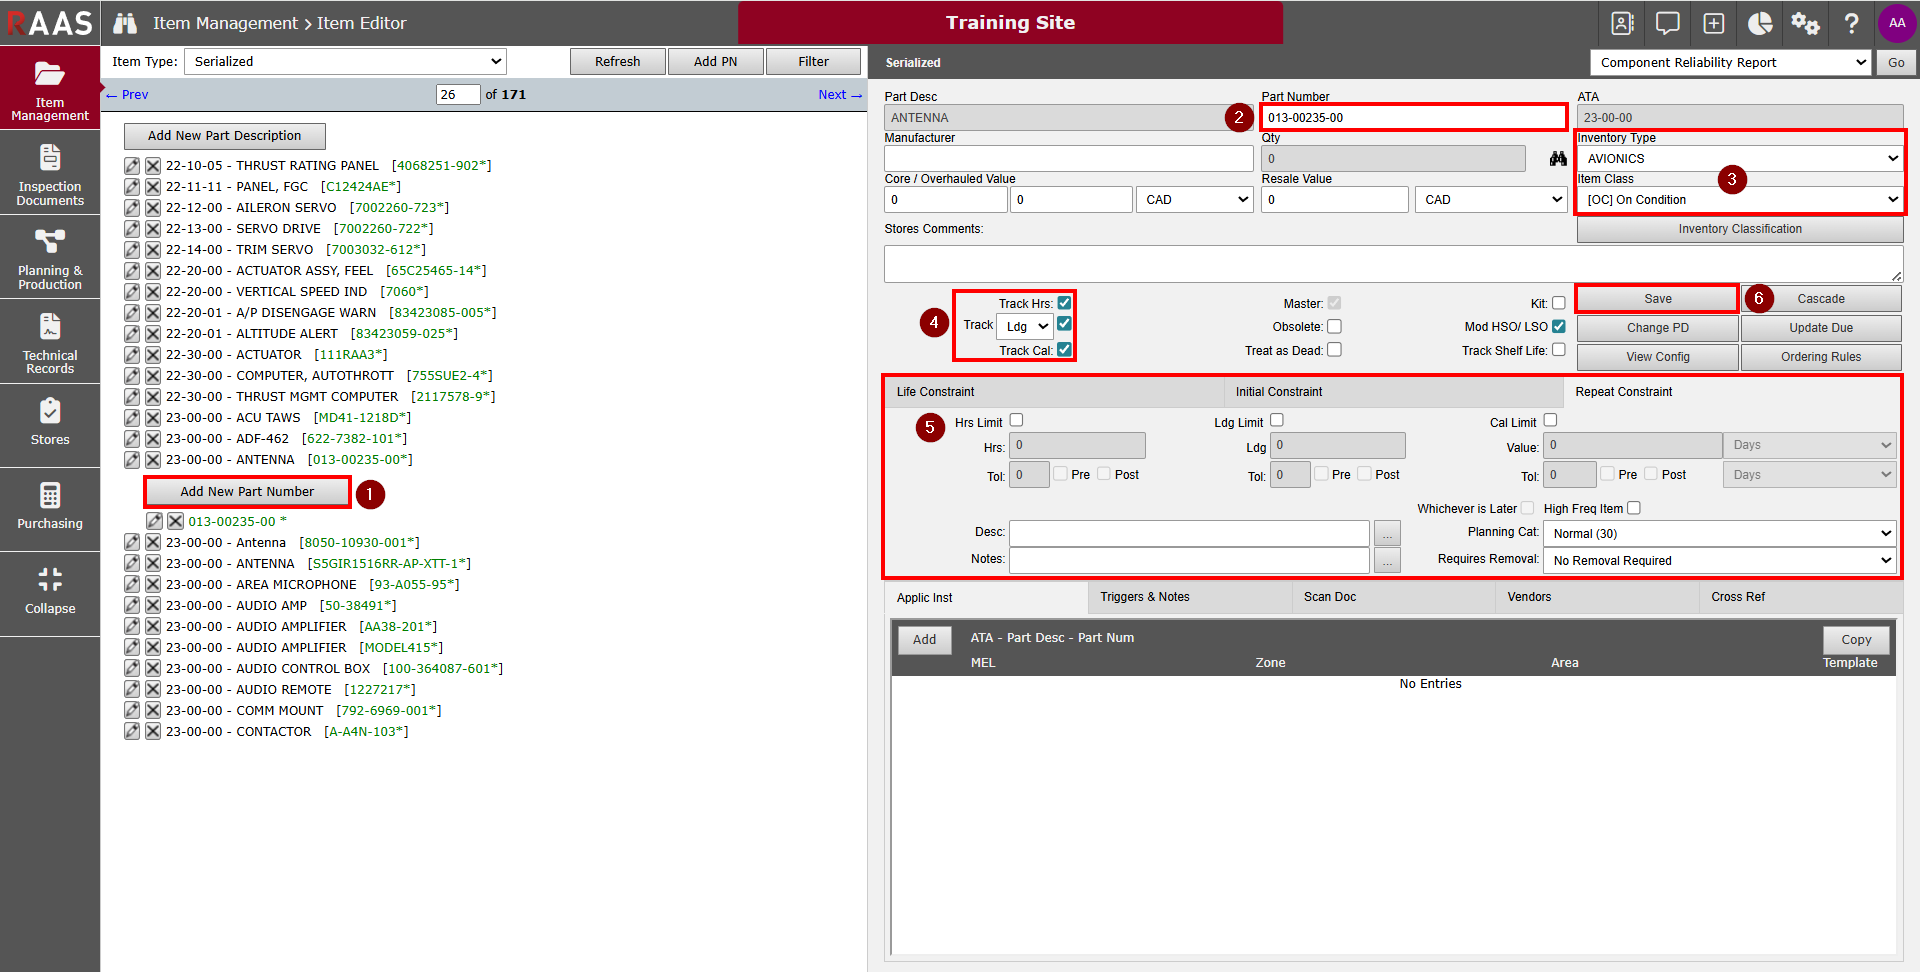
Figure 3: Adding a new Part Number
-
Add New Serial Number
A part Serial Number uniquely identifies a part within the part description and part number sequence.
-
Click Add New Serial Number to display the Item Editor for the serial number level on the right side of the window.
-
Enter the new part Serial Number.
-
Enter the applicable HSN, LSN, HSO, LSO, and Install date.
-
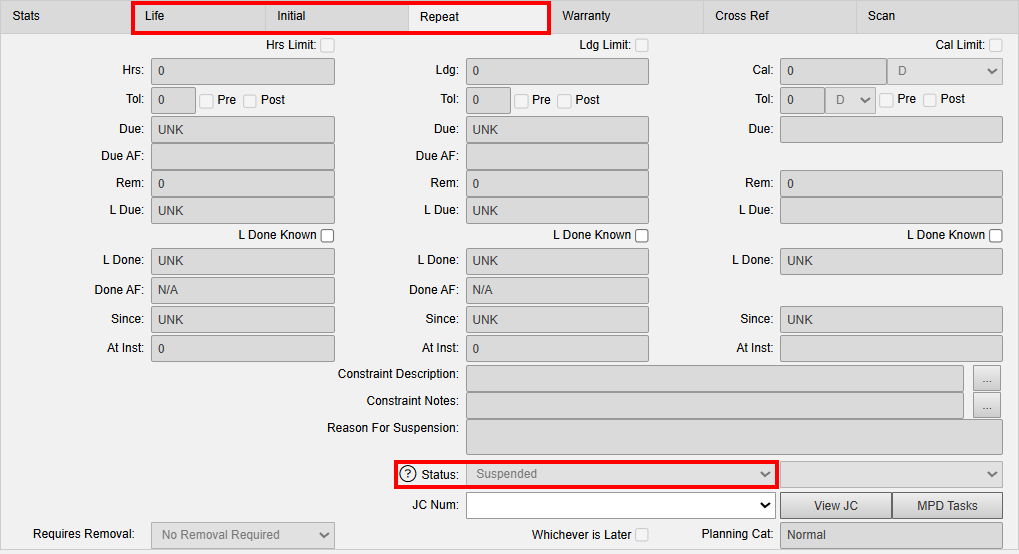
Status: refers to the item’s Serviceability Status. Serviceability Status can be edited at the Trace Detail.
-
Constraint tab Status (Life, Initial, Repeat): refers to the status of the constraint
-
Issued: tracking and issued from forecasting - see MAINTENANCE FORECAST
-
Open: tracking with an opened job card created by issuing from forecasting
-
Suspended: currently not tracking
-
Pending: tracking but not issued or open
-
-
-
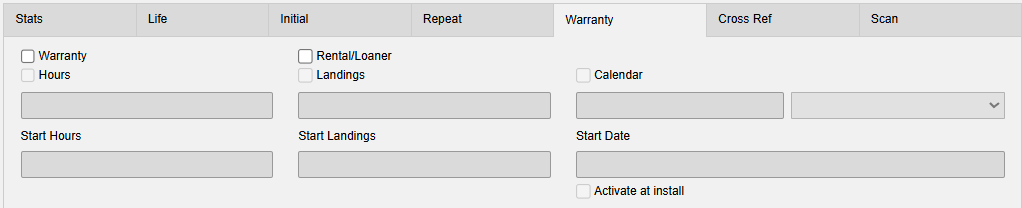
Warranty
-
allows Warranty and Rental/Loaner information to be entered for tracking on expiration reports and will trigger the Warranty Removal email notification.
-
-
HSN Known/LSN Known: refers to the Hours or Landings Since New.
-
Rem Known: refers to Removals Known and tracks the number of removals that occur via Technical Records - TMI Entry.
-
HSN At Install/LSN At Install: refers to the Hours or Landings Since New when the Item was installed on the Aircraft or Assembly.
-
HSI Known/LSI Known: refers to the Hours or Landings Since Install. (HSN Known/LSN Known - HSN At Install/LSN At Install)
-
Install Known: refers to the Date the Item was installed on the Aircraft or Assembly.
-
AF HSN At Install/AF LSN At Install: refers to the Airframe Hours Since New and Landings Since New when the Item was installed on the Aircraft or Assembly.
-
Last Updated: refers to the last date the Aircraft time was updated via Technical Records - TMI Entry or Flight Logs when installed, or the last date the Item was modified.
-
HSO Known/LSO Known: refers to the Hours or Landings Since Overhaul.
-
Received: refers to the last date the item was received or created.
-
-
Click on the ellipsis (...) button at the end of the Installation text box to open the Current Installation pop-up window.
-
After selecting and saving an installation, click Save.
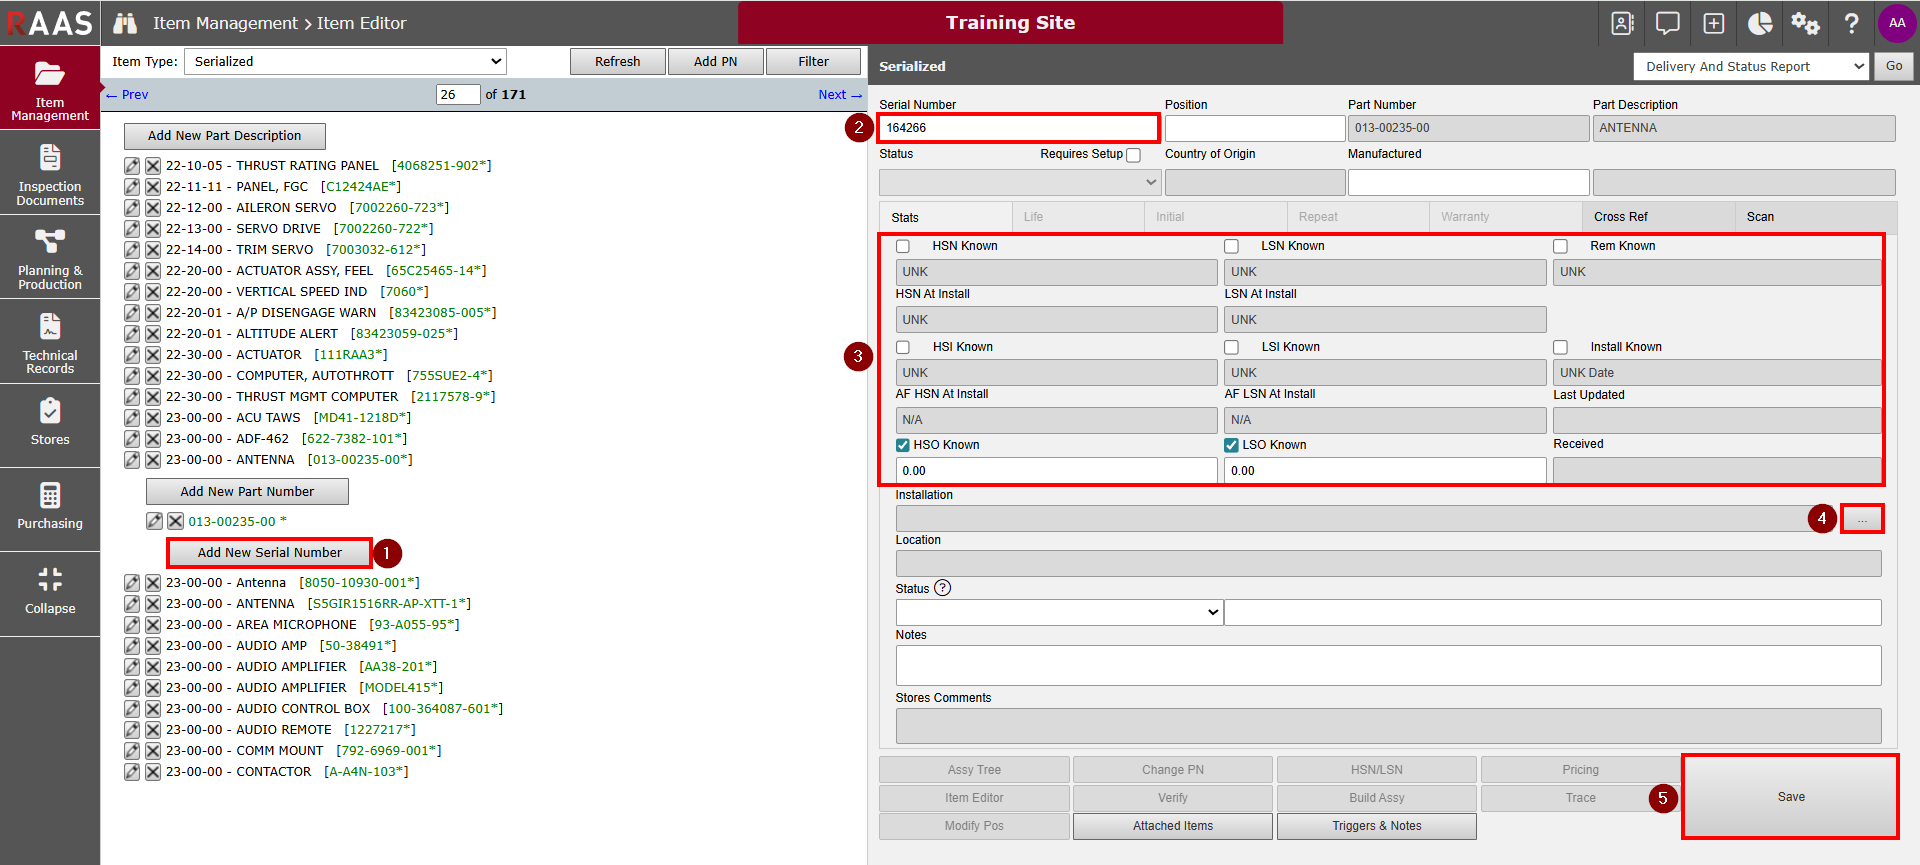
Figure 4: Adding a new Serial Number
Current Installation window
-
Select the required search criteria and click Find.
-
Select the applicable serial number from the search results in the Serial Number dropdown.
-
If the part serial number is being installed on another part, the current installation is the part on which this new part serial number is installed. For example, a part installed on an Aircraft has a current installation of the Aircraft or another part installed on the Aircraft, if the current installation is part of a larger assembly. Additionally, the Aircraft has a current installation and location of its home Base.
-
If the part is not installed on another part, the current installation will be the location in which it will reside.
-
Locations may include any of the following: Aircraft, Awaiting Repair, Base, Dead, External Repair, Ground Equipment, Internal Repairs, Internal Shipping, Inventory, Issued For Maintenance, Quarantine, Return to Inventory, Staffing, and Tool Crib.
-
-
Enter an Effective Date.
-
If the item is being moved to Inventory for the purpose of a stock return, the Return Details section can be filled out appropriately by selecting the Treat as part return checkbox.
-
This section is used for valuation purposes when a part has been removed serviceable.
-
The user must indicate the appropriate Expense Centers to debit and credit. The Expense Center representing the Inventory will be debited, and the last Expense Center the item was issued against (the Aircraft Expense Center) will be credited by the Debit/Credit Values entered.
-
-
Click Save to accept your Installation selection and Return Details, if applicable.

Figure 5: Current Installation