Once the TMI Maintenance Entry is in the TMI log, details may need to be added. Maintenance detail actions include: Install, Removal, Comply, Reset and Comply/Reset. The action may be Scheduled or Unscheduled. If Unscheduled, a problem must be selected. (Problems List can be found in Settings - Problems List).
If Manual or Line Level Rectification (LLR) is being used, then the Maintenance Details will be pre-populated based on the information provided during that process and may only require a QC review before posting.
Removal/Installation of a Part
Removal of a Part
Action, Reason, Problem
-
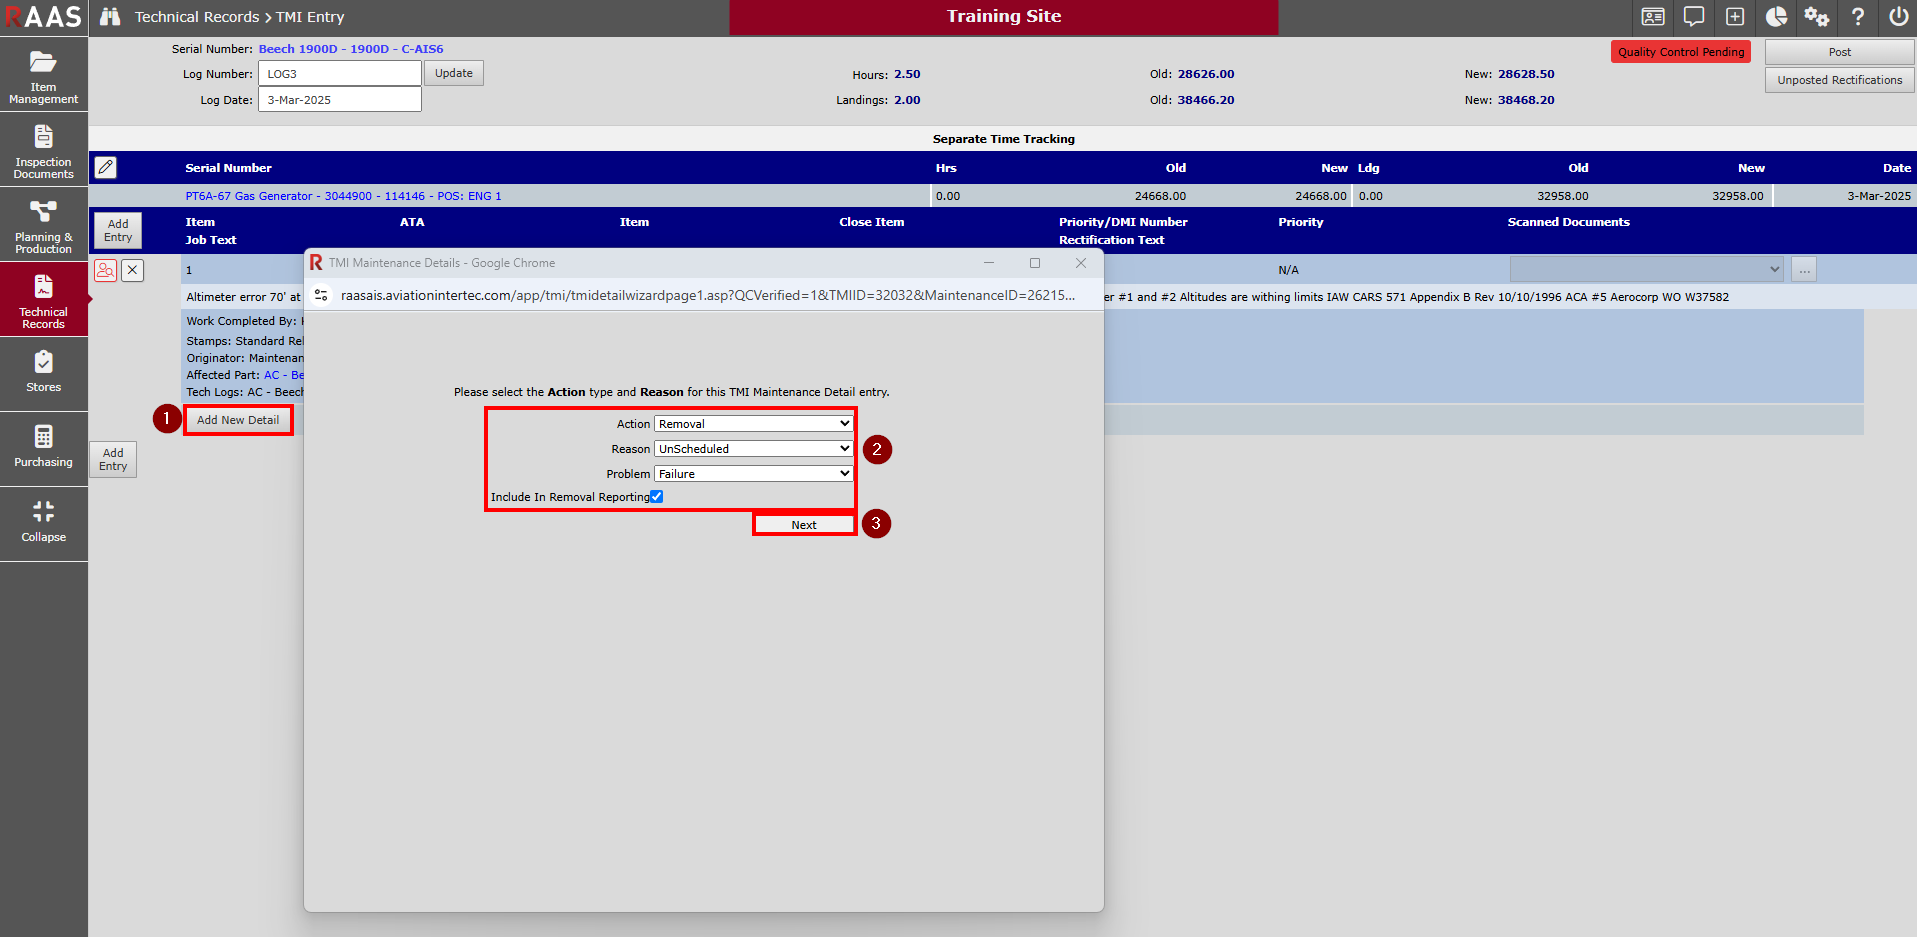
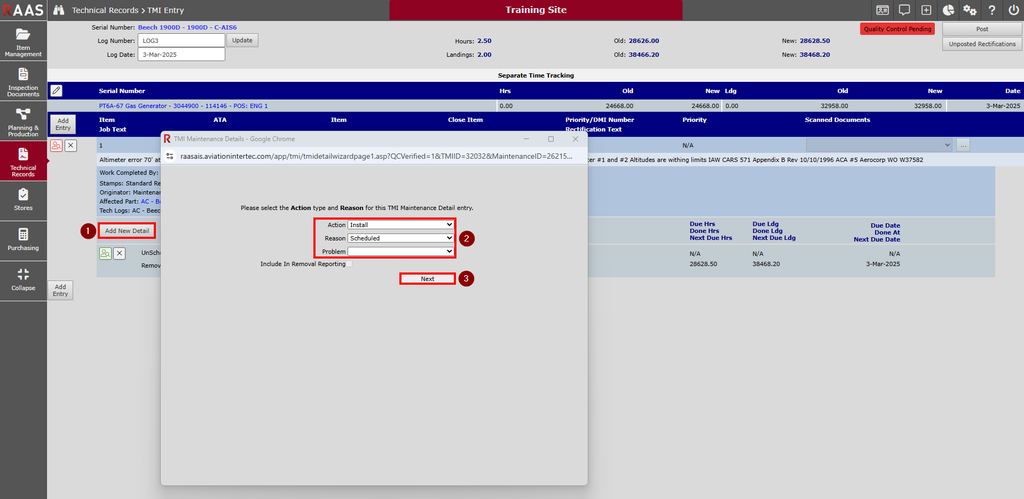
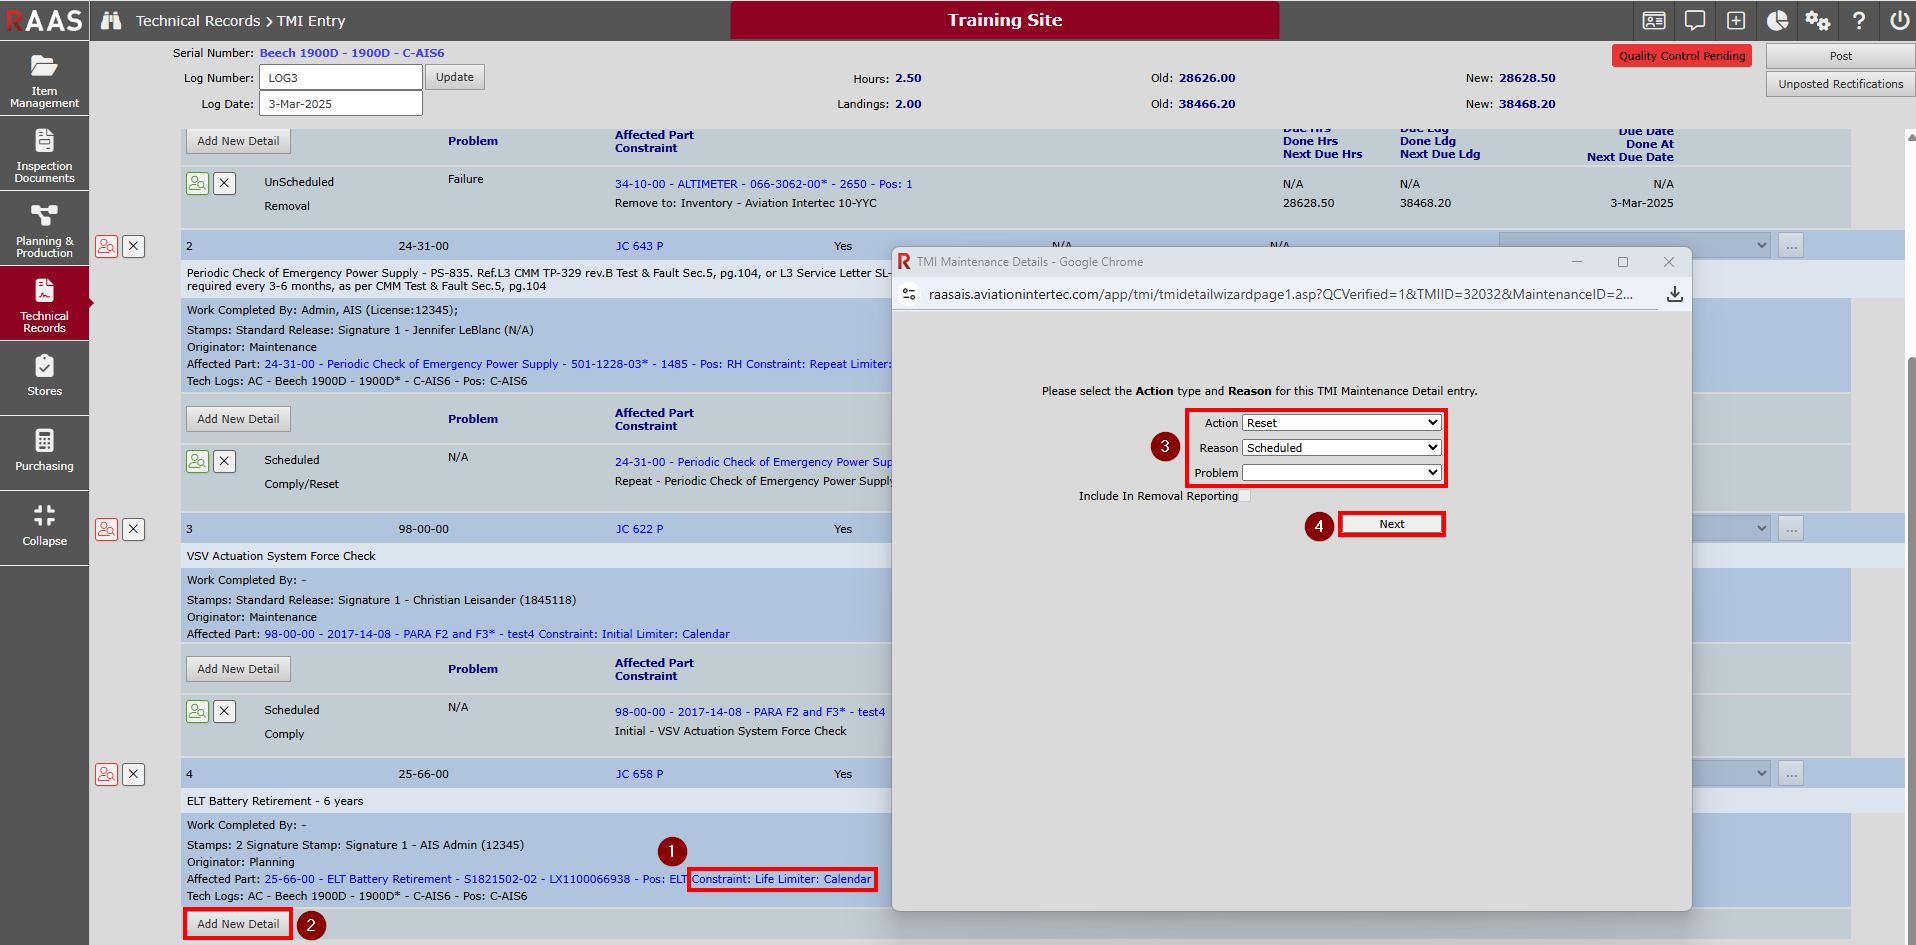
Click the Add New Detail button.
-
Select an Action, a Reason for the detail and, if UnScheduled, the Problem that prompted the action.
-
Click Next.
The maintenance entry detail example in Figure 1 shows an item that is Unscheduled for Removal due to Failure.
The Include in Removal Reporting flag is defaulted on for Unscheduled or Non-Planned Job Cards, but can be removed if not required. When on, this flag will allow the removal to be included in Removal Analysis.
Note: Scheduled Removals don’t require a Problem to be selected, as they are assumed to have been removed for Planned purposes.
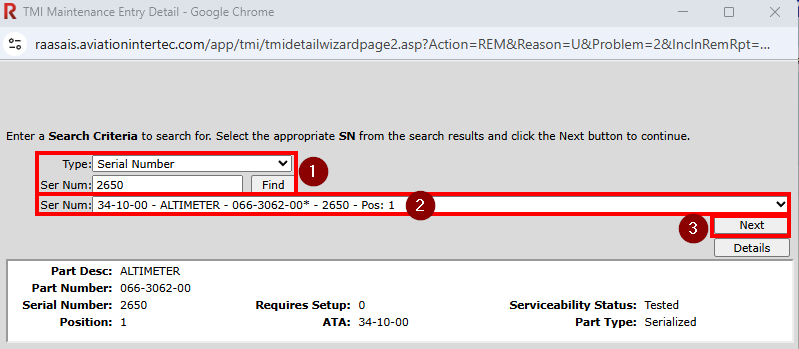
Part for Maintenance
-
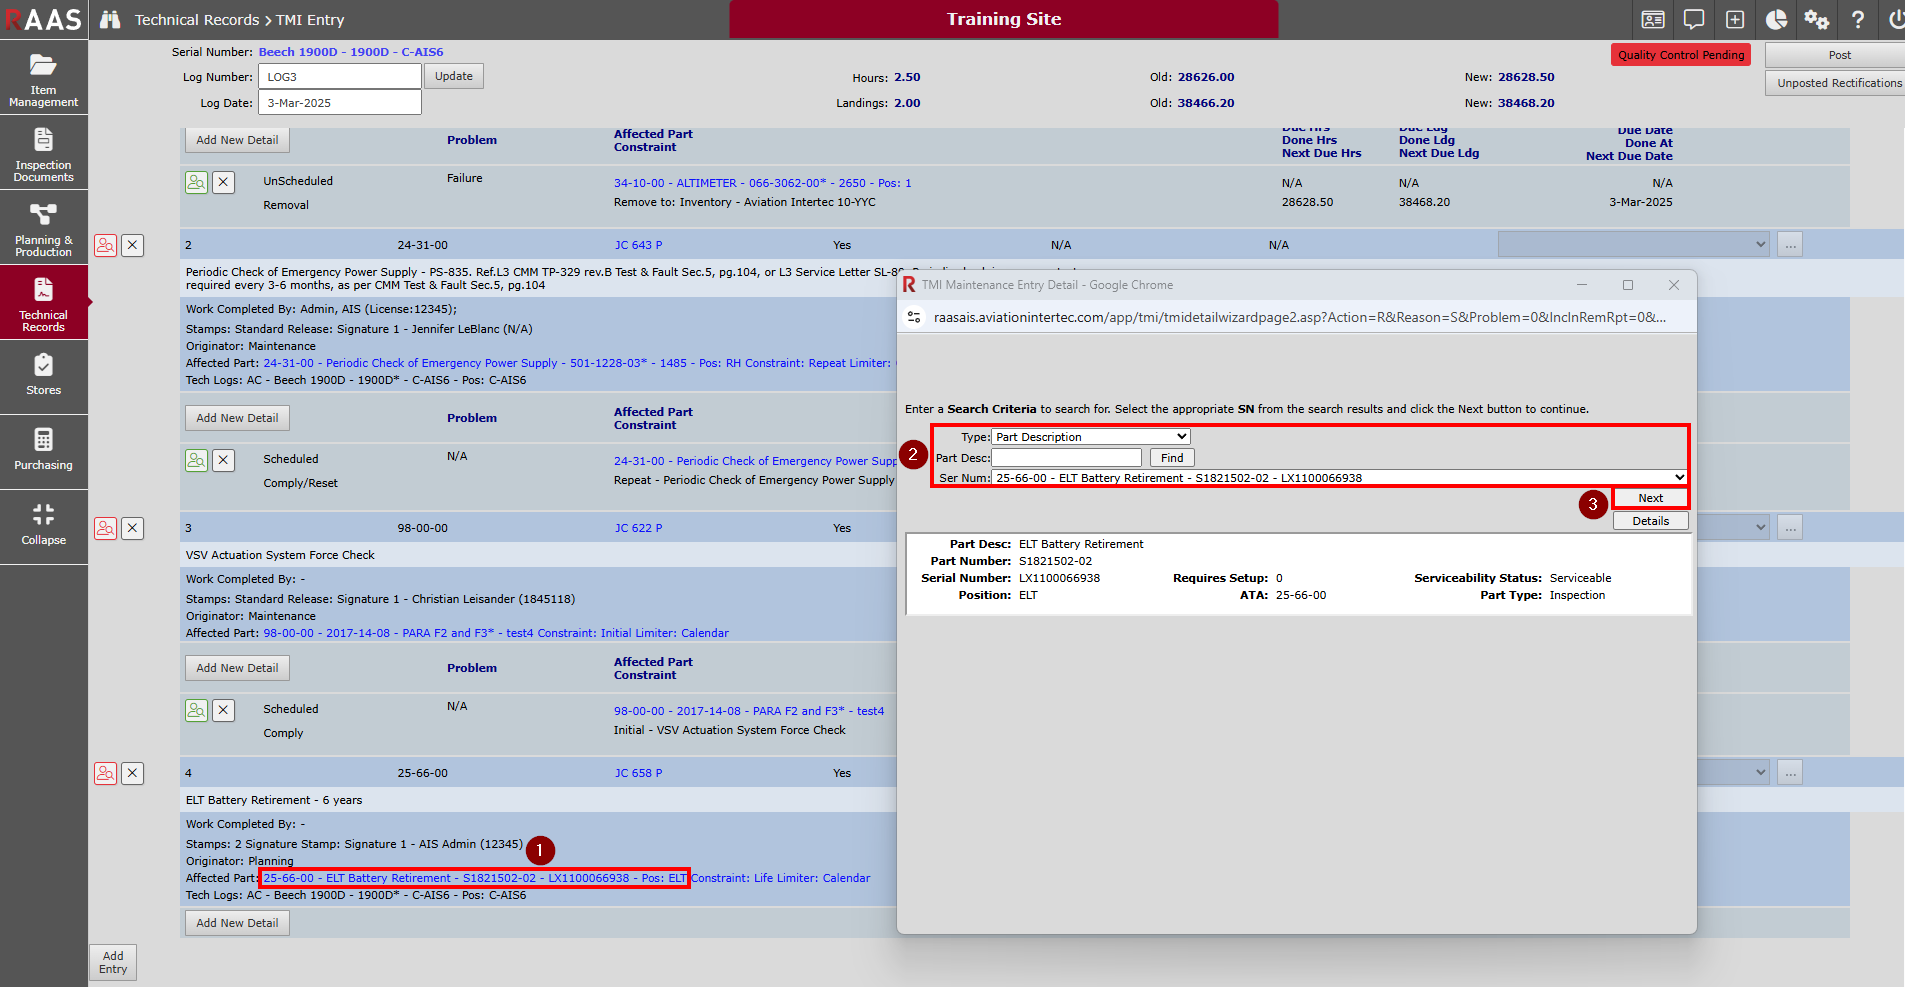
Select the desired Search Type, enter the search criteria and click Find.
-
Select the applicable Serial Number.
-
Click Next.
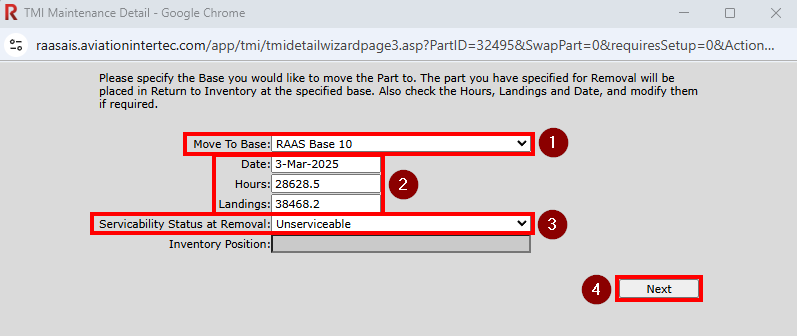
Base Selection
-
Select the Move To Base for the removed parts.
-
Verify the Hours, Landings and Date. This information will populate from the Log Header.
-
Select the Serviceability Status at Removal for the selected part for maintenance.
-
Click Next.
When performing a Removal action on a part, that part will be placed in Return to Inventory at the specified Base once posted.
Installation of a Part
Action, Reason, Problem
-
Click the Add New Detail button.
-
Select an Action, a Reason (Install Reason is normally Scheduled as part removal requires a new part install). No Problem is required for an Install.
-
Click Next.
Part for Maintenance
-
Select the desired Search Type, enter the search criteria and click Find.
-
Select the applicable Serial Number.
-
Click Next.
If a Part cannot be found, it may still need to be Issued for Maintenance, or if a Part is being swapped from another aircraft (see Part Swaps below), it may be located in Return to Inventory. In this case, “Choose to install a part from Return To Inventory” must be selected.
The Details button will open the Serial Number Details window for any part verifications.

Installation on an Aircraft
-
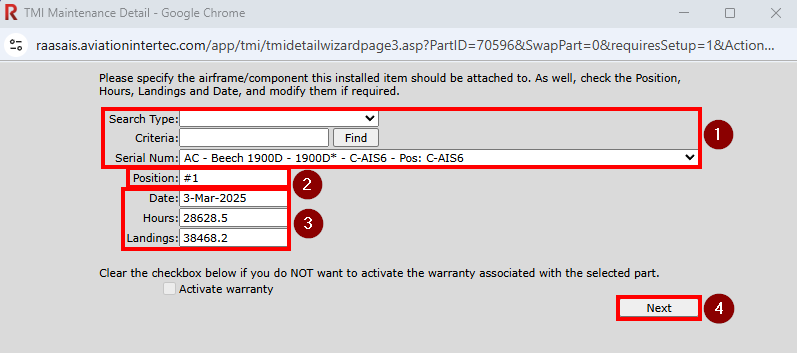
The installation Serial Number will default to the Airframe.
-
Add a Position if applicable (can be left blank if ‘Only’).
-
Verify the Hours, Landings and Date. This information will populate from the Log Header.
-
Click Next.
If a part being installed is part of an assembly (ie. Engine, Propeller, Landing Gear etc.), see Installation on a Component below.
Installation on a Component
-
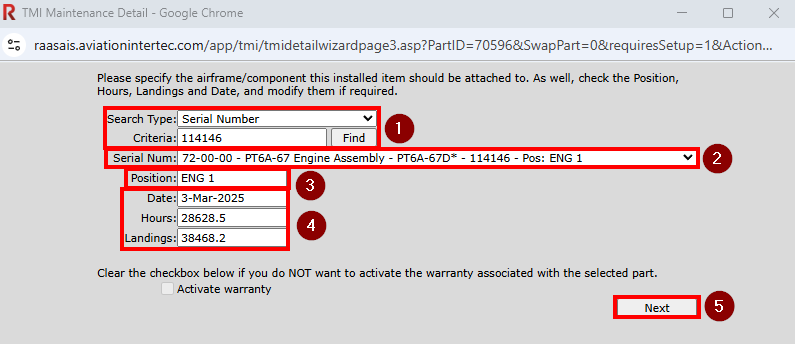
Select the desired Search Type, enter the search criteria and click Find.
-
Select the applicable Serial Number.
-
Add a Position if applicable (can be left blank if ‘Only’).
-
Verify the Hours, Landings and Date. This information will populate from the Log Header.
-
Click Next.
If the maintenance detail entry was for an Installation, more details may be required (see Comply, Reset, Comply/Reset).
If the Installation does not require more details, skip to TMI Maintenance Details Result.
Part Swaps
When parts are swapped on the airframe (ie. for troubleshooting), a TMI Entry can be made for the Removal of the parts and posted; then a PM Log (Prior Maintenance) can be created to Reinstall the parts with the new positions.
When parts are swapped on an assembly (ie. an engine), a TMI Entry can be made for the Removal of the parts and posted; then a PM Log can be created to Reinstall the parts on the proper assembly.
Comply, Reset, Comply/Reset
Selecting Comply for the Action on an inspection or rotable part will save the Last Done details to the Serial Number and suspend the constraint.
Selecting Reset for an inspection or part will reset the Next Due but will not update the Last Done information on the SN Details.
A Comply/Reset for an inspection or rotable part will save the Last Done details to the Serial Number and reset the constraint to the Next Due.
Inspections
When a Planned Inspection is completed, it will require further Maintenance Detail depending on the type of Constraint.
Action, Reason, Problem
Constraint - Repeat:
Comply/Reset
-
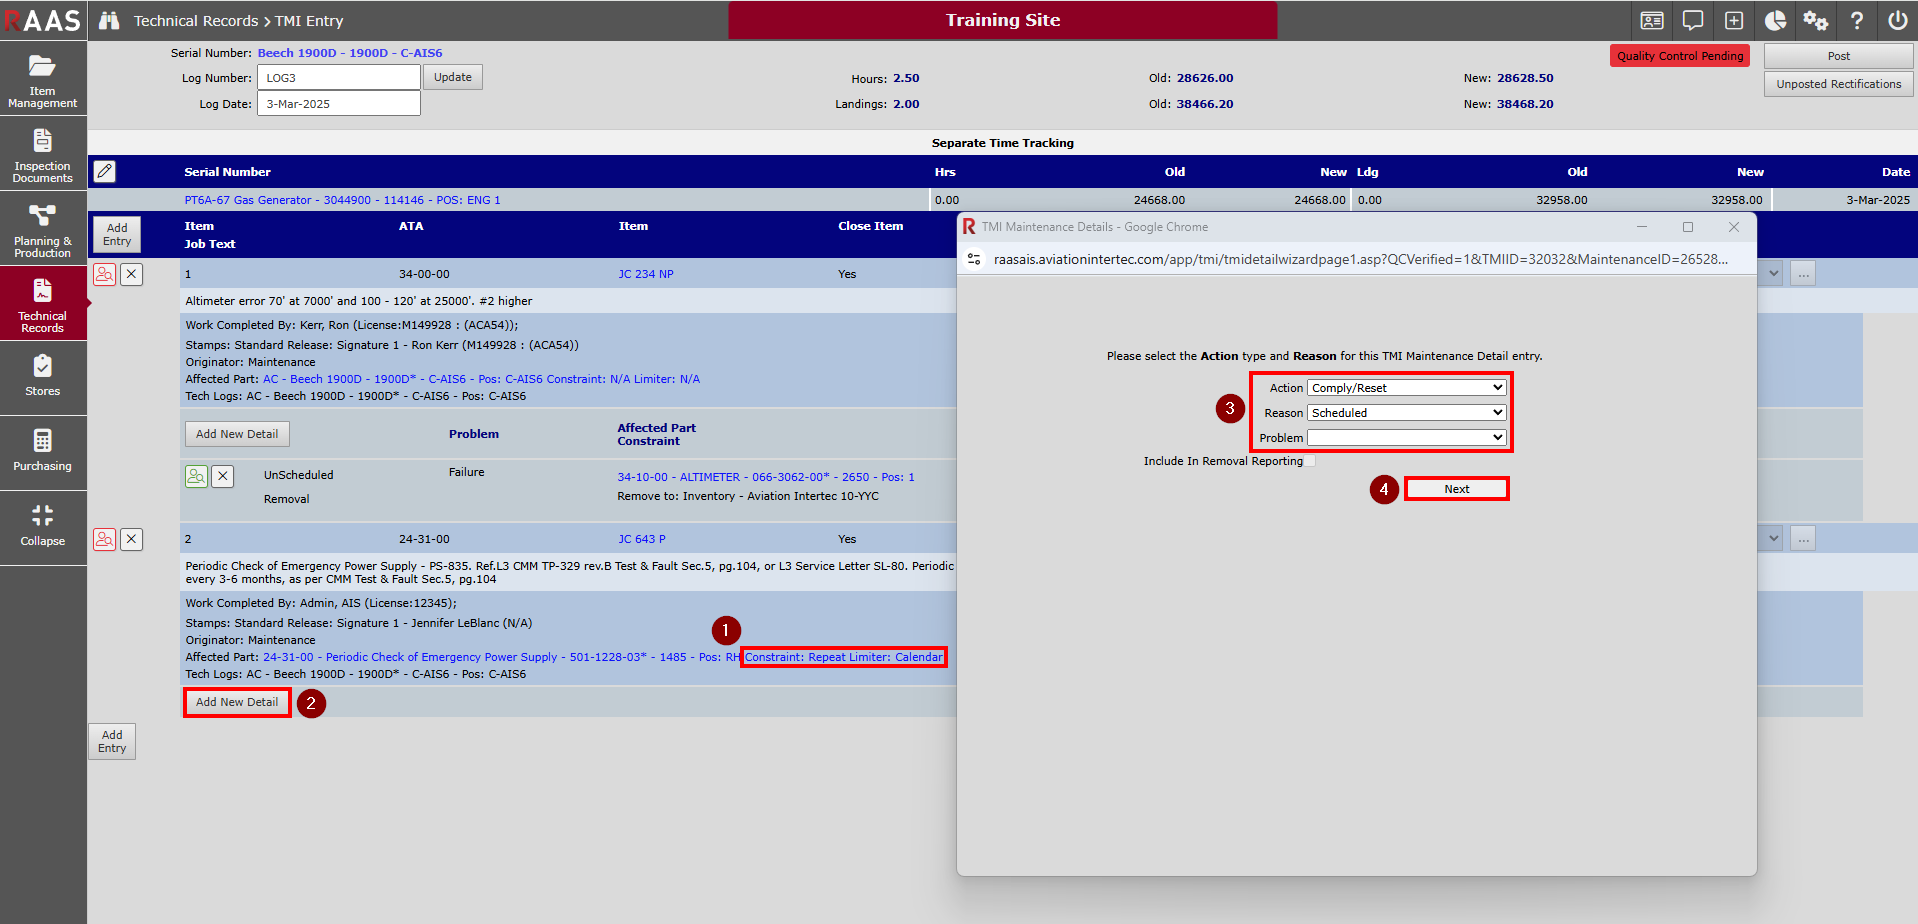
For Planned Job Cards, the Affected Part will tell you what type of Constraint the Inspection was raised for.
-
Click Add New Detail.
-
Action: Default Comply/Reset, Reason: Default Scheduled, Problem: none required.
-
Click Next.
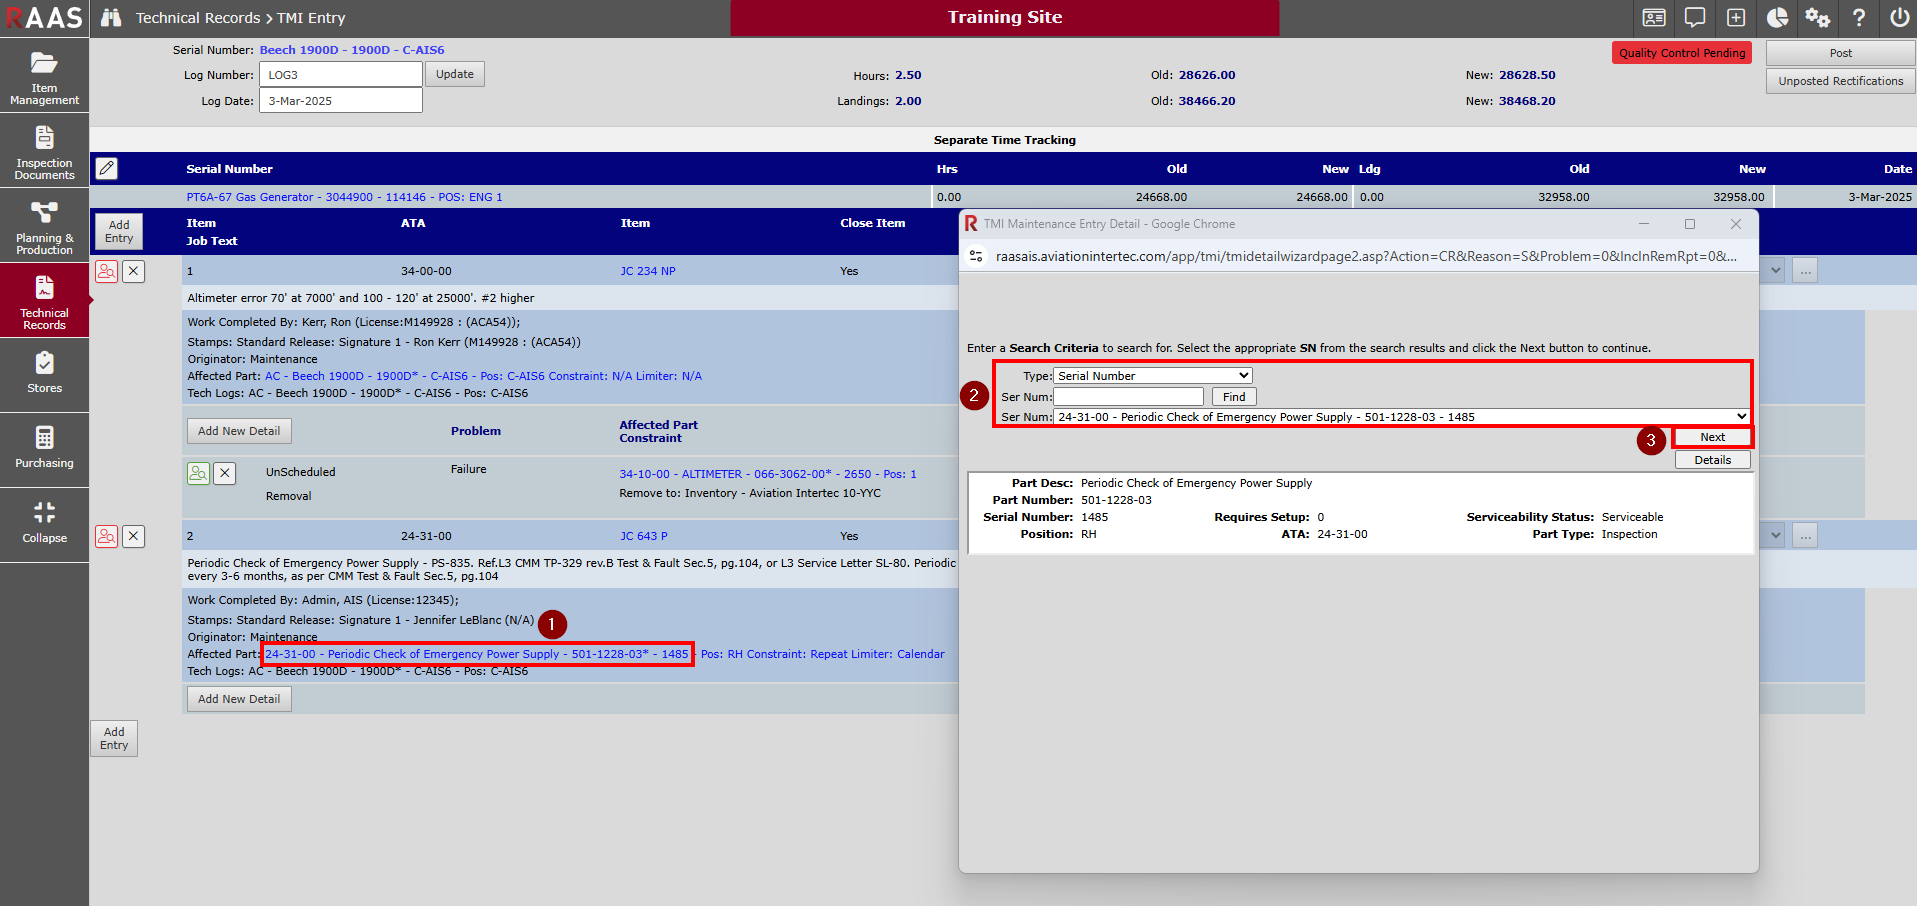
Selecting Inspection for Comply/Reset
-
For Planned Job Cards, the Affected Part will automatically be selected in the Search Criteria window.
-
Verify that it does match the Affected Part detail.
Note: The Search Criteria may need to be updated depending on the situation.
ie. The Affected Part may have been removed, or a Non-Planned part was replaced and a new Part installed that requires its own Comply/Reset.
-
Click Next.
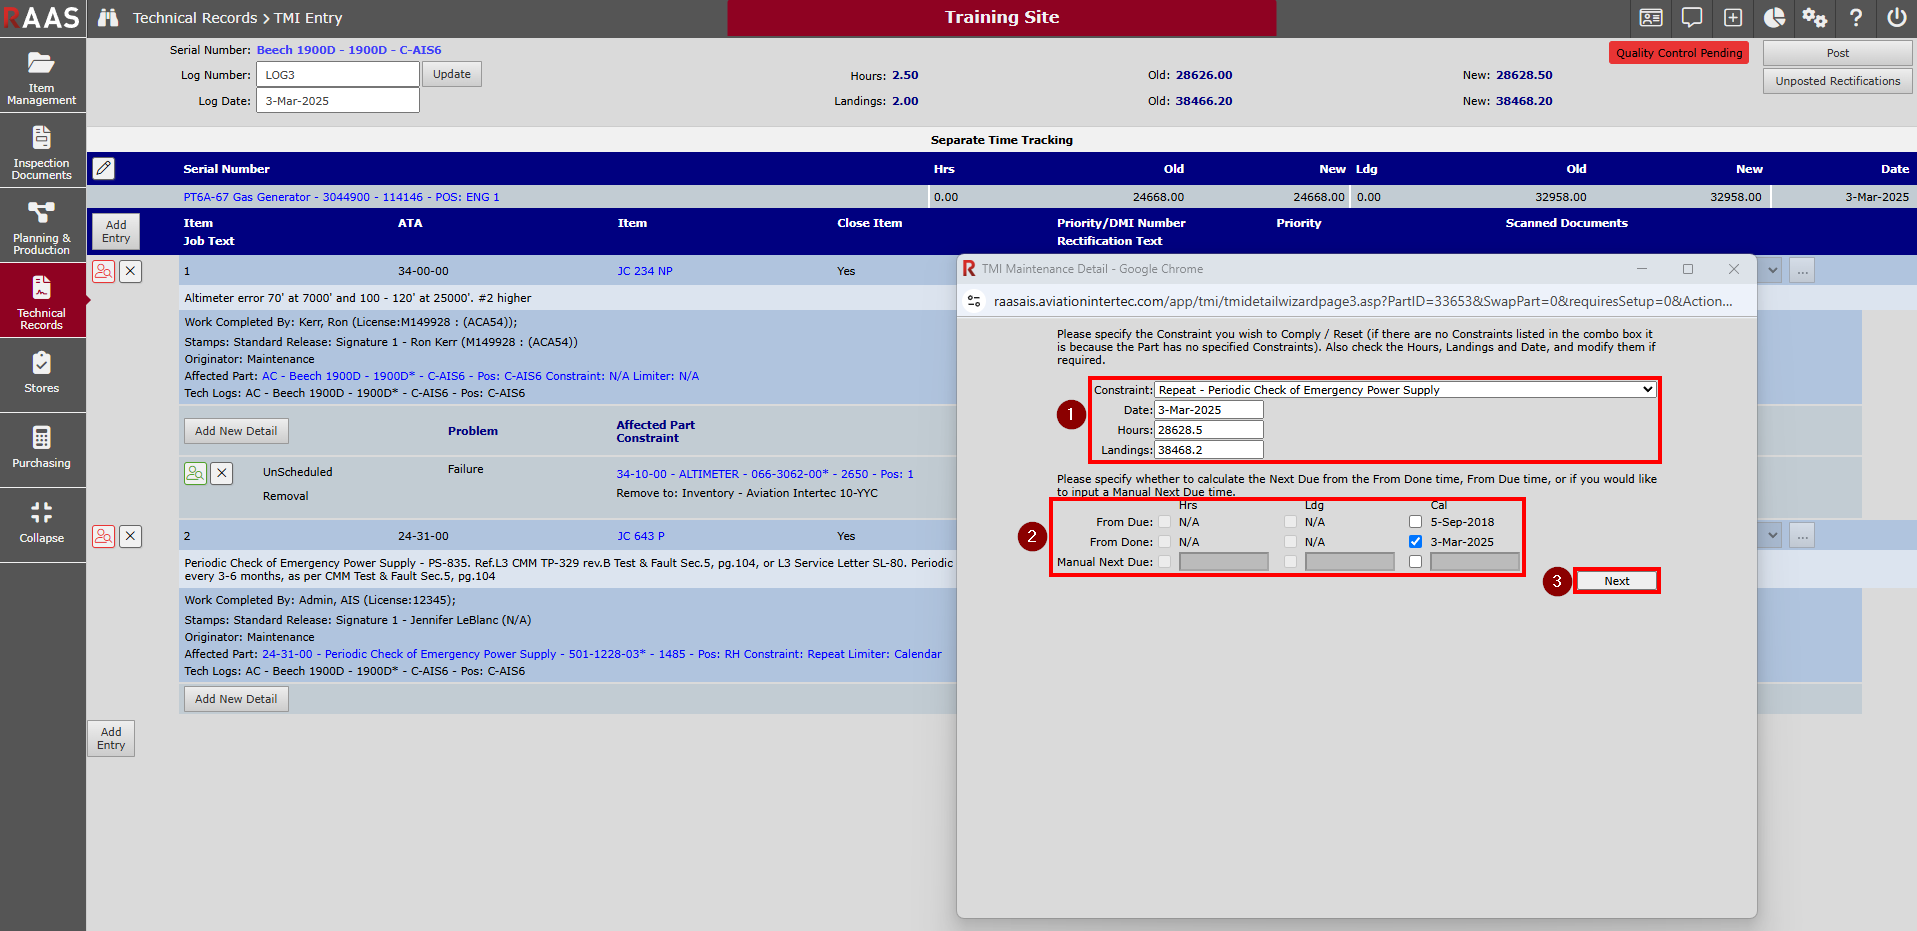
Selecting Comply/Reset from Due, Done or Manual
-
Verify that the Constraint matches the Affected Part or that it is the correct Constraint required. Verify the Date, Hours and Landings. This information will populate from the Log Header.
-
Specify whether to calculate the Next Due from the From Done time, From Due time, or if you would like to input a Manual Next Due time. The default will be From Done.
-
Click Next.
Action, Reason, Problem
Constraint - Initial:
Comply
-
For Planned Job Cards, the Affected Part will tell you what type of Constraint the Inspection was raised for.
-
Click Add New Detail.
-
Action: Default Comply, Reason: Default Scheduled, Problem: none required.
-
Click Next.

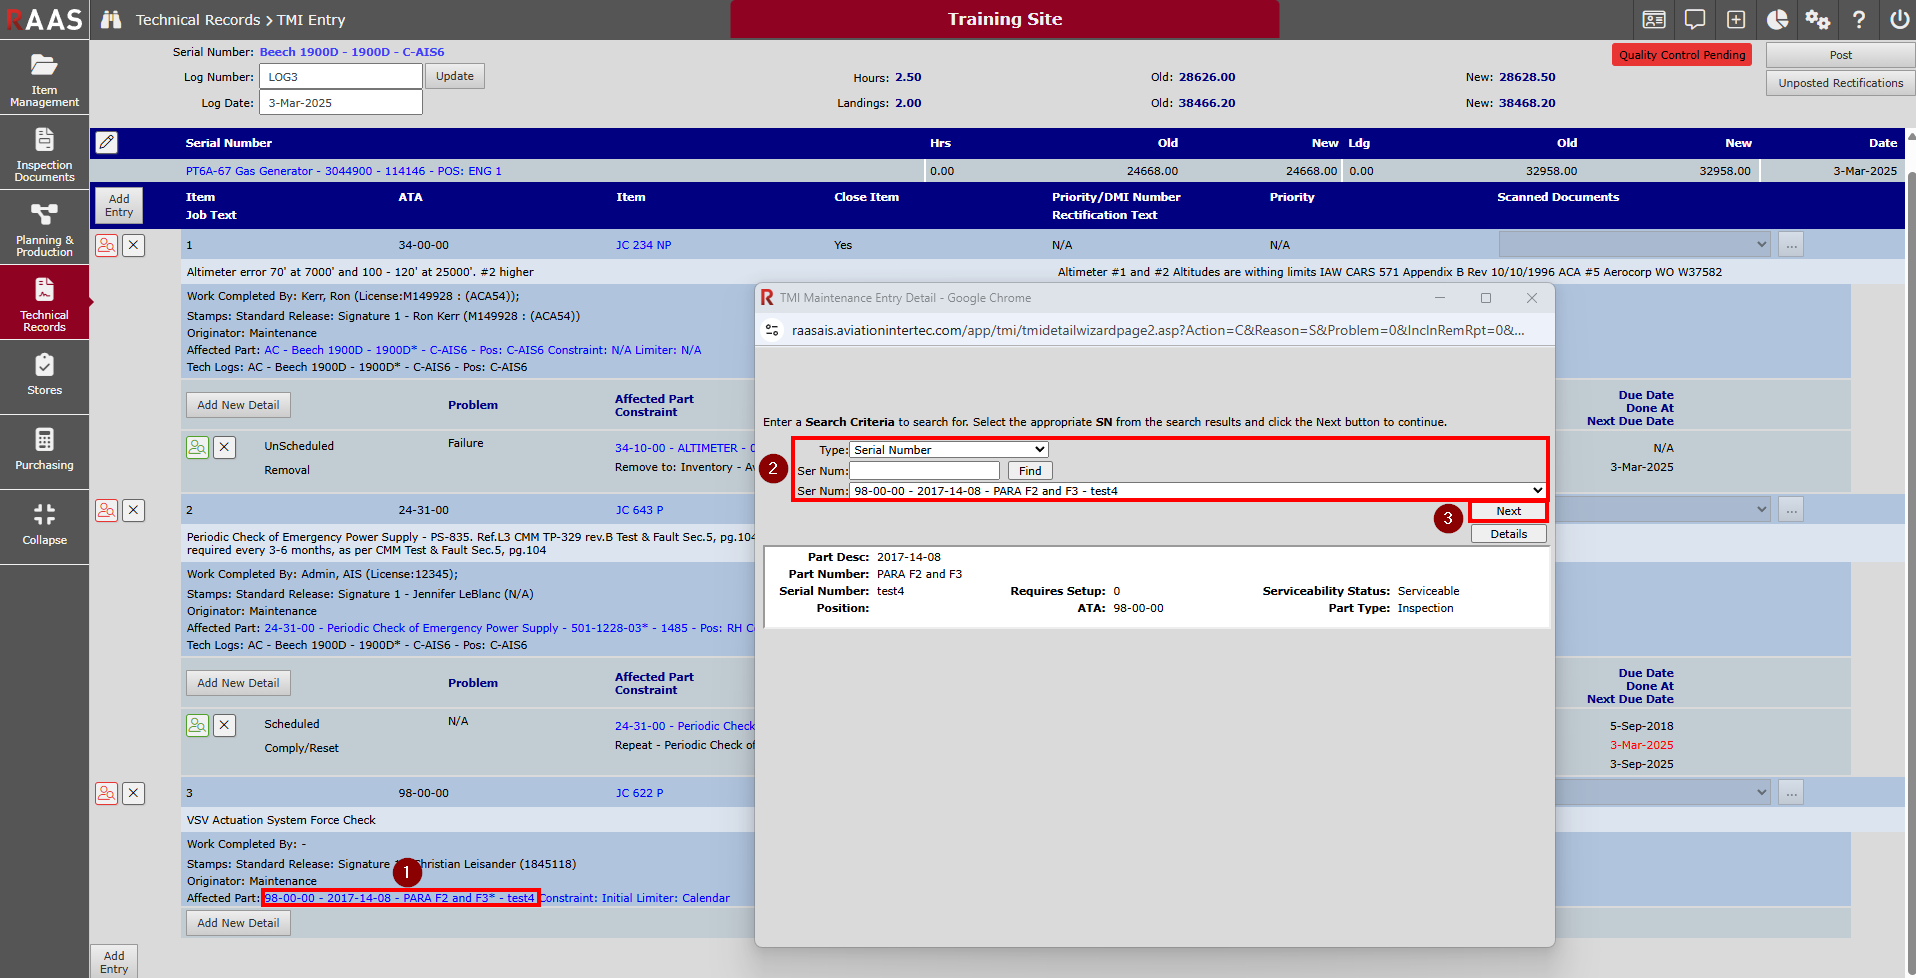
Selecting Inspection for Comply
-
For Planned Job Cards, the Affected Part will automatically be selected in the Search Criteria window.
-
Verify that it does match the Affected Part detail.
-
Click Next.
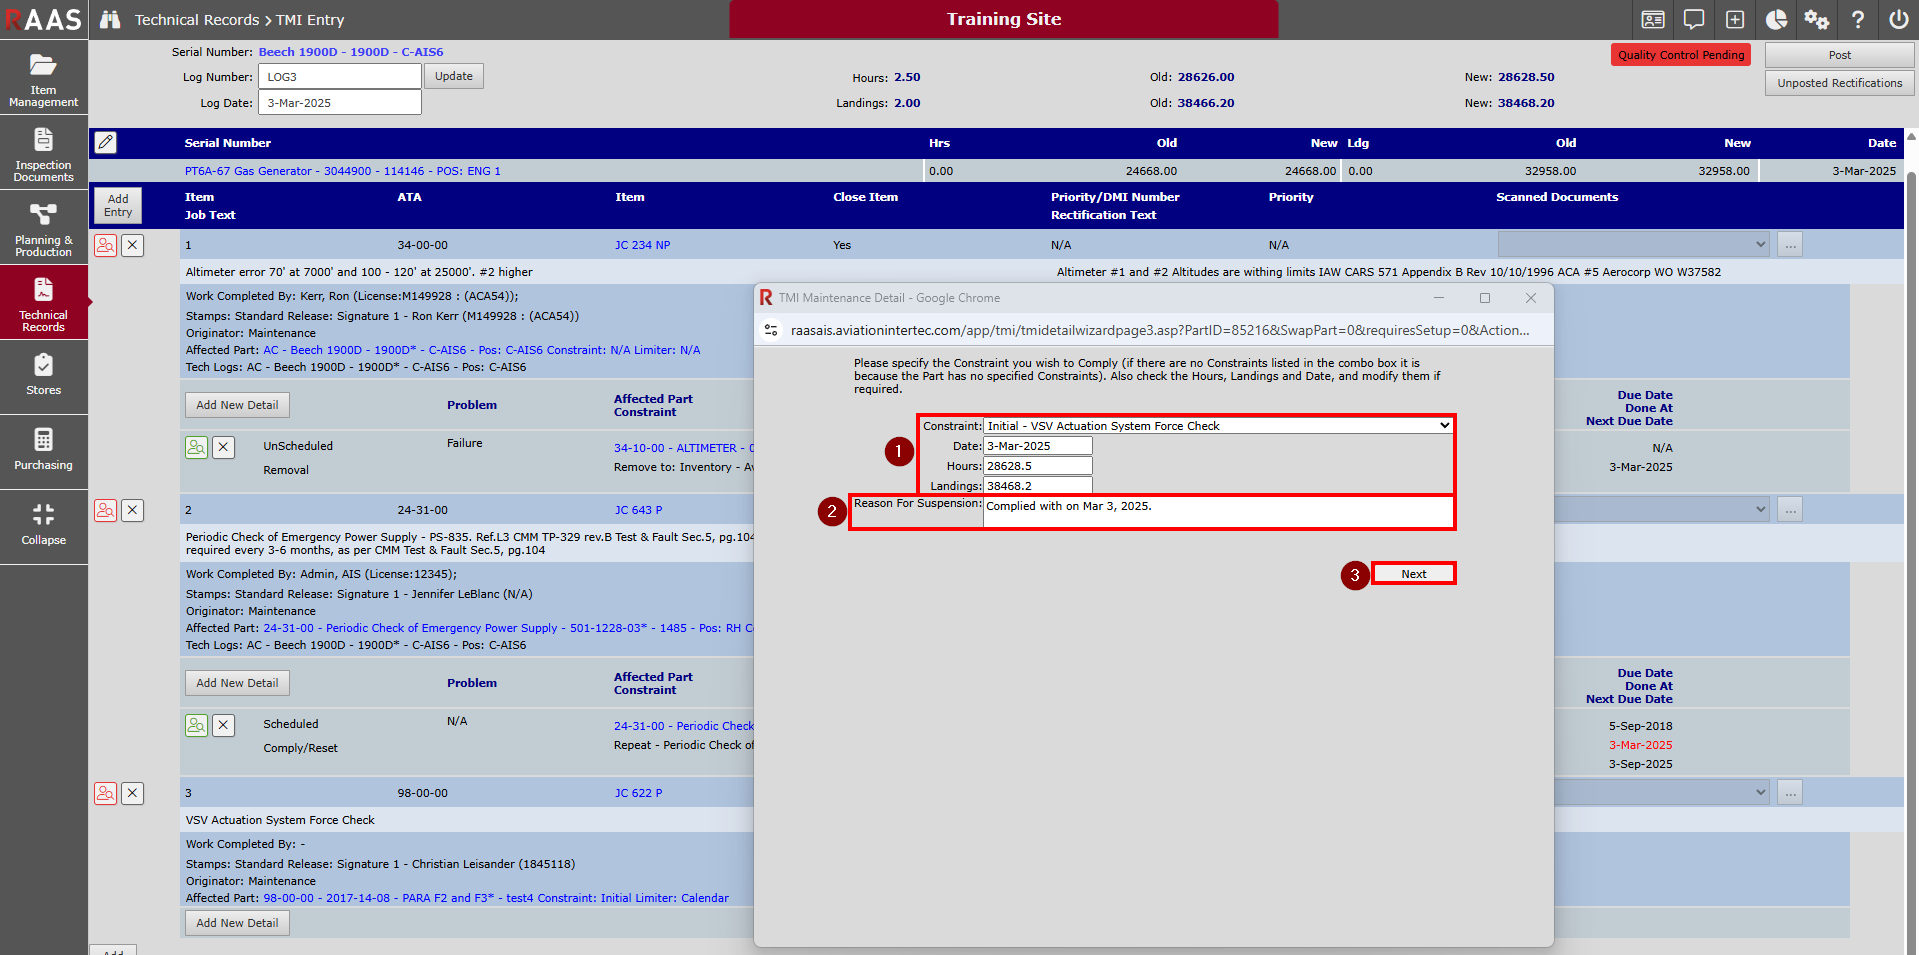
Comply - Reason for Suspension
-
Verify that the Constraint matches the Affected Part or that it is the correct Constraint required. Verify the Date, Hours and Landings. This information will populate from the Log Header.
-
Reason For Suspension: must be entered.
-
Click Next.
When an inspection is an Initial (one-time only) and is Complied, it will then be suspended with a reason and will not come due again in the future. If an inspection is an Initial to be followed by a Repeat Inspection, a Trigger window will pop up (see Triggers).
Action, Reason, Problem
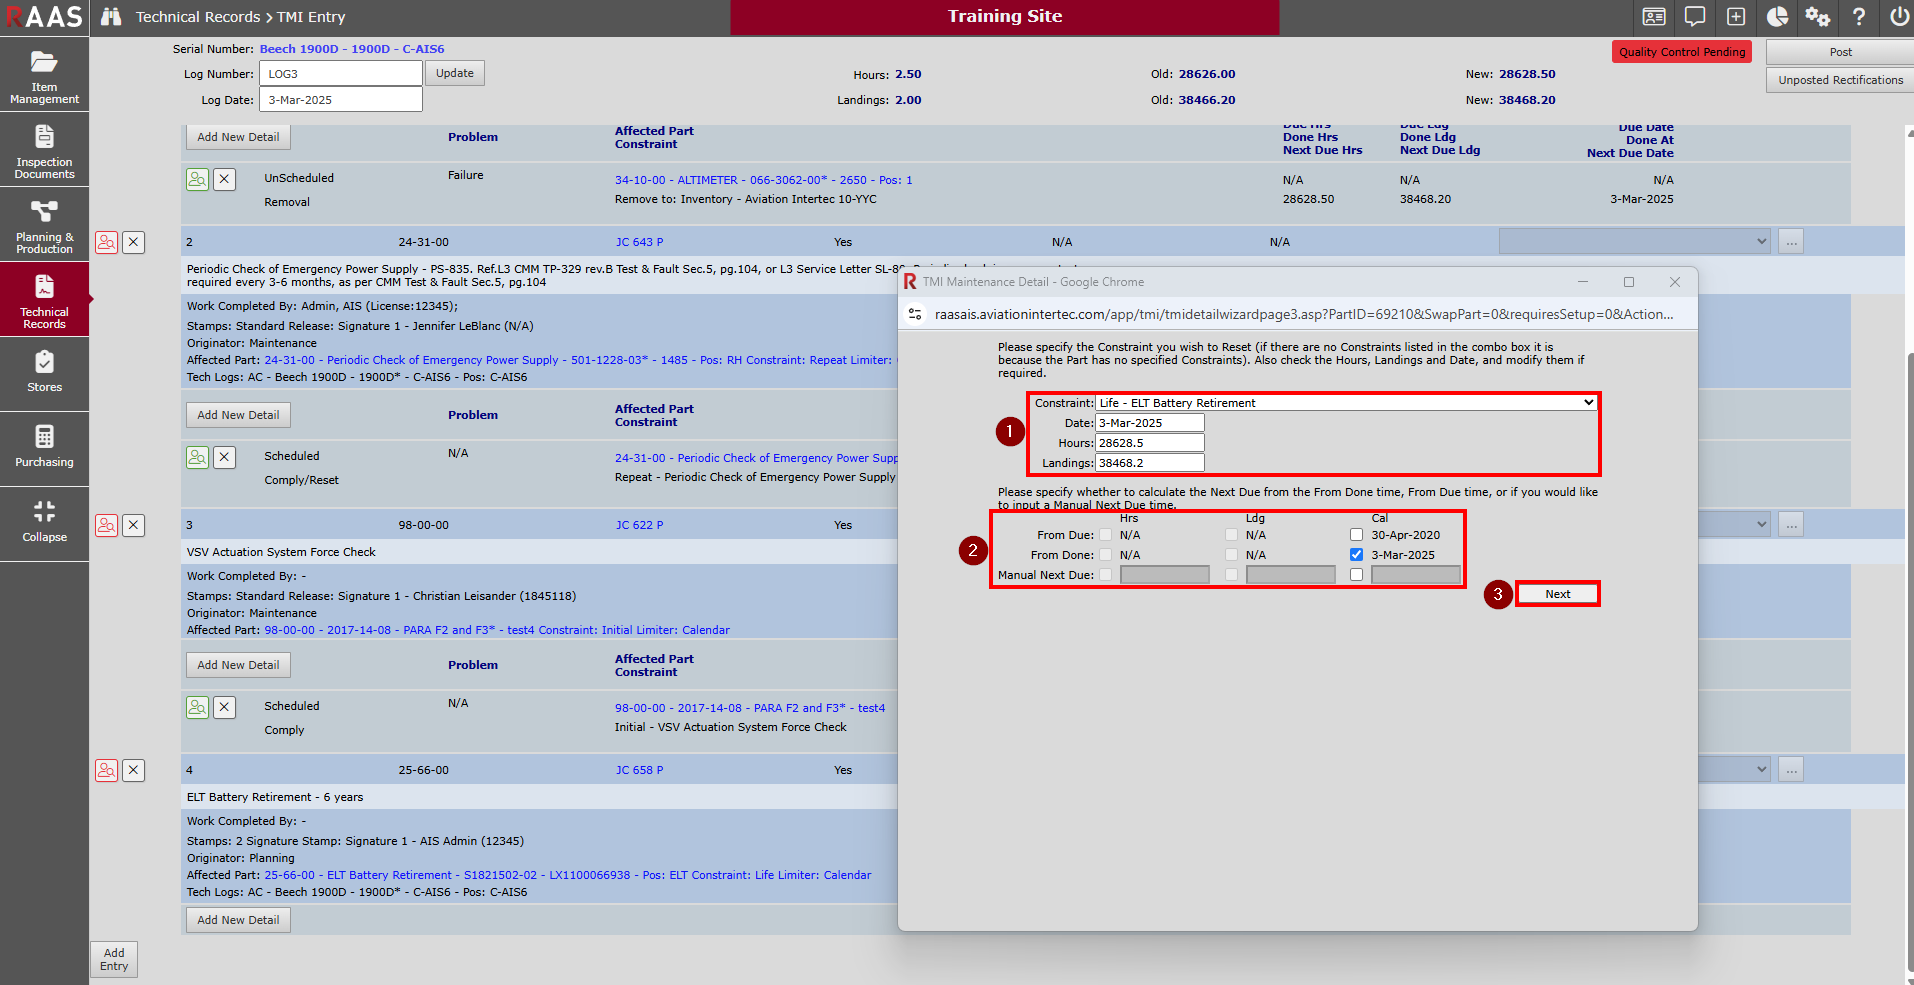
Constraint - Life:
A Life Constraint can be treated either as a final limit - Comply (suspension) or as a Reset action.
The example below is for Reset - see also Comply above.
Reset
-
For Planned Job Cards, the Affected Part will tell you what type of Constraint the Inspection was raised for.
-
Click Add New Detail.
-
Action: Default Reset, Reason: Default Scheduled, Problem: none required.
-
Click Next.
Selecting Inspection for Reset
-
For Planned Job Cards, the Affected Part will automatically be selected in the Search Criteria window.
-
Verify that it does match the Affected Part detail.
-
Click Next.
Reset - from Due, Done or Manual
-
Verify that the Constraint matches the Affected Part or that it is the correct Constraint required. Verify the Date, Hours and Landings. This information will populate from the Log Header.
-
Specify whether to calculate the Next Due from the From Done time, From Due time, or if you would like to input a Manual Next Due time. The default will be From Done.
-
Click Next.
TMI Maintenance Details Result
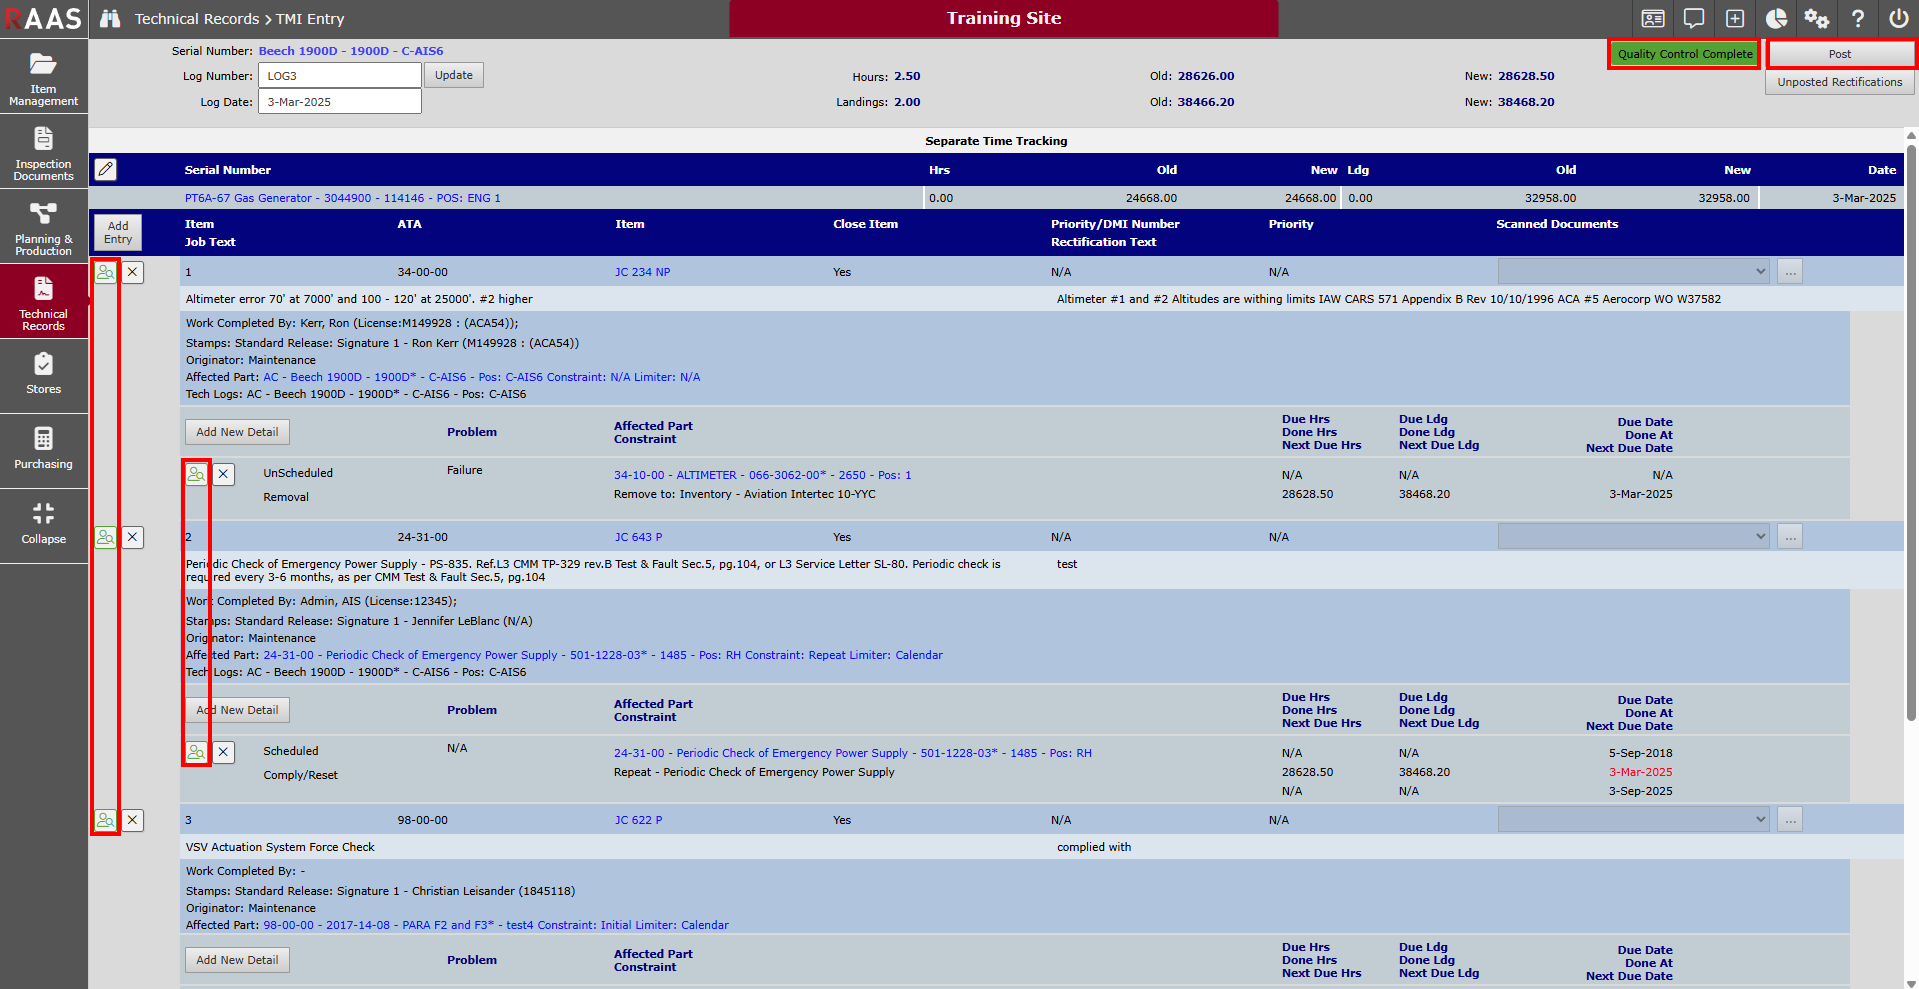
When all entries for the TMI log sheet have been added, a red Quality Control Pending icon means TMI Entries with an accompanying red icon, must be reviewed for QC Verification. Verification for any entry or detail must be completed by stepping through the associated wizard and reviewing each part of the entry.

A green Quality Control Complete icon means the QC Verification is complete, and all icons will be green. The log can now be posted by clicking Post.
Triggers
RAAS employs an automation feature called Triggers to aid tech record entry. Completion of a TMI action having an associated trigger causes a pop-up window to appear.
-
Message triggers show text reminders, like an electronic post-it note.
-
Action triggers automate the creation of one additional action based on the completion of the first action.
-
Cascading Non-Interactive Triggers are used in managing phased inspections.
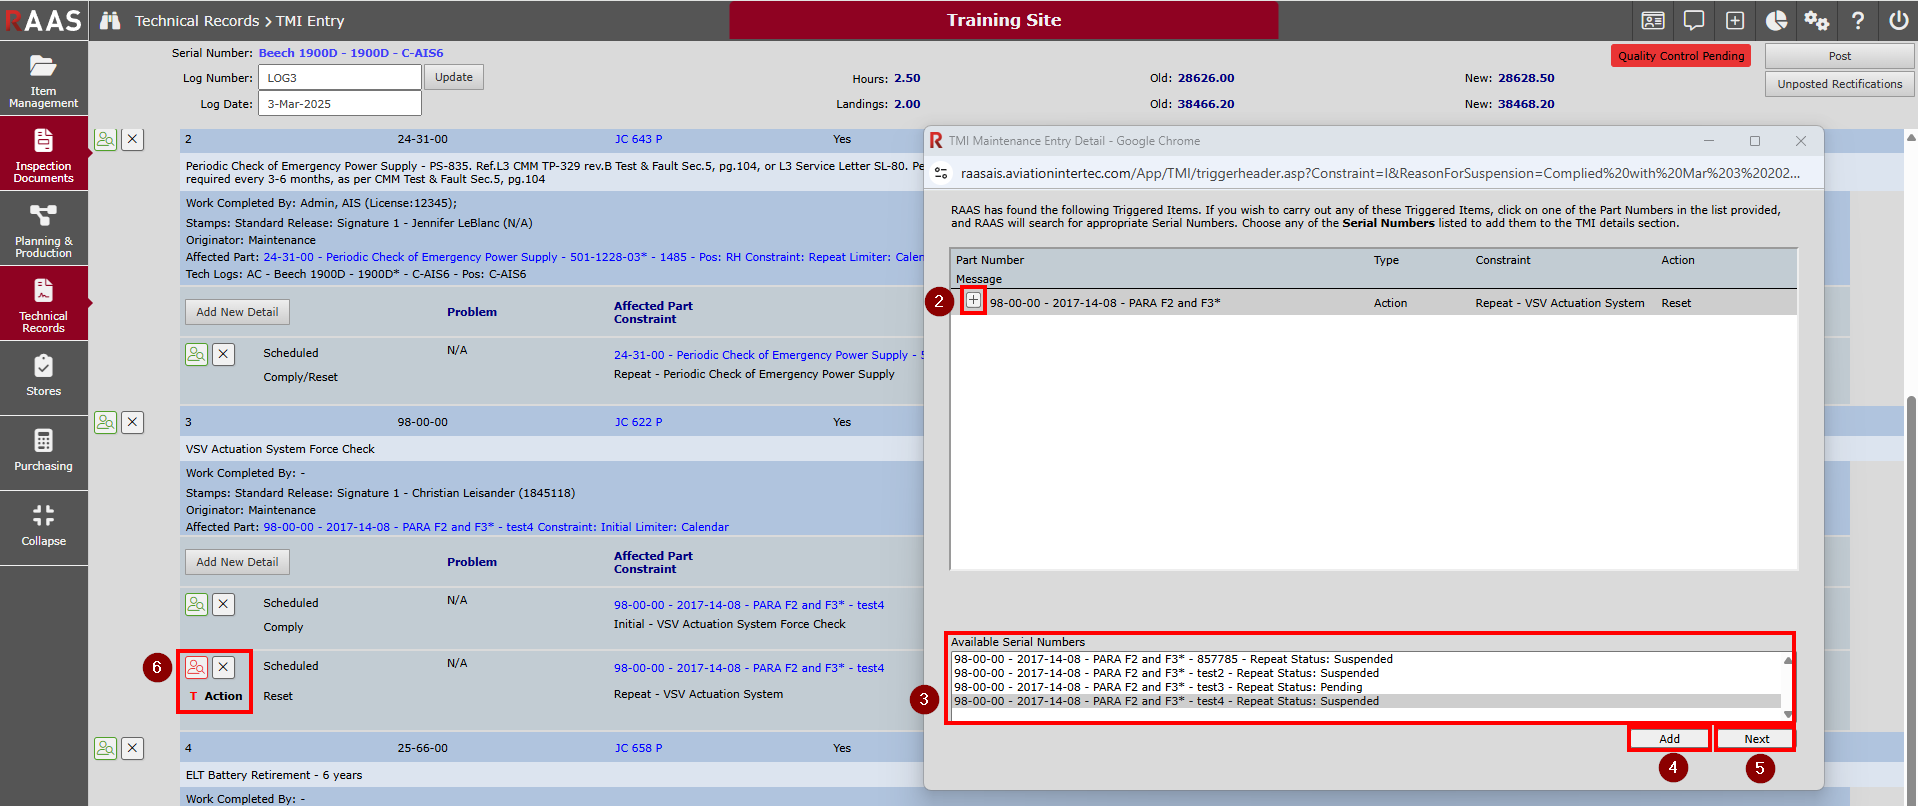
Action Trigger Addition
-
Click the + button in the top pane of the pop-up window.
-
If applicable, supply user credentials for those triggers requiring elevated permissions.
-
Click the applicable follow-up action in the lower pane labelled Available Serial Numbers.
-
Click the Add button.
-
Click the Next button to dismiss the pop-up window.
-
Click the QC Verification icon belonging to the automatically added action, indicated with a red T, verification for any entry or detail is completed by reviewing the entry or detail and fully completing the associated wizard.