
Creating an Aircraft
If the aircraft being added is the first of its type, a new Inventory Type must be created before the aircraft is created in RAAS. See the Inventory Types help page for how to add an Inventory Type. It is recommended that the Inventory Type is name after the aircraft type.
To Create an Aircraft:
Go to Item Management > Item Editor
Part Description (AC Type)
If Part Description (AC Type) already exists, skip to Part Number
-
Select Aircraft in the Item Type drop-down.
-
Click Add New Part Description.
-
Enter Item Description (AC Type).
-
Enter ATA (“AC” is used for Aircraft in RAAS).
-
Select Unit of Issue (Each is used for Aircraft in RAAS).
-
Click Save.
Note: For Aircraft Item Types the following is selected by default:
-
Separate Time Tracking
-
Major Assy (Has Tech Log)
-
Make Removal/Install Log
-
Make Modification Log
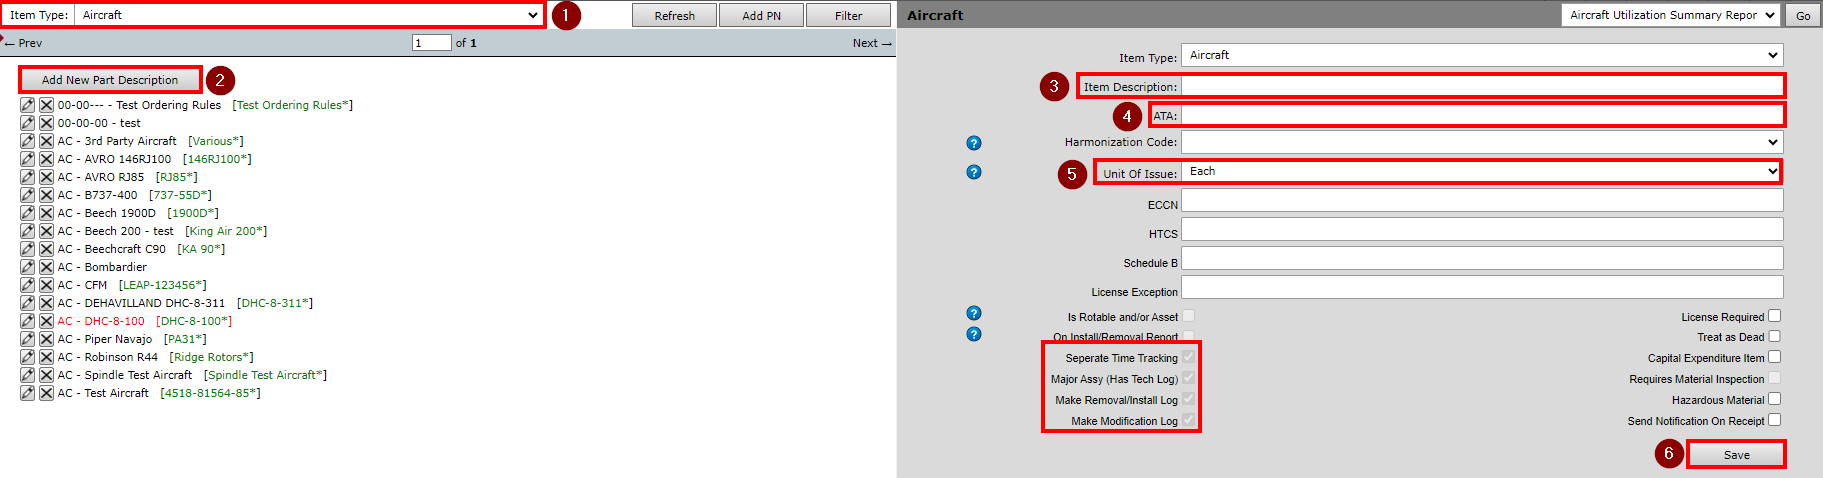
Figure 1: Part Description (AC Type)
Part Number (AC Model)
If Part Number (AC Model) already exists, skip to Serial Number or see Copy an Assembly.
-
Click Add New Part Number.
-
Enter Part Number (Model Type).
-
Select Inventory Type.
-
Select Item Class.
-
Click Save.
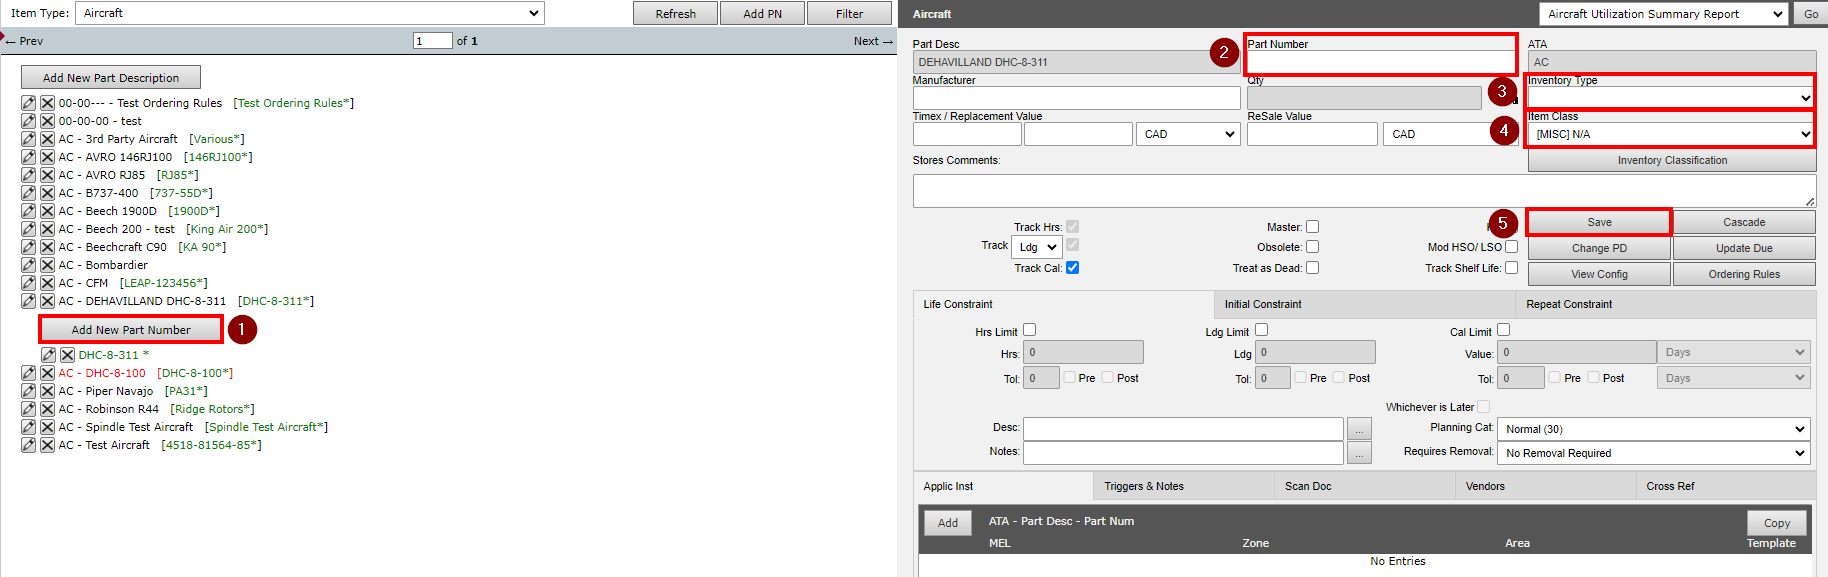
Figure 2: Part Number (AC Model)
Serial Number (AC MSN and/or Registration)
-
Click Add New Serial Number.
-
Enter Serial Number (AC MSN and/or Registration).
Note: The Requires Setup flag will be on by default and can remain on until entire AC is completely set up. -
Select Modify Current Installation ellipses.
-
Install Aircraft to a Base.
-
Click Save.
-
If the Airframe time is known, select HSN Known and LSN Known and enter the current AF Hours and Landings.
-
Click Save.
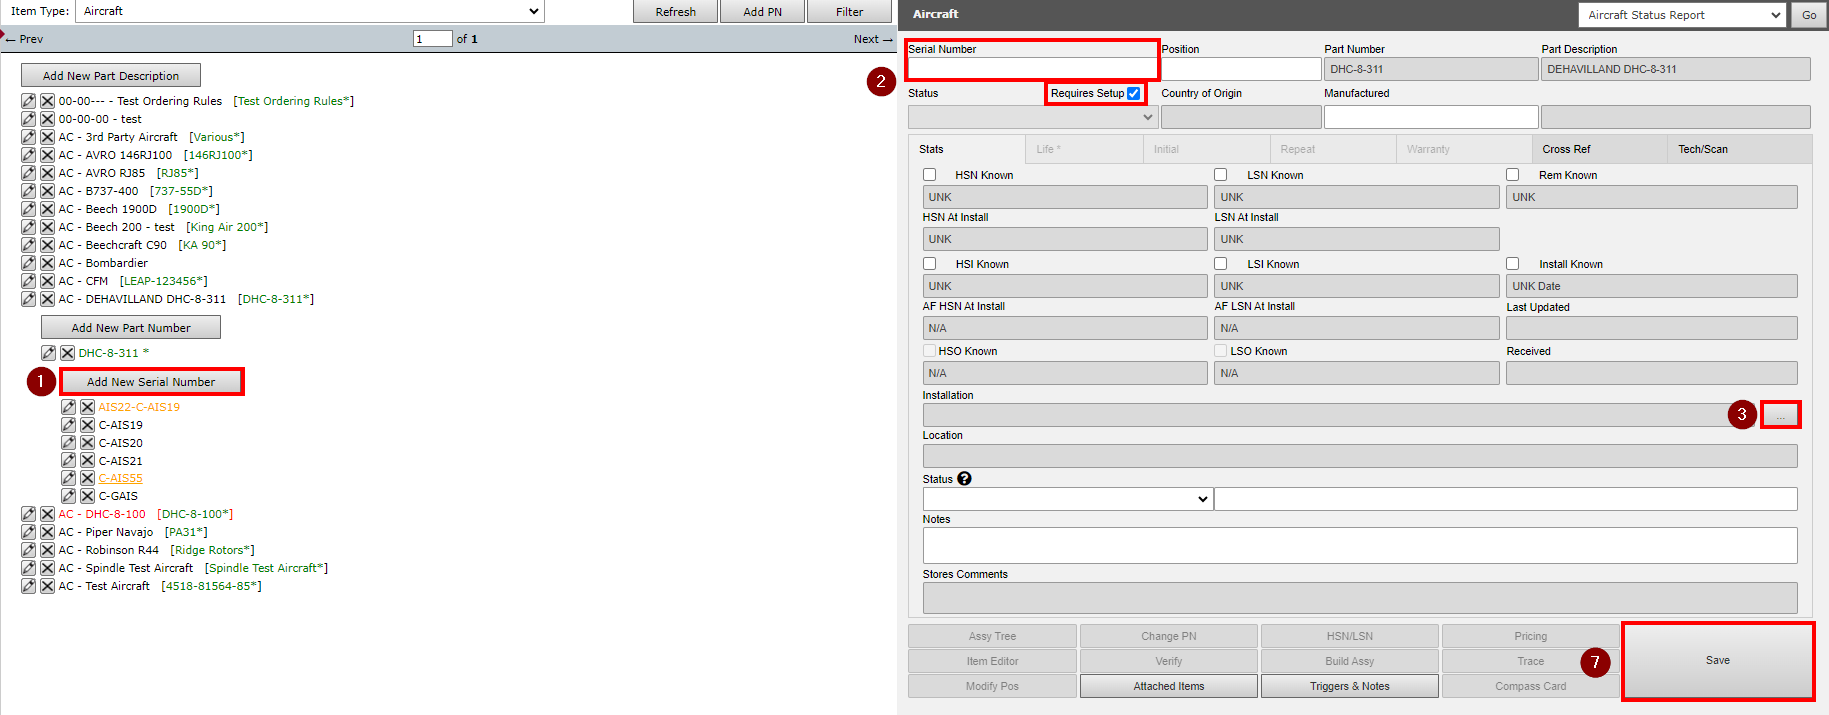
Figure 3: Serial Number (AC MSN and/or Registration)
Adding Aircraft Information
Go to Settings.
Select Options – Aircraft Information.
-
Select the Aircraft Link from the drop-down.
-
Enter the AC Registration Number, Serial Number, Delivery Date (if required), Nationality.
-
Enter the Aircraft Location.
-
“Use Aircraft SN Location” flag on will use the current Base the Aircraft is installed to
-
Flag off will allow a different Current Location to be entered
-
-
Enter any other information as required.
Note: Information entered here will be viewable in the Fleet Status and Fleet Status Dashboard (if applicable).
-
Click Save.
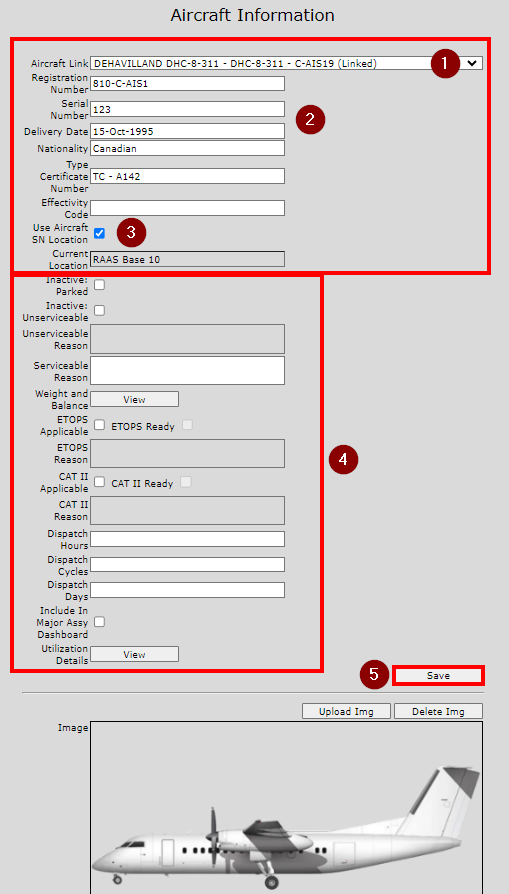
Figure 4: Aircraft Information
Creating an Expense Center
Go to Settings:
Select Options – Expense Center
-
Enter the Expense Center Name.
-
Select a Customer from the drop-down.
-
For a Company Aircraft, select your Company as the Customer.
-
For an External Customer Aircraft, select Customer.
Note: See Vendor / Customer List for Customer set up.
-
-
Enter a Description.
-
Turn the “Active” flag on.
-
If an Expense Center is no longer required, removing the Active flag will move the EC to the Inactive folder so it is no longer visible in the listing.
-
Affected Part:
-
Search and Find the Aircraft.
-
Select the applicable Job Card Group (the default is Line Maintenance).
-
Click Save.
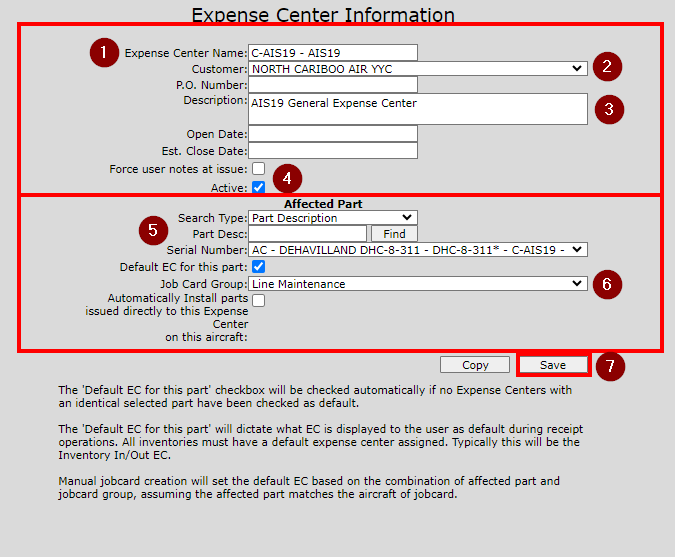
Figure 5: Expense Center
MPD-Controlled Aircraft
If an AC is MPD-controlled, the MPD Task effectivity must be applied to the new AC.
Go to Inspection Documents > Utilities.
-
Verify the correct AC Type.
-
Click Go.
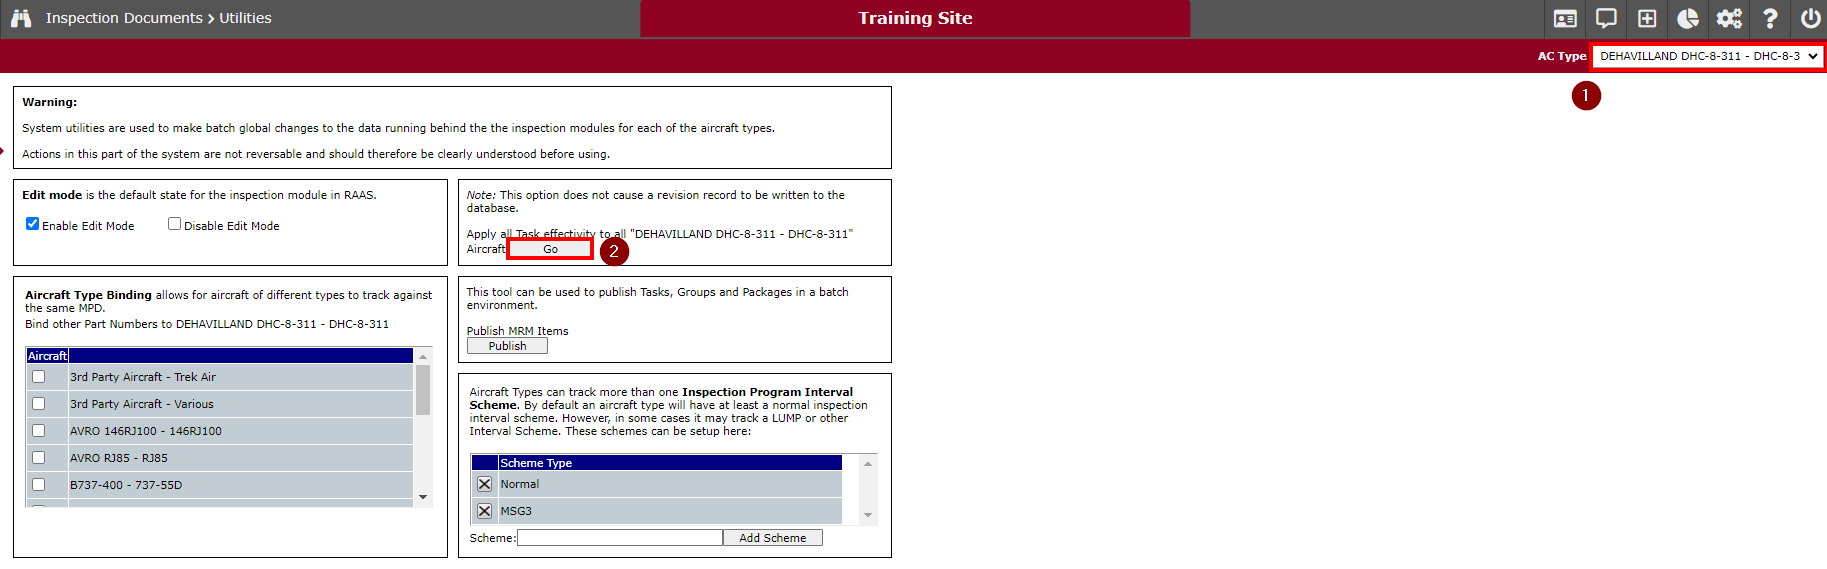
Figure 6: Applying Task Effectivity
Copying an existing Aircraft
See Copy an Assembly.
Notes for Copying an Aircraft:
The serial numbers of copied components will be set to the Prefix entered in the Copy an Assembly window combined with the serial numbers of the original assembly.
Part /Assembly to Copy:
-
Search Type – ATA
-
ATA – AC
-
Choose the serial number of the aircraft you want to copy.
-
Prefix – Enter [ACSN]-COPY where ACSN is the serial number of the new AC.
-
For example, add the suffix of COPY to the ACSN so that all copied components are easily searchable by using the web browser’s CTRL+F (find) functionality. By searching for COPY, you can easily find all components that need to be addressed through the setup still (such as changing SNs to [ACSN]-UNK for components not present on the data load)
-
Location to place the copied part:
-
Search Type – Part Description
-
Part Description – Base
-
Serial Number – choose base
Updating a Copied Aircraft
When updating a copied aircraft, it is easiest to work from Item Management > Assembly Tree. All copied items will require setup, regardless of whether there is a constraint, and will be indicated by the ATA being orange instead of green (and the presence of COPY within the SN). Using the data provided for the aircraft being setting up, select the edit icon of each item on the assembly tree and update them. Update the serial numbers and part numbers to match what is on the new aircraft data as well as set up any constraints and remove any default values/checkboxes selected during the copy procedure. Once complete, you can turn off the “Requires Setup” flag for each item.
Should there be any leftover serialized components or inspections from the AC copy that are not present on the load sheet for your working AC, review and if confirmed that they are not required on the aircraft, select the edit icon of each one and modify the installation to Dead to remove it from the aircraft.
As the prefix of the copied assembly contains COPY, use your browser’s CTRL+F (find) feature to search for the word COPY to quickly identify all components that need to be updated within the copied assembly.
Building a Configuration
See Configuration.
Updating a Built Aircraft
When updating a built aircraft, it is easiest to work from Item Management > Assembly Tree. All copied items will require set up, regardless of whether there is a constraint, and will be indicated by the ATA being orange instead of green. The SN of each items will be the same as the Parent SN built from. Using the data provided for the aircraft being setting up, select the edit icon of each item on the assembly tree and update them. Update the serial numbers and part numbers to match what is on the new aircraft data as well as setup any constraints and remove any default values/checkboxes selected during the copy procedure. Once complete, you can turn off the “Requires Setup” flag for each item.
Should there be any leftover serialized components or inspections from the AC build that are not present on the load sheet for your working AC, review and if confirmed that they are not required on the aircraft, select the edit icon of each one and modify the installation to Dead to remove it from the aircraft.
Run the Requires Setup report from the Aircraft drop-down menu to quickly identify all components that need to be updated within the built assembly.